FREE 1 to 3-Day Delivery on Orders $149+ Details
How to Install Maximum Motorsports Extreme Duty Rear Lower Control Arms (99-04 All, Excluding Cobra) on your Ford Mustang

Shop Parts in this Guide
Read all instructions before beginning work. Following instructions in the proper sequence will ensure the best and easiest installation.
1. Block the front wheels to keep the car from rolling. Jack up the rear of the car and support the chassis on jack stands.
2. Lower the rear axle to a height just above full droop. Support the axle on jack stands.
3. Remove the rear wheels.
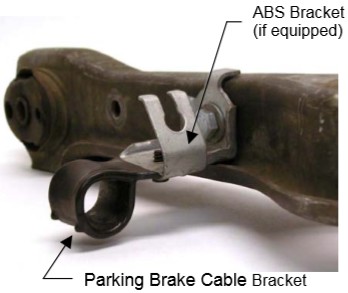
4. Remove the rear swaybar. There are four bolts, two per side. On 1994 and newer cars with rear disk brakes, the Parking Brake Cable Bracket is attached to the rearward swaybar bolt.
5. If so equipped, unclip the ABS wire from the bracket.
6. Loosen the lower control arm pivot bolts, 2 bolts per control arm.
7. Support the control arm near the axle mount with a jack. Remove pivot bolt from the axle end of the control arm. Slowly lower the jack to release the spring tension. Be careful not to lower it too quickly or else the spring may suddenly pop out, causing injury. Once the spring is completely uncompressed, remove it from the car.
8. Remove the pivot bolt from the chassis and remove the control arm from the car.
9. If equipped, the configuration of the Parking Brake Cable and ABS Bracket needs to be changed. Disconnect the parking brake from the caliper. To do this, remove the E-clip and pull on the end of the cable with pliers to unseat the cable end from the caliper. Make sure the parking brake is off!
10. Slide the Parking Brake Cable Bracket off the cable.
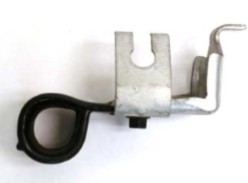
11. Remove the ABS Bracket.
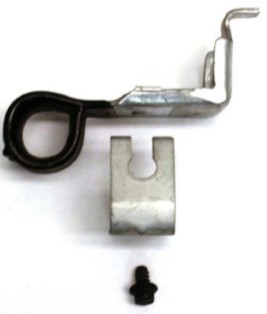
12. Flip the Parking Brake Cable Bracket 180 degrees and place the ABS Bracket on top of the Parking Brake Cable Bracket.
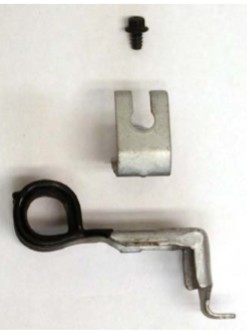
13. Tighten the ABS Bracket screw.
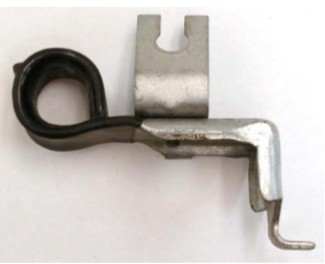
14. Slide the Parking Brake Cable Bracket back onto the parking brake cable and reattach the parking brake cable to the caliper.
15. Install the polyurethane bushings into the MM Control Arms. Apply a coating of the supplied grease to both the outside and inside diameters of the urethane. Install the urethane pieces into the chassis end of the two control arms, only. The urethane is placed over the aluminum reducer bushings (which are pressed into the spherical bearings) and is pressed into the end of the bearing tube.
Note: The axle end of the control arms DO NOT need the Control Arm Urethane pieces.
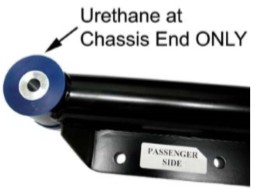
16. Apply a liberal coating of grease to the outside flange of the installed urethane bushings, where they will contact the chassis.
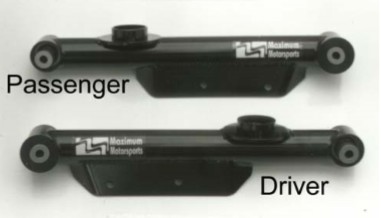
17. Attach the MM Control Arm to the chassis. These MM control arms are side specific-check the stickers on the insides of the swaybar brackets.
18. Install the lower spring isolator on the MM Control Arm.
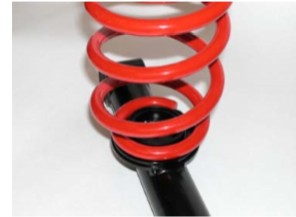
19. Place the spring on the control arm and raise the arm into position with the jack. Be sure the spring is correctly seated into both the upper and lower perches. The spring’s “pig tail” should be oriented towards the rear of the car, as shown below.
20. Reinstall the rear pivot bolts at the axle housing.
21. Torque the chassis pivot bolts to 111 ft-lb.
22. Torque the axle pivot bolt to 111 ft-lb.
23. Repeat steps 5 through 22 for the opposite control arm.
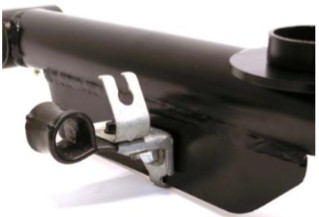
24. Reinstall the rear swaybar. Use the original bolts and the supplied Nylock nuts. Attach the Parking Brake Cable Bracket to the rearward swaybar bolt in the position shown below. Torque the swaybar bolts to 40 ft-lb.
25. Reattach the ABS wires on both sides of the car.
26. Verify the parking brake works from inside the car. Adjust to factory specifications if necessary.
27. Reinstall the rear wheels.
28. Lower to the ground and torque the lug nuts.
29. MM uses special close tolerance bearings. These typically take 100-200 miles to break in. Until the break-in period is over the car will ride more firmly--it will seem like it has stiffer rear springs.