FREE 1 to 3-Day Delivery on Orders $149+ Details
How to Install Maximum Motorsports E-Z Remove Door Bars Retrofit Kit (05-14 Coupe) on your Ford Mustang

Shop Parts in this Guide
Read all instructions before beginning work. Following instructions in the proper sequence will ensure the best and easiest installation.
The latest version, high quality COLOR instructions are available online at www.maximummotorsports.com Check the bottom of your installation instructions for the date and compare it to the copy available online.
Preparation
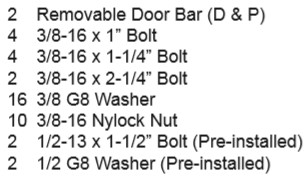
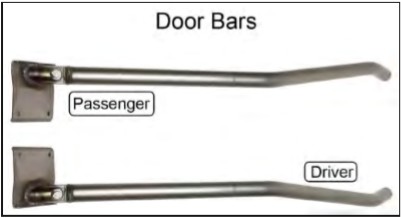
• Unpack the door bars and remove the supplied hardware kit. Verify that the items in the hardware list at the end of these instructions are present. Identified below are the main components of the kit.
• The vehicle must be safely supported on jack stands.
Painting the Door Bars
1. We recommend painting or powder coating the door bar and its components to protect them from rust. Do NOT grind on any of the welds when prepping the door bar for paint.
NOTE: If the barrel shaped portion of the door bar mounting spuds was painted or powder coated, the INNER DIAMETER OF THE DOOR BAR MAY NEED TO BE ENLARGED slightly so that the Door Bar may slide over the spud. Use a round file or sandpaper to help enlarge the inner diameter.
Interior Removal/Preparation
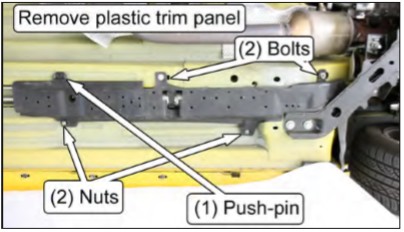
2. Remove the plastic trim panel on the underside of the floor pan, beneath the driver seat, that protects the fuel/brake lines and fuel filter. Use a 10mm deep socket to remove the two hex nuts and two 10mm hex head bolts, and pliers to remove the one push-pin that secures the panel.
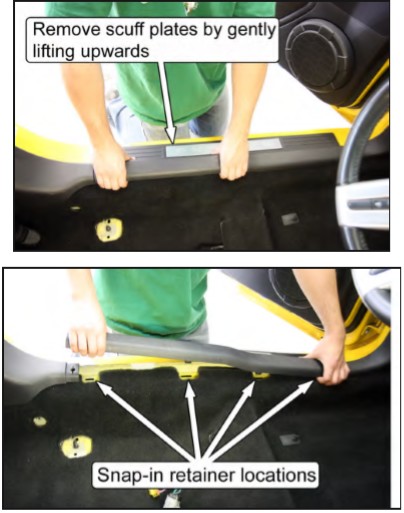
3. Remove the door scuff plates. Pull up at the ends and middle of the plates to disengage the three (4) snap-in retainers.
NOTE: There may be an electrical connector attached to the scuff plates. Detach if present.
NOTE: Front seats removed for clarity
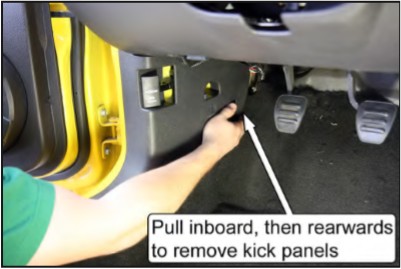
4. Remove both front plastic kick panels. Pull the portion closest to the firewall inboard to disengage the push-pin retainer, and then pull the panels rearward.
NOTE: The passenger side panel may have an alarm switch connected to it. Be sure to remove the switch before pulling the panel out of the vehicle.
5. Fold the carpet towards the center of the car to reveal the door bar mounting pads.
6. Remove the five bolts holding each existing door bar in place and remove the door bars from the vehicle.
NOTE: Retain the Half-Round Spacers and the Door Bar Doubler Plates. These will be reused.
7. Install the new Removable Door Bars using new 3/8”-16 x 2 ¼” long bolts and 3/8”-16 Nylock nuts for the upper connection to the Roll Bar. Leave the bolts loose for now.
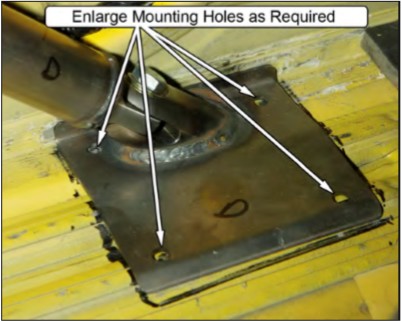
8. With the Door Bar Mounting Pads pushed outwards against the rocker panel, enlarge any of the mounting holes in the floor pan as necessary so that the mounting hardware can be installed. A hand file should be sufficient to open up the holes.
NOTE: Make sure the pad is resting against the rocker panel before enlarging the holes.
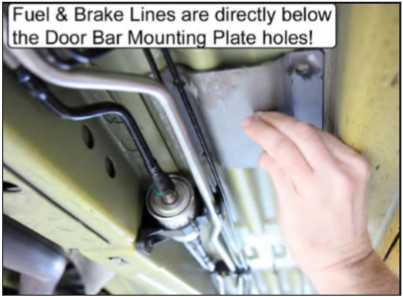
NOTE: There ARE fuel and brake lines directly beneath the driver side Door Bar Mounting Pad. Take care when enlarging the holes that the lines do not get damaged.
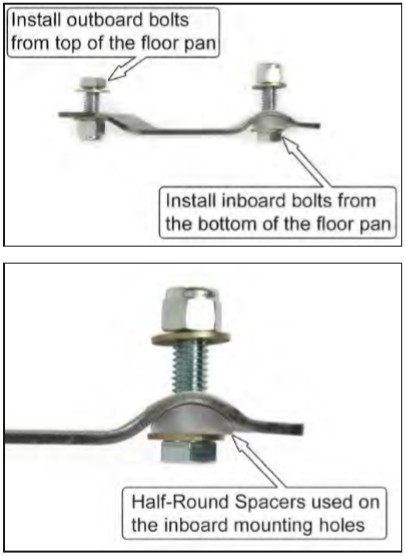
9. Secure the Door Bar Doubler Plates to the Door Bar Mounting Pads using the following hardware:
• Use 3/8”-16 x 1” long bolts, 3/8”-16 Nylock nuts, and 3/8” G8 washers beneath the bolt heads and nuts for the two outboard mounting holes.
• Use 3/8”-16 x 1 ¼” long bolts, along with the provided Half-Round Spacers, 3/8”-16 Nylock nuts, and 3/8” G8 washers beneath the bolt heads and nuts for the two inboard mounting holes.
10. Torque the entire Door Bar Mounting Pad hardware to 33 lb-ft.
11. Torque the 1/2”-13 x 1 ½” bolts that connect the lower half of the Door Bar to the Door Bar Mounting Pad to 78 lb-ft.
12. Tighten the 3/8”-16 x 2 ¼” long bolts and 3/8”-16 Nylock nuts that connect the upper half of the Door Bar to the Main Hoop. They should be just tight enough so that the door bar doesn’t rattle on the upper connection point.
13. Fold the carpet back into position. Trim as required if the existing hole doesn’t accommodate the new door bar position. The trimmed carpet is shown below.
NOTE: Door bar removed for clarity.
14. Install the plastic kick panels and secure each one with a plastic push-pin.
NOTE: Reinstall the alarm switch into the passenger side kick panel if it was removed in Step 4.
15. Install the door scuff plates.
16. Install the plastic trim panel removed in Step 2 that protects the fuel/brake lines and fuel filter. Torque the 10mm hex head bolts and nuts to 5 lb-ft (7Nm).
17. Safely lower the vehicle to the ground.
NOTE: Roll bar padding must be installed on any areas of the Roll Bar that the vehicle occupants may possibly contact during an accident. This includes any parts of the Roll Bar that the occupants’ hands, arms, legs, and feet may contact, as well as the head.
Door Bar Removal
1. Remove the two bolts attaching each Door Bar to the Main Hoop and to its Door Bar Mounting Pad.
2. Once the bolts are removed, swing the bottom of the door bar inboard to clear the Lower Mounting Pad.
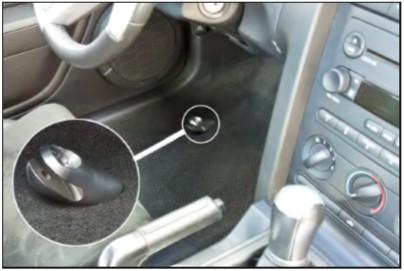
3. Then pull the Door Bar forward to detach it from the Door Bar Mounting Spud on the Main Hoop.
This kit includes: