FREE 1 to 3-Day Delivery on Orders $149+ Details
How to Install Maximum Motorsports SN95 Caliper Stainless Steel Brake Hose & Hard Line Kit - Rear (86-93 5.0L) on your Ford Mustang

Shop Parts in this Guide
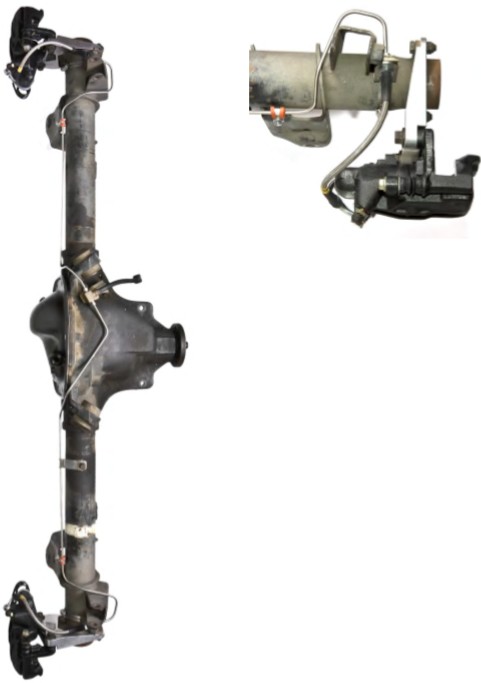
Congratulations on purchasing Maximum Motorsports’ MMBK13R Brake Hose Kit for rear disc conversions. It will make your life much easier when swapping 1994-04 Mustang rear brakes onto a Fox Mustang rear axle. The hard lines in this kit are unique. Designed by Maximum Motorsports, they are routed to clear the 1979-93 Mustang chassis bumpstops, and the quad-shock brackets on the 8.8” axle housing. These lines avoid the problems of trying to reuse drum brake hard lines with a disc conversion, and the interference encountered when using 1994-95 Mustang hard lines on a Fox chassis.
Fits
• 1986-93 5.0L chassis
• 1986-98 8.8” axle housing
• Ford OEM SN95 calipers and rotors, both Cobra and GT
NOTE: To install on 1979-85 chassis and 1986-93 non-V8 chassis, modifications to the chassis brake hard line are required to allow fitting a 1986-95 5.0L center brake hose.
Features
• New stainless steel hard lines for the rear axle, uniquely designed for a Fox Mustang rear disc brake conversion.
• Stainless steel braided hoses for the calipers
• Mounting hardware for the hoses and hard lines.
Read all instructions before beginning work. Following instructions in the proper sequence will ensure the best and easiest installation.
Required Supplemental Items
• Brake Fluid
Supplemental Installation Notes
• We recommend upgrading the stock rubber center brake hose to the MMBK1R Stainless Steel Hose
• These instructions assume 1994-04 calipers and rotors have already been fitted to the axle
• This kit does not fit the 7.5” axle housing
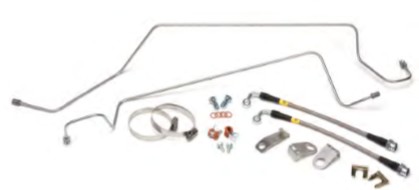
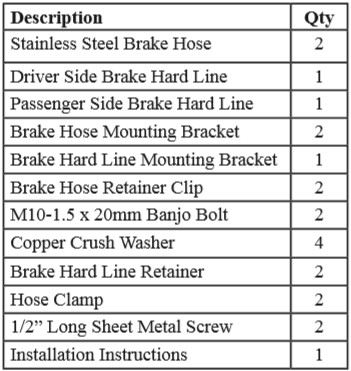
This Kit Contains
Preparation
These instructions assume the disk brake calipers and related hardware have already been installed.
1. Safely support the rear of the vehicle on jack stands, so that the axle is at full droop.
2. Remove the rear wheels from the vehicle.
3. Disconnect the stock brake hard lines, where they connect to the T-fitting on top of the differential, using a 3/8” wrench.
4. Remove the driver and passenger side stock rear brake hard lines from the axle.
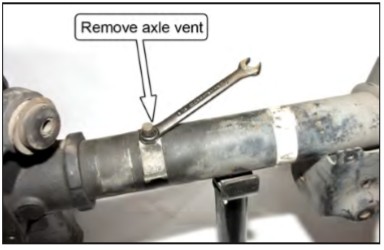
5. Clean any loose dirt/grease from the axle vent on the passenger side of the axle.
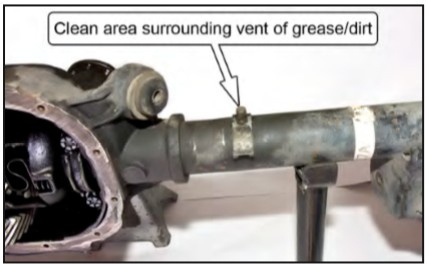
6. Remove the axle vent and the sheet metal bracket it retains on the axle using a 9/16” wrench.
7. If replacing the stock rubber center brake hose with the MMBK1R, do so at this time.
Installation
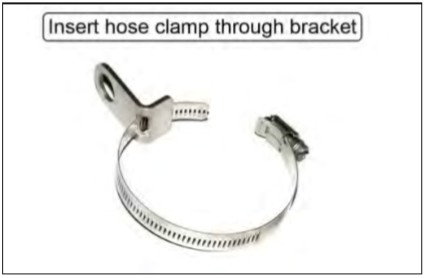
8. Open up one of the provided hose clamps and pass the end through the slot in one of the Brake Hose Mounting Brackets as shown below.
9. Starting on the passenger side, position the Brake Hose Mounting Bracket on top of the axle, with the short leg facing the front of the vehicle. The Mounting Bracket should be near the end of the axle housing.
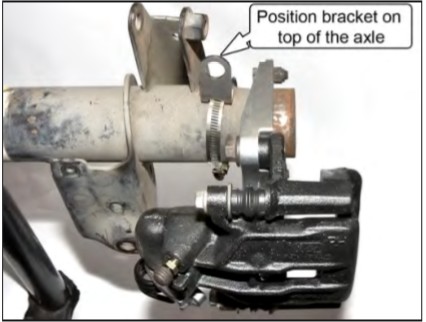
10. Wrap the hose clamp around the axle housing and loosely secure it so the position of the Brake Hose Mounting Bracket can still be adjusted.
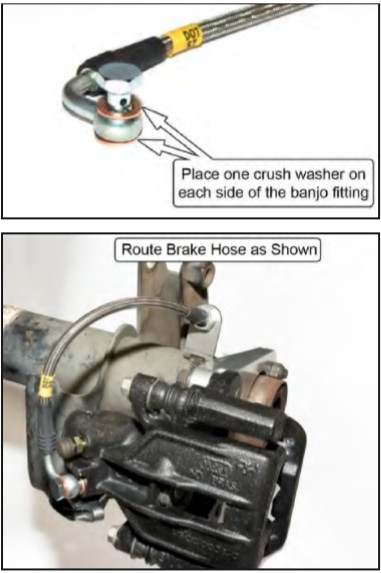
11. Loosely attach one of the provided Stainless Steel Brake Hoses to the caliper. Be sure to use a copper crush washer on each face of the banjo fitting, along with one of the provided banjo bolts. When installed correctly, the end of the brake hose should point upwards.
NOTE: The MM Rear Hoses are not side specific.
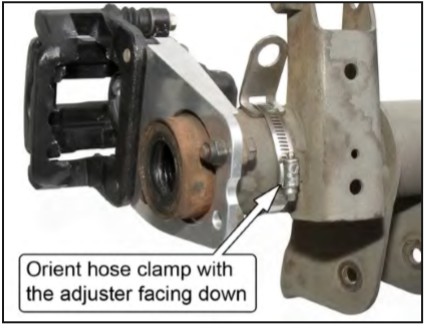
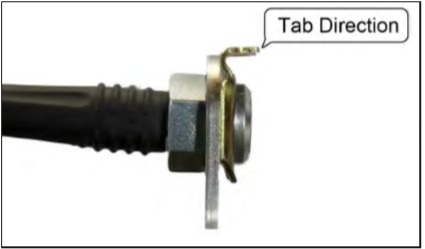
12. Attach the MM Rear Hose to the Brake Hose Mounting Bracket. Pass the end of the hose through the hole in the bracket, and secure it with the supplied retainer clip. The clip should be oriented with the tab facing away from the bracket and the opening facing down toward the axle tube.
13. Position the provided Passenger Side Brake Hard Line onto the axle. Connect the inboard fitting to the T-fitting on top of the axle using a 3/8” wrench, but do not tighten.
NOTE: See photo on last page.
14. Connect the Passenger Side Axle Hard Line to the brake hose, but do not tighten.
15. Repeat Step 8-14 for the Driver Side.
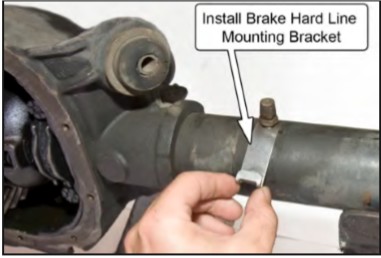
16. Place the Brake Hard Line Mounting Bracket onto the axle so it’s mounting hole is directly above the axle vent hole and reinstall the axle vent. Do NOT tighten the vent fitting yet.
17. Slide the Passenger Side Brake Hard Line into the end of the Brake Hard Line Mounting Bracket.
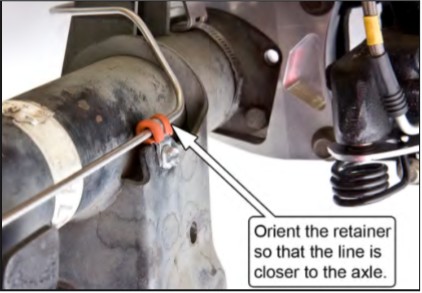
18. Place one of the Brake Hard Line Retainers onto each of the Brake Hard Lines and squeeze the legs of the retainer together. Install the retainer in the orientation shown below using the supplied Sheet Metal Screws.
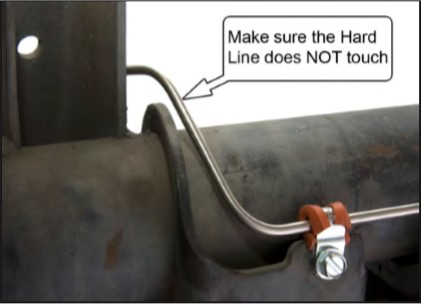
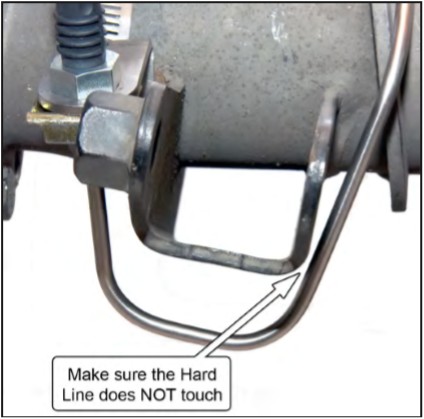
Brake Hard Line Positioning
It is important to ensure that the Brake Hard Lines are not contacting the axle housing before tightening any of the fittings or retaining brackets. Check around the Quad Shock and control arm mounting brackets for contact.
19. Adjust the position of the Brake Hose Bracket to ensure that the brake lines will not come in contact with the body, suspension, or wheels during suspension movement.
20
20. Tighten all hard line fittings, using a backup wrench when possible.
21. Tighten the banjo bolts to 14 lb-ft.
22. Slightly squeeze the Brake Hard Line Mounting Bracket with a pair of pliers. Squeeze just enough so that the brake line is retained in the bracket, but not enough to crush the line.
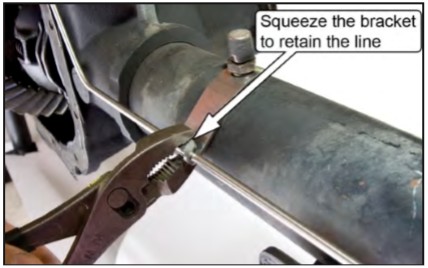
23. Tighten the Axle Vent fitting while holding the Brake Hard Line Mounting Bracket.
24. Bleed the rear brake system and check all fittings for leaks. Consult a service manual for further information on bleeding air from the brake system.
25. After bleeding the brake system, re-install the wheels and set the car back on the ground. Torque the lug nuts to the manufacturer’s specifications.