FREE 1 to 3-Day Delivery on Orders $149+ Details
How to Install Maximum Motorsports Standard Duty Oil Filter Relocation Kit (99-01 Cobra; 03-04 Mach 1) on your Ford Mustang

Shop Parts in this Guide
Read all of the instructions before beginning work. Following the instructions in the proper sequence will ensure the best and easiest installation.
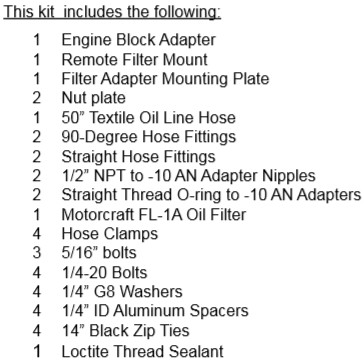
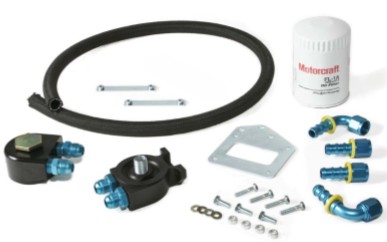
Maximum Mototrsports’ Modular Engine Oil Filter Relocation Kit moves the oil filter from the OE location to inside the driver side fender, behind the bumper support. This kit is required for all Modular DOHC and SOHC engines with OE oil coolers when installing Maximum Motorsports’ tubular K-member. Installation of this kit mandates the use of a larger volume FL-1 series oil filter (or equivalent).
1. Check the oil level and add oil, if necessary.
2. Jack up the front of the car and support securely on jackstands.
3. Remove the driver side wheel.
Filter Mount Installation
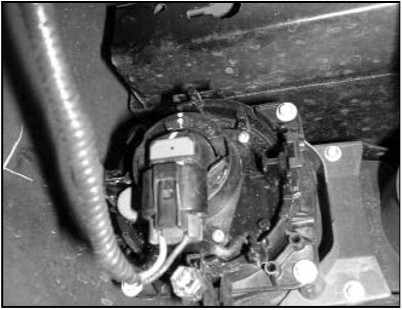
4. Remove the driver side driving light connector from the driving light. Position the connector up and out of the way.
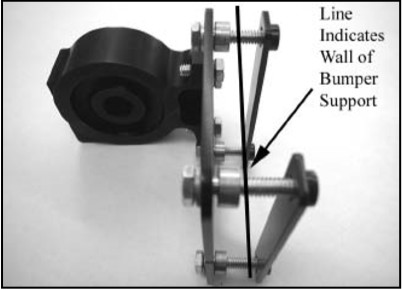
5. Position the Adapter Plate on the bumper support, and use it as a template to locate the position of the required four new mounting holes on the bumper support. Make sure that the top of the plate is lower than any protrusions from the overhead plastic panel, and that each new hole location has at least 1/8” of metal between it and any OEM holes in the bumper support.
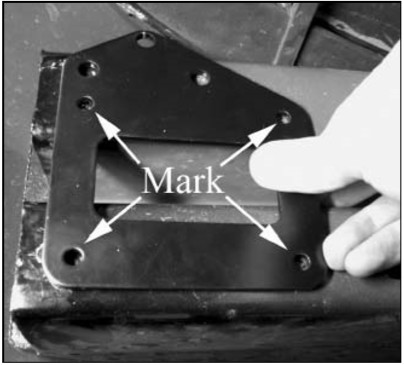
6. Mark the location of each new mounting hole on the bumper support. Use of a clamp to hold the adapter plate to the support while marking can aid the accuracy of this step.
7. Remove the Adapter Plate from the bumper support.
8. Drill four ¼” holes at the locations marked in step 7. The bumper support is made of a steel alloy that is difficult to drill. Use high-quality, sharp drill bits. Start by drilling a 1/8” pilot hole. Then enlarge using a 3/16“ drill bit, followed by a 1/4” drill bit. The use of multiple drill bit sizes simplifies this step greatly. When drilling, the front portion of the plastic fender liner can be pulled back towards the wheel to greatly increase the room available for drill access.
9. Apply a light coat of motor oil to the O-ring of the two Straight Thread O-ring to -10AN fittings.
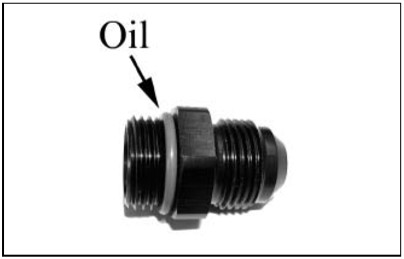
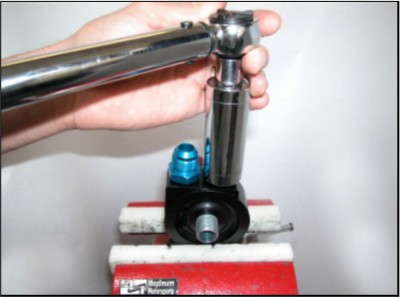
10. Place the Remote Filter Mount into a vise with “soft jaws” and install each of the two Straight Thread O-ring to -10AN fittings into the two ports of the filter adapter. Tighten the adapter nipples to 35 ft-lbs.
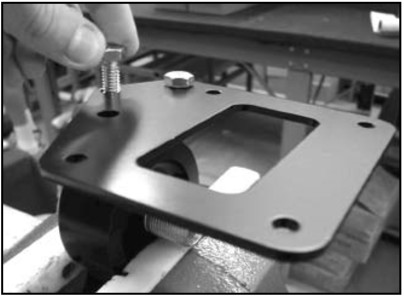
11. Attach the Adapter Plate to the Remote Filter Mount using the three supplied 5/16” bolts. Orient the plate so that the Remote Filter Mount will be biased toward the fender when installed on the car. Tighten the three bolts to 19 ft-lb.
12. Place the four thin ¼” washers over the ¼”-20 bolts, and insert them through the mounting holes in the adapter plate from the Filter Mount side of the plate.
13. Place the thick ¼” washers on each of the ¼”-20 bolts on the bumper side of the Adapter Plate. The washers space the Adapter Plate away from the bumper support, providing clearance for the bolt heads installed in Step 11. Use of a sticky substance between the Adapter Plate and the spacers, such as a light coating of the oil used in Step 9, can help prevent the washers from falling off during attachment to the bumper support.
14. Attach the Adapter Plate to the bumper support by inserting the ¼”-20 bolts of the plate assembly through the mounting holes drilled in Step 8. The two supplied nut plates must be positioned inside the bumper support to receive the bolts. Clamping the Adapter Plate to the bumper support while positioning the first nut plate can also aid this step.
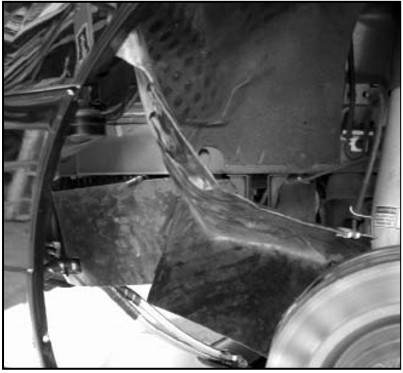
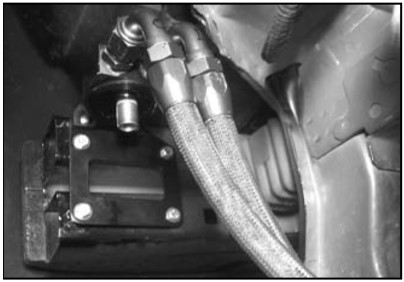
15. Tighten all four adapter plate bolts to 10 ft-lb. Note: While the photo below shows the oil lines already installed, they should not be installed until Step 22. (Braided steel lines shown)
Engine Block Adapter Installation
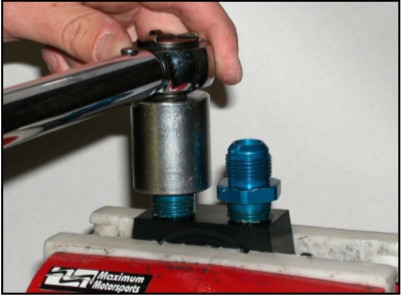
16. Coat the tapered pipe threads of the two -10 AN to pipe fittings with the supplied Loctite Thread Sealant. Do not coat the leading thread. Place the Engine Block Adapter into a vise with “soft jaws” and install each of the two adapter nipples into one of the ports of the Engine Block Adapter. Tighten the adapter nipples. The tapered pipe threads form a wedge and the fittings do not bottom. Do not over-tighten, or damage will result.
17. Lube the Engine Block Adapter rubber gasket with motor oil.
18. Place a drain pan under the oil filter and remove the oil filter. Be sure the rubber filter gasket is removed with the filter.
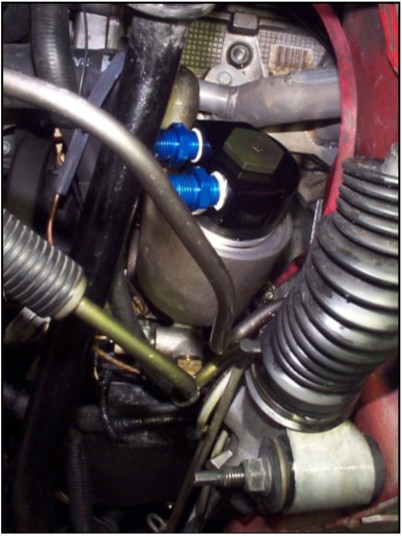
19. Loosely attach the Engine Block Adapter at the OE filter location on the block. Rotate the Engine Block Adapter such that the adapter nipples face toward the front of the car.
Oil Line Fabrication And Installation.
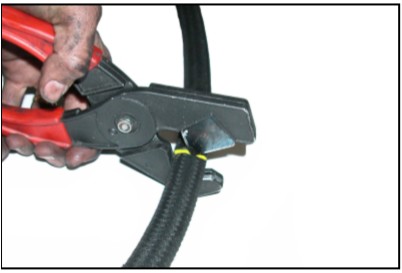
20. Inspect the ends of the supplied oil line hose. Choose the end of the hose that is in best condition, this is the first end that you will install a 90-Degree fitting into. Lubricate the barbs on the fitting and the ID of the hose with engine oil. Press the fitting into the hose. The fitting is completely installed when the hose just contacts the plastic yellow hose end cover.
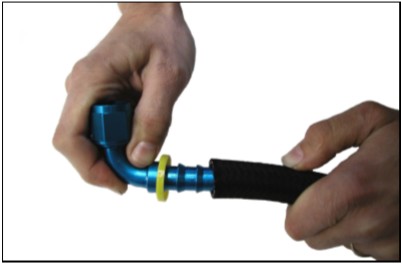
21. Slide a hose clamp over the end of the hose that does not have a fitting. Position the hose clamp next to the yellow hose end cover and then use a slotted screwdriver to tighten the clamp until snug. The hose clamp provides extra security in high heat and pressure applications.
22
22. Hand tighten the attached 90-Degree fitting onto the adapter nipple of inboard port of the Remote Filter Mount ( the adapter nipple closest to the radiator support).
23. Route the hose under the frame rail, over the antisway bar and clutch cable to the Engine Block Adapter. The specific routing should be based on your personal preference and vehicle configuration.
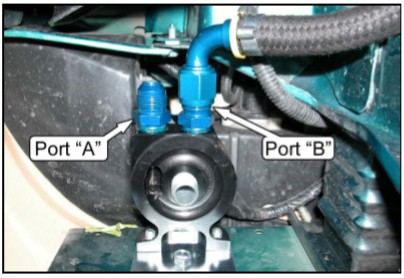
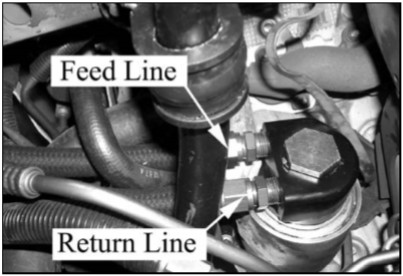
NOTE: It is important to understand that each one of the Remote Filter Mount ports must be connected to the correct port of the Engine Block Adapter. Specifically, the inboard port of the Filter Mount must be attached to the lower port of the Engine Block Adapter. This is the RETURN line. The outboard port of the Filter Mount must be attached to the upper port of the Engine Block Adapter. This is the FEED line. This configuration ensures proper oil flow in the system.
24. Thread a straight fitting onto the lower adapter nipple of the Engine Block Adapter, do not tighten the fitting.
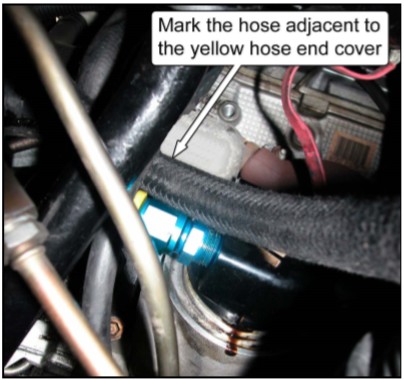
25. With the hose routed properly, hold it next to the straight fitting on the Engine Adapter Block. Mark the hose at the yellow hose end cover. It will be cut to length in Step 27.
26. Disconnect the hose from the Remote Filter Mount and remove the hose from the car. Remove the straight fitting from the Engine Block Adapter.
27. Use a pair of hose cutters or a sharp razor knife to cut the hose at the location of your mark.
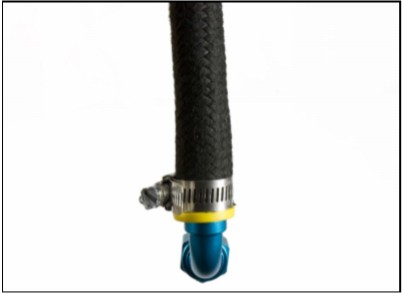
28. Slide a Band Clamp onto the hose.
29. Lube the barbs on the straight fitting and the ID of the hose. Install the fitting in the hose. Again make sure the hose is just touching the yellow hose end cover.
30. Position the Band Clamp about 1/4” form the yellow hose end cover and then pinch the end loops.
31. For reference, apply a piece of tape on this oil line. The tape will designate the RETURN oil line, which will be attached between the inboard port of the Remote Filter Mount and the lower port of the Engine Block Adapter.
32. Repeat steps 20-30 to make a second oil line to attach the FEED line between the OUTBOARD port of the Remote Filter Mount and the UPPER port of the Engine Block Adapter.
33. Attach the 90-Degree fitting of the FEED oil line onto the outboard adapter nipple of the Remote Filter Mount, and tighten to 15 ft-lb. Use a crow-foot socket and a small torque wrench.
34. Route the FEED oil line under the frame rail, and over the anti-sway bar and clutch cable to the Engine Block Adapter. Do not attach the oil line to the Engine Block Adapter yet.
35. Attach the 90-Degree fitting of the RETURN oil line to the inboard adapter nipple of the Remote Filter Mount, and tighten to 15 ft-lb.
36. Route the RETURN oil line under the frame rail, and over the anti-sway bar and clutch cable to the Engine Block Adapter. (Braided steel lines shown)

37. Attach the STRAIGHT fitting of the FEED oil line to the upper adapter nipple of the Engine Block Adapter and tighten to 15 ft-lb.
38. Attach the STRAIGHT fitting of the RETURN oil line to the lower adapter nipple of the Engine Block Adapter and tighten to 15 ft-lb.
39. Fine tune the orientation of the Engine Block Adapter in order to give the best oil line routing. Tighten the hex head on the Engine Block Adapter. The Engine Block Adapter uses a rubber oil filter gasket. Do not over tighten to avoid damage to the sealing surfaces.
40. Use the supplied zip ties to secure the oil lines as needed.
Finishing The Installation
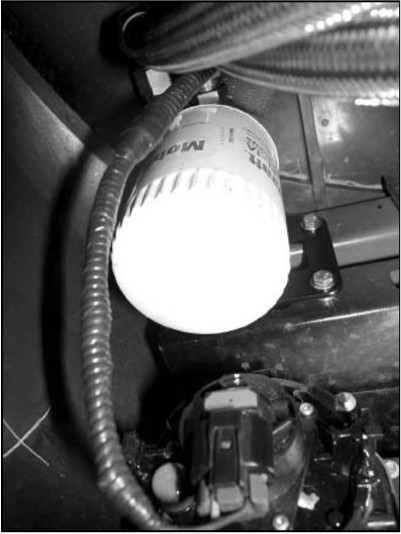
41. Fill the provided oil filter with oil and hand tighten the filter on the Remote Filter Mount until the seal contacts the Remote Filter Mount. Tighten the oil filter 1/2 turn further.
42. Re-attach the driving light connector to the driving light.
43. Start the engine and examine all of the oil lines, oil line connections, filter, and block connections carefully to ensure that everything is tight and that there are no leaks. Turn off the engine after examining the oil lines and oil line connections.
44. Re-attach the driver side wheel. Torque the lug nuts to the appropriate wheel or vehicle manufacturer’s specification.
45. Lower the front of the car to the ground.
46. Let the engine sit for 10-15 minutes to allow the oil to drain back into the pan. Check the oil level. Add oil, if necessary.