FREE 2 or 3-Day Delivery on Orders $119+ Details

Talk to a Challenger Enthusiast
1-877-887-1105
M-F 8:30A-11P, Sat-Sun 8:30A-9P
Win $3,000 in Store Credit! Enter Daily >

MBRP Cat-Back Exhaust with Carbon Fiber Tips (15-23 3.6L Challenger)

Item CH6912
Call a Challenger Enthusiast at 1-877-887-1105
M-F 8:30A-11P, Sat-Sun 8:30A-9P
$0.00
On Sale

$1,144.99 (each)

FREE Shipping Market Price $1,316.99 You Save 13% ($172.00)

Will this fit your Vehicle?

Select a different vehicle Help?
Update or Change Vehicle
Ship to: Ashburn - 20149
Sorry, please enter a valid US or CA postal code
We're sorry, zip can't be updated at this time.
Recommended Install Shops
How It Works

Add Local Shop Installation

Install Shops are available near Ashburn - 20149
Total cost of service $299.00
    Create a list
    Add to New List

    Saved - View your saved items

    We're sorry. We couldn't save this product at this time.

    or use

      Video Review & Installation

      Jake: Jake here for americanmuscle.com. And today I've got this MBRP 2.5 inch Cat-Back quad rear exit exhaust with carbon fiber tips for 2015 and newer challengers with the 3.6 liters V6. Now, if you've got a Pentastar power Challenger and you find yourself craving a better exhaust note with more volume, then look no further because MBRP has got you covered. Not only is this a good-looking system with these carbon fiber tips, but it also has some really nice features, a good sound, and a solid construction, all at a pretty reasonable price. Now, when it comes to modifying V6 engines, it often tends to be a struggle to get them to sound good. A lot of the times just uncorking that exhaust with a straight pipe setup or something like that, as you might do with a V8, just isn't gonna yield a good sound.However, MBRP has managed to make an exhaust that it both sounds good and is unobtrusive while you're driving along. As you heard from the clips in the beginning of the video, this system has a really nice tone to it. Outside of the car, it's got that cool little bass-y growly type sound that gets a little raspier in the higher RPMs, just like you expect out of a good V6. Now, to my ear, it sounds pretty cool and it amplifies the good sounds without making it droney or too loud.MBRP classifies this system as a street profile and with good reason. Inside the cabin, the exhaust is noticeably louder than stock, but it's not obtrusive. You can easily carry on a conversation and the volume drops off noticeably when you reach highway cruising speeds. However, when you really bury the throttle, you're still gonna get some of that nice sound out of the pipes.Now, the system also includes an X-pipe, which is not something you find on a lot of others. X-pipes help even out exhaust pulses caused by uneven firing orders like you find in a V6 or traditional V8. They cross over right here, hence the X. This is also gonna help even out the exhaust pressure and all that combines to eliminate the exhaust drone in the cabin. It's a really nice feature to have, and it contributes to how good this exhaust sounds. You also get these two suitcase mufflers to keep things controlled and sounding good as they're coming out of tips.Now, the whole thing is made from T3 or 4 stainless steel. So it's gonna stand up well to the elements and provide really good corrosion resistance. But the coolest part has to be the tips. Now, replacing the dual rectangular tips that you get stock on a Challenger are these twin tips with carbon fiber finishes.Now, I'm not necessarily the biggest fan of carbon fiber myself, but I have to admit, I kind of really like these. I think they bring a unique and subtle update to the look of your Challenger. Also, since they are a clamp-on style, you have the benefit of being able to adjust them as you see fit. So if you like your tips to sit a little more flush with the bumper like so, or if you want them to stick out a little bit for more of that hot rod muscle car look, you have the option to do that.So, how much is this all gonna cost? Well, as with most exhaust, it doesn't exactly come cheap. This system will run you around $1,200. Now, that is pretty standard for the category. Of course, you can get something cheaper, but the benefit to spending a little more money here is that you are getting the excellent corrosion resistance, the high-quality finish, these cool tips, and exhaust that sounds good without drone. And to me, that's the most important part.It really has a lot of nice features. And if you wanna upgrade the exhaust in your V6 Challenger, you really owe it to yourself to consider this system. And that brings us to the install. Coming in at a one outta three on the difficulty meter, this is a job you can certainly accomplish yourself at home in around an hour's time. This is a complete build-in system. So you don't have to cut or modify anything on the exhaust or on your car. You're gonna reuse your stock exhaust hangers and all the clamps that you need to secure everything together are also included in the box. And to show you how to install this on your Challenger, here's one of our American Muscle customers to walk you through it.Man 1: The tools I used were two heavy-duty ramps, four-wheel clocks to hold them in place, two 3-ton jack stands, and two 6-ton jack stands, the factory jack, a breaker bar, a torque wrench, two ratchets, variations on the 15-millimeter sockets, 13-millimeter sockets, 10-millimeter sockets, a 15-millimeter wrench, a 13-millimeter wrench, a 10-millimeter wrench, two extensions, a swivel head, two screwdrivers, some pliers, and a rubber mallet.Hi guys. Today we'll be installing the MBRP Cat-Back exhaust system, stainless steel with a quad carbon fiber tips on my 2021 Dodge Challenger SXT. Let's begin. Okay. Now that we're under the car, we gotta loosen the two clamps that hold the factory X-pipe to the factory converters. So, we'll start doing it with a 15-millimeter wrench. What we're gonna do is loosen it up. Once we gotta it about as loose as you can get it with a 15-millimeter wrench, you can go with a 15-millimeter ratchet. As long as it's to the correct depth, we can keep loosening it up. Okay. There you go.Now that it's loose to the hand, we can go to the driver's side of the nut and start loosening that one. Okay. Once that's a little bit looser, I can use the ratchet. Once that is loose, we start to move it around to loosen up that clamp. We can use a flathead screwdriver to open it up, open up the clamps a little bit, just enough so they can move around like that. We got a rubber mallet that we can give it a couple of wacks. Okay. Now we're gonna move down to the mid-muffler. We're on the mid-muffler side of the exhaust. We're gonna loosen the bolt to the hangers for the driver's side first, then we'll go to the passenger side.There's a fairly long bolt in a little tight space, so, we're gonna need a ratchet, then we're gonna switch it up to the wrench since we're limited on space. Let me put it here. Okay. Then we're gonna be loosening it up with a 13-millimeter wrench. We're gonna take a little bit of time, but it's gonna be all worth it. I'm using conventional tools right to here. But if you have a ratchet wrench, this process could go a little bit quicker. It's just some patience. Only loosen the bolt. Do not try to loosen up the nut. It's welded on to the chassis of the vehicle. You may damage it if you try to do that. So just go slow, steady with patience and you'll get that bolt out. I promise you. Let's see if it's... Once it's almost there, you can loosen it up with your hand. There we go.Now we got our first hanger bolt. And as you can see, you can disengage it, but don't do it yet since we're gonna use that clip to hold the completed exhaust system. Sorry. Before we can take it all down. So we're gonna loosen up all the bolts first, then we can take it out as one single piece. Let's move to the passenger side.Passenger side and we're gonna start loosening this bolt. Try to get a good position. Okay. There we go. Start loosening it. This one is a little bit looser once you untighten it. I think I can start loosening it up, yeah, with my hand until a certain point. Okay. There we go. So, like on the other side, a little bit of patience. Okay. It's loose enough, so I can take it out with my finger. That's the second bolt from the passenger side. The first bolt of the hangers. We're gonna place it right here.Okay. So now we're going to the last two hangers on the driver's side. Yeah. So I used the jack stand because these hangers are, once I loosen up the bolt, it's gonna come down a little bit. So I don't want it to come down on me. I'm using an extension tool, a 13-millimeter and a breaker bar just to loosen these up a little bit. You see, it's coming down a bit. Once it's a little bit loose, I'm gonna switch to a ratchet, so I can do it a bit faster. Okay. The bolt is almost loose. There it is. It turns and it's all the way out. Okay. I think it's... Yeah, it is. So we got the bolt loose. We're gonna go to the back of the muffler side to loosen this one.For this one, we're gonna use the same 13-millimeter with an extension tool and a swivel head, since it's a little bit of an angle. Sorry. We're gonna try it without the breaker bar first, just to see if we can get it out. Okay. Let's see. Try to hold the tool in place so you don't strip the nut. Okay. Let me see if everything is coming down. At this point, you can take it out with your hands since the muffler is being held by the jack stand. Now that we have all the hangers, the bolts for the hangers, they're loose on the driver's side. Before we go to the passenger side, I wanna take off the factory square tips. So when we take off all the hanger bolts, these tips are not gonna be on the way.So, first to make it a little bit easier, we're gonna take out these two nuts that are holding the underside of the bumper. So it's fairly easy. A 10-millimeter socket, we're gonna take off these nuts. Take this. Okay. We can put em to the side over here. So, now we got this part that's off. So we can get to the 10-millimeter bolt that is holding the inside part of the tip. We can use a swivel head for this one. So, we'll stretch it out a little bit and start loosening this one. We can go slow so we don't strip that bolt.There we go. And I think it's loose enough so I can take it out with my hand. This is the little bolt that's holding the inside part of the factory tips. There's another one on the far side. So you need to move it up too. Take your swivel head to that part and start moving in. There we go. And you start loosening it. There we go.So there's that part. That part there. We loosened up the bumper bolts and we started taking off the factory tips. But there's another bolt on the top of those tips. But before we do that, I wanna take all the bolts from the hangers. Because once we got this part a little bit loose, the mufflers are gonna go out even smoother. So take off this bolt. It's not that tight, so you can take it out with a wrench and a 13-millimeter socket with an extension.And also remember to have something hold the rear muffler so it doesn't fall on your face. You don't want that. Okay. Now that we have that bolt out, we're gonna take out the last one using a 13-millimeter wrench. But this time with a swivel head so we can reach the hanger. But we're gonna go over here to this last bolt and position it in such a way that we can break it loose. A little bit... There we go.Okay. Perfect. Got the bolt out. As you can see, the jack stand is holding the muffler. So, now we're gonna go to the mid-muffler side and take the hangers off the hook, so we can start taking out all the factory exhaust. Now, we're almost done taking off the factory exhaust system. To make it a little bit easier, we're gonna loosen these bolts. But since they're spring-loaded, I gotta press. So, just to make things safer, we're gonna loosen these bolts slowly so that the spring doesn't come off and doesn't hurt either me or my camerawoman. So, we're doing this slow and loosening the press a little bit by bit. Not too much. Always make sure you got the press holding the bolt. Now we got the bolt and the spring out. You can put that to the side. And I'll get my 13-millimeter ratchet and bit socket, so I can forward the other side.But you see, by taking our time doing this bolt, we ensured that it's not gonna go flying out and hit anything and cause an injury. There we go. We got the bolt and the spring. We took those two bolts out. Ah, so we're now gonna take the driver's side of the exhaust system. So we gotta be a little bit careful because it's heavy. So I got two jack stands over here. The small one is gonna be holding it once I take the biggest jack stand out. So you can see I'm gonna need a little bit of a wiggle room right here. So I'm gonna move this a little bit just to make room. Okay. Now that we've got this one off, I'm gonna let it go on the ground and just take it off a little bit by a little bit. Perfect. We got the driver's side off. Now we're gonna start taking the whole system off from the X-pipe all the way down to the passenger side.Okay. So now we're going to the passenger side of the exhaust system. I'm gonna take it off the bigger jack stand and transfer it to the smaller one. But we're gonna try and angle it a little bit, since the screws for the factory tips are way too uncomfortable to take out. We're gonna move in a little bit and finagle it so we can take it off. We got it out. We're gonna put jack stands over here. It's off this side. We're gonna move it. Take off this big jack stand. Get under it again.Now, since we have it like this, we can start taking these bolts off. We finally took these bolts. Just two more on the top side of the factory square tips. Let me get the ratchet over here. And it's a 10-millimeter ratchet to take these four bolts out.You need to hold it on this last one, because it's gonna come off like so. So, once this is off, you're gonna want to take the factory square tips, put 'em aside, and then reinstall the... I think you could call it a shroud. So when you put the aftermarket exhaust tips, they're gonna hold like that and it will look uniform. Let's go to the passenger side so we can take off the square tip.There's one. I got another one. And then the last one is on the far side. So, we need to get there. And now that it's off. Be careful taking this off. Put it in. It's jammed in there by the factory exhaust system. Oh, we got it off. And you wanna take this and put it back on. It should be fairly easy. You can start by aligning them up and threading them with your fingers because you don't cross-tread them.Okay. It's there. There we go. Right side of this. Put it there. Okay. Then with the combination of a ratchet,10-millimeter deep socket, and a 10-millimeter wrench, for the inside one, you can start tightening so it doesn't move. Perfect. That one is good. I'm going to the far side. There we go. That's tight. We're gonna take the wrench and tighten this one. This one you're gonna have to tighten like this, or if you have a small ratchet, which I'm gonna go get right now. The small ratchet with a 10-millimeter to get into that space right there like so. Right there. A little bit tight.Check the other three bolts, just to make sure it's right on there. And you're done. On this side, it looks uniform for when you put your new exhaust system. So, final step to taking out the factory exhaust system. I just moved it a little bit to loosen it from the factory converter pipes. So, one last pull and we're gonna be taking the factory exhaust out and putting the aftermarket exhaust in. So let's go.Okay. You gotta be careful since this is heavy. The biggest part is already on the floor. Okay. So now we have on display the factory exhaust system. As you can see our factory X-pipe, mid-muffler, and rear muffler. Compare it to the aftermarket system that we're gonna be installing X-pipe into performance mufflers, muscle car performance mufflers, straight pipe all the way to quad carbon fiber tips made by MBRP the Cat-Back exhaust system, stainless steel T304 with carbon fiber tips.Now we have the whole factory exhaust system out and the aftermarket exhaust system on my left. We're gonna be taking off the rubber hangers that are gonna be placed on the aftermarket exhaust. They have the hangers already positioned and we're gonna be taking these six rubber hangers off. It's gonna be a little bit of... We're gonna use a little bit of force to take it off. But once it's off, you can easily... There we go. So this is gonna be the hanger. We're gonna be placing it on the aftermarket side.And in the aftermarket side, it's quite a bit easier since it doesn't have the tip that it's preventing it from taking it off from the factory. So, once you put it on the aftermarket, this is gonna be what it looks like. So when you put it back on your Challenger, it'll hang there right there all nice, safe, and snug. So we're gonna be doing that on the other six rubber hangers. Be taking them off. So, let's finish on the driver side of the exhaust system.This is gonna be a little bit tricky because, as I said, you're gonna be needing a little bit of force. If you don't have the hanger remover tool, you're gonna be using a little bit of force. There we go. Two down, four more to go. There it is. We've got three more to go. So you don't lose track of where you're supposed to put them, you can put 'em next to your new hangers on your aftermarket. Place 'em right there. Yes. But we gotta go.I suggest, since the rear muffler side is the tightest one, start with that one and work your way down to the mid-muffler one. So, we're here. And it's off. Perfect. Do the same as the other two and put it under the corresponding side of your aftermarket exhaust. Let's go to the last two.On this one, you gotta take off this clip before trying to take off the hanger. So take it off on both sides. There we go. Put it on the side. We're gonna need it for this one over here. Then the same as the last one. While this one you got a little bit more room. So take your screwdriver, place it, then start moving it around. Now that you're there, give it some more pulling force. And you got it off. Put it to the side, to your aftermarket with the clip. This is the last one. Be careful since you got these two bolts. You don't wanna cut yourself or get an injury.Put again your screwdriver in between the hanger. Start moving it around, back and forth. Perfect. There we go. We got all the hangers out. So now, we can go ahead. Put it next to the aftermarket exhaust system and then start putting it on. Okay. Now that we got all the hangers off the factory exhaust system, we're gonna put them on the aftermarket. So let's go.We already put this one on. It's right there. We can adjust it once we start installing it on the Challenger. But let's start with this one. As you see, you just move it back and forth. Perfect. Until you see the end of the hanger part. Then leave it right there. We're good on that one. Let's go to the last two on the passenger side. There we go. And remember that you had this clip. Put it back over here and on the hanger part. And there you go. We got that one over there. Let's put the last one at the back right here.There we go. Let's go to the driver's side and finish installing the last two. Right here at the driver's side. Let's go. There we go. And the last one. Perfect. As you can see, all the hangers are placed. We have it displayed with all the clamps where they're supposed to go. Next, we'll be installing the aftermarket exhaust on our 2021 Dodge Challenger SXT.Before we start installing the aftermarket exhaust, we need to put the four bolts on this cover and also on these two bolts so we can hold the rear bumper. We start by putting them by hand, just enough until they catch. And then we'll go in with the 10-millimeter socket to put them all the way through. This one is the tightest one. The one in the inside part next to the fuel tank. Then we can go in and start to tighten it.Okay. That's good and tight. Go to the next one. All good and snug right there. Check the last one. Good. I'll go to the far side one to get all the easiest one. There we go. Good and snug. So we'll go to the inside one. If you have a small ratchet with a 10-millimeter, it's gonna make things a lot easier, or even better, you can take a 10-millimeter wrench since it's a little bit uncomfortable. But that will take a little bit more time. But patience is key to not break anything or strip any bolt.You can check if the clearance it's enough so you can squeeze the 10-millimeter ratchet right there. If you have enough clearance, you can go ahead and finish it off. Hey, just... So it's snug right there. Check the other bolts to make sure they're good. Perfect. A little bit there and a little bit... Let's move to these bumper bolts to finish off right here. There're 10-millimeter. If you have a little bit longer, deep wrench, deep socket cup, a 10-millimeter, you can do it so you have better control of it. So we'll start with this one.Put it by hand until it can go no further. And the other one too. And like that. Perfect. And we can start to tighten it. Not too tight. So it's fastened right there. Let's go to this side. There we go. Perfect. Now we got to check. Let me just do a little check on the driver's side of the cover to make it even, like this. Perfect.And since we're ready to tighten the bumper, all I'm gonna need is that 10-millimeter wrench for the inside nut. And just... There we go. Next, we're gonna be installing the aftermarket exhaust. I have a jack over here, so I can pull it up and hold the aftermarket X-pipe so that I can then start tightening the clamps. Very helpful. You should put the clamps first, obviously, since after it's installed, you're not gonna have room to put it in.Oh, you're gonna need a little bit of an elbow grease right here installing it. And get that jack stand up. Here we go. I'm gonna get the rubber mallet, so I can install it even easier. If you have a piece of wood, so you don't damage the end of the aftermarket exhaust, you can put 'em right there and to just give it a little, some taps on both sides. Hold it. Important thing. You don't want any gaps in between each joint of the aftermarket exhaust, because you don't want any gases leaking out.So, this is a safety measure. You can do it a couple of times. Then you go down and check. Make sure you don't move anything so it doesn't fall on you. And you can come down here and you... As you can see, I'm almost all the way in until the tube starts trimming down. And if I check over here, I don't see any exposed tubing. So, for my own peace of mind, I'll give it two more taps at the back end. All these bolts are 15-inch sockets. So, my advice to you is to get a deep socket wrench like this one. And take your time doing it.Since it's by hand, it's gonna take a little time. Very important, you want to put it right there where the seams are, so it holds the whole structure together. Okay. It's getting a little bit tighter. So, I wanna put the extension right here, so I can have a little bit more leverage to make the job a bit easier. You're gonna want to put some elbow grease right there. Perfect. That's not going anywhere.Now, do the same to the other side. Now that we have the aftermarket X-pipe installed, it's not gonna go anywhere. So, next we're gonna be installing the next portion of the aftermarket exhaust. Now we're on the muffler part of the exhaust. I have two jack stands right here to help me out with the installation. So first, we'll put the clamps inside. So they're already situated right there in the direction I want them. I want them to be on this side so I can better work with them.I'm gonna install the driver's side muffler first, being very careful with the edges. Remember they are steel and we like this. Perfect. And they stay there, but for my own peace of mind, you can put a jack stand or you can put it on this side, so holding the pipe in place. Then I'm gonna move my way down, because at this point I'm gonna put the passenger side muffler.So moving carefully. Remember, be careful with the edges. Put it right there. All the way in. And get your jack stand to hold the pipe. On this case, I'm gonna need to put it on the far side so it doesn't sway to each side, because I want it straight. There we go. And I'm gonna take my tools right here. And also very important, the clamps that we're gonna be using for now on, are gonna be the two and a half-inch clamps.And also remember on the passenger side, you don't have that much room right here. So, you're gonna be putting the clamp in a bit of an angle. It's a difference with the driver's side. Let's start tightening this first. This side is almost pretty much tight to the point where I can go to the other side. Just give it a little bit. Perfect. That's not going anywhere.Now, I'm gonna go to the passenger side. Before we do that, we've gotta make sure it's straight, so it doesn't rub on the floor or anything like that. So I'm gonna put my jack stand right there and hold it to the desired angle. Let's go to the passenger side. As you see, it moves a little bit. That's okay because we're gonna clamp it down as hard as we can so it doesn't move ever.Okay. Let me see. We're gonna move it a little bit, just to see. As you can see, it's not clamped all the way down as we want it to. So, we're gonna keep clamping down until it's tight enough. So we're finishing tightening this hanger bolt. It's right there. It's in place. It's not gonna go anywhere. If you have a small ratchet with a 13-millimeter socket, you can get in here. I don't have one. So I'll keep doing it with this wrench. But, yes, it takes a little bit of time with basic tools. You can do it, but it'll take a little bit of time.Let me just check if I can get that wrench in there. Perfect. [inaudible 00:43:05]. Just enough. Perfect. There we go. Now that that's done, I can take it off and change my sockets to a 15-millimeter so I can tighten the clamps. Not all the way, but just tight enough so that I can keep going down the... And that's about it. I can put it right there without... Leave it right there.So, we're on the last part of the pipes for the exhaust. We're gonna be placing these two bolts. We're gonna be tightening them with a 13-millimeter socket. Let me get this one out. It's held on. Let me get this out quick so I can put this here. So, I'm gonna wanna tighten it. There we go. And on this, this backside one. On this one, to make it a little bit easier, you can use a swivel head, clamp in right here. There we go. And there we go. Okay. And that's there secure. Let me take this swivel head off, so I can secure this last one.Okay. Keep it tight so that it doesn't move. We have it right there. We got the aftermarket exhaust tips. We're gonna place them all the way in, then do the clamps or put it right there. As you can see, we're gonna place it so they're straight with the bumper and tighten the bolt. There we go. Like that. Tighten it so that it doesn't move. Right there. There we go. As you can see, this is the driver's side. We got all the way to the carbon fiber tips. We're gonna do the same for the passenger side. So we finished. We have the aftermarket exhaust system installed right there with the carbon fiber tips.Jake: That's gonna do it for our review and install of this MBRP Cat-Back exhaust with carbon fiber tips for 2015 and newer V6 Challengers. Thanks so much for watching. And for more products and videos like this for your Challenger, be sure to stick with us right here at americanmuscle.com.

      Product Information

      Features, Description, Reviews, Q&A, Specs & Installation

      Features & Specs

      • Improved Torque and Horsepower
      • True Muscle Car Resonance
      • Lower Exhaust Gas Temperatures
      • Increased Throttle Response
      • Crafted from Premium T304 Stainless Steel
      • Mirror Polished Finish
      • 2.50-Inch Tubing
      • Dual Rear Exit
      • Features 2.50-Inch (In) 3.50-Inch (Out) Quad Black Carbon
      • Fiber Tips
      • Resistant to Rust and Corrosion
      • Bolt-On Design
      • Utilizes OEM Hangers
      • Medium Installation
      • Limited Lifetime Warranty
      • Fits All 2015-2023 Dodge Challenger 3.6L Models

      Description

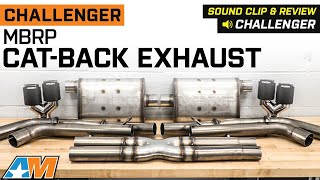
      Aggressive Sound. Looking to give your Challenger a little extra attitude? Then look no further than the MBRP Cat-Back Exhaust with Carbon Fiber Tips. Engineered to lower exhaust gas temperatures, you’ll also love that throaty, muscle car resonance that’s sure to turn heads everywhere you go.

      Built to Perform. Designed to improve your performance, this stellar technology improves your torque and horsepower. Precision details in every facet of this exhaust results in massive performance gains including a better throttle response.

      Superior Manufacturing. Crafted from a premium T304 stainless steel, 2.50-inch tubing with a dual rear exit supports quad black carbon fiber tips. Resistant to rust and corrosion, the mirror-polished finish is sure to stand up for miles and miles.

      Installation. This medium, bolt-on install requires common garage tools for a successful completion. Quality OEM hangers are included, and the install time is estimated at 2 hours. No modifications or cutting are necessary.

      Warranty. MBRP proudly backs this product with a generous limited lifetime warranty. Any defects found in the materials or craftsmanship due to faulty manufacturing will be replaced in full.

      Application. The MBRP Cat-Back Exhaust with Carbon Fiber Tips is manufactured to be a direct fit for all 2015-2023 Dodge Challenger 3.6L models.

      Fitment:

      Details

      MBRP S71113CF

      CA Residents: WARNING: Cancer and Reproductive Harm - www.P65Warnings.ca.gov

      Installation & What's in the Box

      Installation Info

      What's in the Box

      • (1) Cat-Back Exhaust
      • Installation Hardware
      5.0

      Customer Reviews (6)

        Brand Image

        Reviews of MBRP Exhaust products have an average rating of 4.7 out of 5

          Questions & Answers

          10 More Questions

          Will It Fit My Challenger

          • GT - 17, 18, 19, 20, 21, 22, 23
          • SXT - 15, 16, 17, 18, 19, 20, 21, 22, 23
          • SXT Plus - 15, 16, 17, 18