Talk to a Challenger Sales Tech
1-877-887-1105
M-F 8:30A-11P, Sat-Sun 8:30A-9P
$20K Sweeps! 10 Chances to Win! Enter Daily >

MBRP Armor Lite Cat-Back Exhaust (15-23 3.6L Challenger)

Item CH6913
Verify parts fit and get product recommendations.
Challenger Sales Techs: Connect Now M-F 8:30A-11P, Sat-Sun 8:30A-9P
$0.00
On Sale

$664.99 (each)

FREE Shipping Market Price $821.46 You Save 19% ($156.47) Up to 10% off for Military & First Responders! See Details

Will this fit your Vehicle?

Select a different vehicle Help?
Update or Change Vehicle
Ship to: Ashburn - 20149
Sorry, please enter a valid US or CA postal code
We're sorry, zip can't be updated at this time.
Recommended Install Shops
How It Works
Install Shops are available near Ashburn - 20149

Add Local Shop Installation

Total cost of service $299.00
    Create a list
    Add to New List

    Saved - View your saved items

    We're sorry. We couldn't save this product at this time.

    or use

      Product Videos

      Justin: If you're looking to crank the volume on your 2015 and newer 3.6 Challenger but would prefer to keep things as budget-friendly as possible, well, then the MBRP Installer Series cat-back might just be the system for you. This extremely popular cat-back is going to combine aluminized steel with the 2.5-inch mandrel-bent tubing and quad polished tips, all for right around that high $600 price point. Now, unlike the HEMI-powered sibling, the 3.6 doesn't exactly celebrate a ton of different options on the site when we're talking aftermarket exhaust systems. However, the options that do exist are all pretty solid overall. Now, as I did point out at the top of the video, the Installer system from MBRP is currently the most affordable out of the bunch here, and that's mainly due to that aluminized steel build, which we'll cover more in a minute.But for now, what do you say we get into the sound you can expect with the Installer Series bolted up? And honestly, guys, this system does pack a good amount of volume overall, so breaking out my highly scientific wake-the-neighbor scale, I'm gonna call the MBRP a strong three out of five on my one to five or one to wake-the-neighbor scale. I'm getting a deeper tone overall compared to the stock system, one that's certainly more audible outside of the car compared to inside, basically, meaning there really isn't a ton of interior noise or drone to speak of, which I always think is a good thing to point out. Responsible for that sound will be a couple of things here. We got the twin MBRP chambered mufflers working with the factory cats. Those do remain in place with the MBRP install. Now, these mufflers are fully stamped, fully welded, and they do feature internal baffling but no packing or anything like that. That's really going to change the sound over the years.Now, this particular system working with these mufflers will be the high flow X-pipe that is going to help contribute to a powerful tone under full acceleration and then one that picks up I think just a small amount of rasp when you're really hammering on the car, especially in that upper RPM range. Piping is all gonna be 2.5-inch mandrel bent, as you guys can see right here, and then, of course, does lead through the X-pipe, through those chambered mufflers that we've already talked about, before all exiting out the quad, 3.5-inch polished tips, and ones that do look really good underneath the rear bumper.Now, speaking of the price point, guys, again, I do want to go back and talk about why this system is so affordable overall, and that is due to the aluminized steel build. Typically, aluminized steel is used on more budget-friendly applications such as this. Now, the only downside to aluminized steel is that it's not exactly the most corrosion-resistant material, especially when we're talking about comparing it to stainless steel, and as such, the Installer system here with the aluminized steel will only get backed by a three-year warranty. Now, if for whatever reason you want that full stainless steel build along with a corresponding lifetime warranty, maybe live in a salty or snowy area. Well, MBRP does offer their Pro Series system, which is going to be identical to this, basically, throughout in regards to design and sound but basically replace all of that aluminized steel that you see here with a far more durable premium 304-grade stainless steel, and that system can be found here on the site as well, but it's going to be nearly double the cost of the aluminized steel at around 1,100 bucks total.But now, we want to shift gears and talk about the install, and site's gonna call this a two-out-of-three-wrench job on the difficulty meter, maybe an hour or a little bit more to get in place depending on how fast you like to work. As far as tools are concerned, well, jack and jack stand or a lift are needed to get underneath the car, of course, and at that point, a basic socket set should get you through the rest of the job. But to give you a better idea of just how things will go down on your 3.6 at home, check out this detailed walkthrough provided by an AM customer now.Man 1: What's up, guys? Today, we're gonna be doing an exhaust on a 2019 Dodge Challenger SXT V6.All right. So now we're underneath the car, we're gonna try and get these bolts off. Give a little spritz, just try and get that off. See, this is one you need, the extension pipe. Now, we got that free. So once that comes free, I'm gonna start taking... Okay. Clamps are loose and free. Okay. So now, we're gonna go back to the back and start pulling the other clamps off.Working with a 13-millimeter wrench, box end, you could use a ratcheting one if you have one, and we're loosening. There are two bolts, one that holds this bracket up here and another one that holds this pipe. We're gonna take those bolts and brackets down so that we can get the rubber hangers off the pipe easier out from underneath the car instead of struggling underneath the car with it. And we'll put the hangers back up once we get it down. Luckily, on this car, these are pretty clean and not corroded, so they came...they freed up very easily. And there's not a lot of room to work here with a socket, so we had to use a wrench. And this is almost out. There's one bolt. Now, we'll move over to the driver's side and get that one out.Okay. So what we did is we got another jack, we put it in the middle of the exhaust to keep the exhaust up while we take the bolts and everything and hangers down to make it a little safer and a little easier to take it out later.And another good thing to have is a bucket for all your bolts and your tools. A little bolt bucket is nice to have so you don't lose all your stuff.You won't want to lose your stuff. Checking to make sure the hardware are the same, you know which ones go where later on. This guy has, like, a bullet head, and he's for the rear bracket on the muffler. The ones I pulled off for the brackets just behind the catalytic converters are threaded higher up. So you want to make sure your hardware...differences in your hardware so you don't mix them up later on putting them back in.And this one is identical to the last one, so I'm gonna have it two for two. Okay. That's the passenger's side.And we're gonna do the exact same thing on the driver's side.Smart. Since we have the equipment, I'm using an impact to make it quicker to get the bolts out. And like I said, these weren't too rusted so they came out relatively easy and loosened up. That's the one behind the muffler. There's no surprises on that clip. And the last one.Okay. What I've learned is, if you took the bolts out of the clips hanger brackets behind the catalytic converters and besides being bolted on, just a little pinch on the bracket that helps hold them on or alleviates the tension, the downward force. So you have to lift the muffler up for that to come off. I got this side off and the factory, put a strap around the bushing, which you'll see again later. Now, this driver's side is off, and now I have to wiggle my way to the passenger's side and get that side off.Okay. Now, I'm using my left knee since, in how I'm situated, to hold up the muffler for this bracket, take the tension off of it, and I just kind of lift the bracket up, and it comes off with a little pinch. And it's free so now it can hang lightly. And these are very heavy. They're good over 60 pounds apiece. So just beware. I'm glad we have the jack there at least. The system is loose and ready to start to work its way free from the motor end.Okay. Since the exhaust system is so heavy, I'm gonna disconnect this driver's side portion of it so we don't have so much weight to have to deal with trying to break the connection off the pipes coming off the motor. So I'm going to spray the hard bolts with some lubricating oil, which probably they'll come free quickly and easily because the car is still clean and new. But if you're old and rusted, then you definitely have some problems. Make sure I'm on reverse. And this end is 12...looks like 12-millimeter. Although my eyes are a little off, it could be 13.Okay. So now, we're taking that piece off that we got unscrewed, and it was a 13-millimeter socket to get that off. So now, we're just trying to wiggle that part.Oh, you know what, Joe, push it back on, then get it down below the bumper and everything.All right, it's good.Man 2: And then we come out.It's caught on the plastic piece. There we go. And there we go. Now, this whole piece right here is now free.We decided to take, alleviate some of the weight. So I'm going to cut the muffler off at this point here. I decided to take this cut here just in case we ran into problems with the newer system and the old system had to go back in, we could put a coupling on this. It's a straight run, so just in case. Better to be safe than sorry. So we added a tool, Sawzall, with a metal cutting blade. Cut the pipe. And here we go.All right. Now, I'm going to move up to this point behind the catalytic converters, I guess. With a sledgehammer, I'm going to try and drive these pipes out towards the rear of the car from the connections from the wide pipes coming off the motor. And I'll leave the jack underneath these to support the weight so that'll be less tension on that connection. I put a block of wood here to use as cushion so I can try and drive the pipes towards the rear of the car. And they are free, I think. Yeah, they came free. Just a little more. They're out. All is good.Now, we got to take all these straps off, put a little lubrication in there. And we're just going to pull these.Hang on, back up. Don't wanna hit the car.So this is the one hanger. And then once we just attach this, we're going to put it right directly on where it goes on for the other one. So we got that one off that's gonna go right onto this hanger right there. Okay. So this is what it looks like now with all the hanger back on from factory to now. These are all the hanger brackets. Now, this hanger bracket has a little wire right here that has to get...it's already on here so it's got to get clamped back on to the new one. So the new hanger has to have this ground wire onto here. That's important to keep that, take that off the stock, and make sure you put it back onto here.All right. We're starting with the X connection here. This end here, the pipes are perforated so that you can squeeze them together when you put the clamps on them. And this end goes to the motor end, and these pipes coming down from the motor will slide into these pipes' flow of air. So make sure you put your clamps on. Also, before you put your clamps on, make sure that you have your nut ends sticking out on each side, something like that, so that you'll be able to get your ratchet on. If you turn them the other way, then you'll be working with a box end, be very unhelpful. So we put our clamps on, making sure that our nuts...we can get the socket on, as you can see that. And we'll just slide right up and on there. Wiggle it up into place. And they're on. You can see, I went as far as the old existing system went on the pipe, so we know we're up. And slide your clamps down to the end. And you're ready. Get it in place.All right. What I did was, this back, the bolt wasn't staying in place so I took a pair of channel locks, put a little pressure on it, held it in place, put the impact on it, and squeezed it to snug it up, and that solved the problem. So now I'm able to snug up the strap and move on, which I did.Okay. Moving down the line, I have my next muffler. Again, these ends are 2.5, so make sure you find your 2.5-inch clamps, and as I mentioned, if you can see that, that 2.5 on the clamp, so that tells you it's a 2.5-inch clamp. Now, the mufflers, as you can tell, one outlet is offset where the other end is straight out. The offset is going up to this X connection and the straight down the middle go out the back of the car. And again, making sure that you put your bolt facing outward so you can get your equipment on there to tighten it up. And it just slides on there like that. I grab my impact, all discombobulated. I think I'll move on to the next step before I tighten that up. I'll get the next pipe on and the clamp to hold it, and then I can come back and tighten that up. So let's move on to that next.All right. This bracket just in front of the rear tire, I'm going to put this up first so it gives me more room to work with the wrench to tighten it up. And there's a little clip, the bracket, the bottom of the bracket has the receiver end from the car, it's turned up. So you can just...it'll hang by itself as well. So we'll just put the nut in there, get it started, thread it up. And what you can do to help get the hanger, you can spray the hanger with a little WD-40, and it'll slide right in. It'll evaporate so it won't give you any problems later on.So I put the bracket up first, then put the pipe in to the bracket so I have room to work with the wrench tightening up that bolt that holds the bracket to the car. That was a 13-millimeter, and I snugged it up, not to over tighten it or break it. Just get it good and snug. So now, we've got the next section of pipe in to just behind the rear axle. And now, from here, we test fitted the last section of pipe, and everything seems to line up nicely for this section. So I am going to snug up my clamp just in front of the muffler.Got it. Make sure it's snug. Okay. Now, we're gonna do the back of the muffler. Again, now, the back of the muffler is the 2.5-inch clamp, and again, you'll find the marking for that clamp on the side of the clamp. So at this point, this clamp I have facing down. It doesn't really matter if it's down or horizontal, as long as you can get your equipment on it. And now, I'm just kind of wishing I had a third arm and a shortened torso. Let's get my clamp piece all in alignment. Am I clamping the proper spare?Okay. Now, working my way down to the last section pipe, twist it on, slide it into place, line up my hanger brackets to the body of the car. Now, the hanger brackets have little tails on them so that they hook into the bottom of the car. It can't slide. And we're working with 13-millimeter socket. Start my bolt by hand so I know that it's not threaded. Got that one started, now move to the very rear bracket. Get that one started.Just want to make sure you see the bolt. You can see how it's not threaded. There's four of these. These are for the rear brackets on the very tail of the last two pieces of pipe.Okay. Last connection on this pipe is just behind the rear tire. You've got your 2.5-inch clamp, make sure that you're covering that little keyway, and tighten them up.There we go.Okay. We're gonna set this bracket first. Here's our bolt, and as you can see, it's not as far or rounded as the other ones, so just so you don't confuse the bolts. And again, this, the bottom of this bracket, is a little hook, which it hangs on. Set it up there, and we get the bolt started by hand. There's not a lot of room up here to work. You could use a socket on this one, but it's pretty tight. The bolt goes in pretty easily, so I can hand tighten it and then just snug it up with the 13-millimeter box-end wrench once I get it as far as I can go by hand.Okay. That one's up. Now, we'll move on to installing the next muffler and pipe down the line. So we're gonna put on the driver's side now using the offset goes towards the motor and then pipe coming out the center going towards the rear of the car. Your 2.5-inch pipe clamp, and again, make sure your nut is facing in a good direction that you can get your equipment on to tighten it up. Put it up, align it up with the other one so it's nicey nice. Get my impact on it.Okay. Again, we put some lubricating oil on the end of the bracket so we can start it onto the rubber hanger. And, boom, move right on. And then we slide, move our pipes around, get this one to slide into the muffler. And again, 2.5-inch clamp. We put the bolt facing downward so we can get our equipment on the end of it. We get that one. Starting this down.Two-and-a-half-inch clamp, again, positioning is important. Make sure you can figure out which way is going to work best for you. For me, I put the clamp buckle facing on the rear tire side, facing downwards, so I can get my equipment up and it won't be hitting into the body. I have my two bolts for the brackets. As you can tell, they're long-ended. These, I know, go up holding these brackets into the bottom of the car. And again, you can see the bracket has this little tail. As I was talking about before, there's a little notch for them, so you know they line up.Put the back one up first, get the bolt hand started. Get the next one in place.Changing over from 13-millimeter for the rear bolts to 15-millimeter for the pipe clamps.Is it 45 foot-pounds?Man 1: Yep.Man 2: Here we go, folks, 45 foot-pounds. And that one, just that one. We're going to move on to another one because that one's being stubborn.Man 1: So each one has to go 45 pounds of torque pressure, and you have to do it each...each bracket has to be that way.So you have to take your time and go to each single bracket and put in 45 pounds.Justin: So if you're looking to give your 3.6 some more bark for not a ton of dough, well, then check out the Installer Series cat-back from MBRP right here at americanmuscle.com.

      Product Information

      Features, Description, Reviews, Q&A, Specs & Installation

      Features & Specs

      • Improved Horsepower and Torque
      • Aggressive Muscle Car Sound
      • Ensures Lower Exhaust Gas Temperatures
      • Increased Throttle Response
      • Crafted from Premium Aluminized Steel
      • Polished Finish Exhaust Tips
      • 2.50-Inch Tubing
      • Dual Rear Exit
      • Resistant to Rust and Corrosion
      • Bolt-On Design
      • Utilizes OEM Hangers
      • Medium Installation
      • Three-Year Limited Warranty
      • Fits All 2015-2023 Dodge Challenger 3.6L Models

      Description

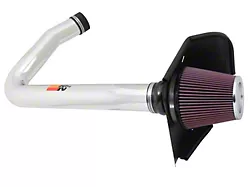
      Muscle Car Sound. If you’re looking for an exhaust that will deliver big on true muscle car resonance, look no further than the MBRP Installer Series Cat-Back Exhaust. Engineered to lower exhaust gas temperatures, this exhaust is guaranteed to make an impact on your Challenger’s performance.

      Superior Performance. Designed to give your vehicle a boost in attitude, this cutting-edge design improves your torque, horsepower, and increases your throttle response. Precision-built for manufacturing excellence, this design also minimizes backpressure for a smooth performance.

      Unmatched Construction. Manufactured from a premium aluminized steel, this product boasts 2.50-inch tubing with a dual real exit. Featuring quad, polished tips, this MBRP Installer Series exhaust is sure to please. Highlighting a brilliant, polished finish, you won’t have to worry about rust or corrosion causing unwanted damage.

      Installation. This bolt-on design comes with OEM hangers and can be installed with common garage tools in approximately 1 hour. No modifications or cutting are required.

      Warranty. A 3-year limited warranty is provided to cover any defect found in the materials or workmanship due to faulty manufacturing.

      Application. The MBRP Installer Series Cat-Back Exhaust is designed to accommodate all 2015-2023 Dodge Challenger 3.6L models.

      Fitment:

      Details

      MBRP S7111AL

      CA Residents: WARNING: Cancer and Reproductive Harm - www.P65Warnings.ca.gov

      Installation & What's in the Box

      Installation Info

      What's in the Box

      • (1) Cat-Back Exhaust
      • Installation Hardware
      4.8

      Customer Reviews (500+)

        Questions & Answers

        10 More Questions

        Will It Fit My Challenger

        • GT - 17, 18, 19, 20, 21, 22, 23
        • SXT - 15, 16, 17, 18, 19, 20, 21, 22, 23
        • SXT Plus - 15, 16, 17, 18