Installation Time
(approx) 20 Minutes
Difficulty Level:
Simple installation for anyone.
FREE 2 or 3-Day Delivery on 10,000+ Items. Details
$535.99 (each)
FREE Shipping Market Price $597.99 You Save 10% ($62.00)Saved - View your saved items
We're sorry. We couldn't save this product at this time.
or use
Justin: If you're looking for a modern and aggressive tail light for your 2010 through 2012 Mustang at home, then you might want to consider the Smoked Light Bar LED Tail Lights that we have here today. Now, these particular options will deliver that modern S550 look, thanks to the smoked tri-bar design and they will also feature a full LED operation while still maintaining that iconic sequential functionality. Price point's going to hover in that mid to high $500 range, while the direct swap plug-and-play job really couldn't get much easier. So, figure soft one out of three wrenches on the difficulty meter and maybe 20 minutes of your time to complete from start to finish.All right guys, so at first glance, the light bar LED tails that we have here resemble part S550 tail light and part Raxiom Aero tail light, with the detail here on the bottom. If you're not familiar with those, definitely check them out, you'll, kind of, see where I'm coming from. Now, the end result is a very sharp-looking tail light that will pack the aggressiveness, if you will, of a smoked light, but again, with the modern amenities like that full LED operation. Now, I really dig how the light bar LED tail lights here do maintain that sequential functionality for your 2010 through 2012 turn signals and hazards, and that LED treatment has also made its way to the reverse lights down here in this section, which is done in a clean manner. And you're also given some little detail down here below this tri-bar design.But outside of the operation, guys, you are looking at a really nice construction here, smoked polycarbonate lenses around the tri-bar treatment here. Everything's been installed or housed in a durable ABS Surround, and then you have been given, kind of, the gloss look for most of the lens itself, which you're going to feel great with a color-matched decklid or if you've switched the decklid panel on your S197 to something, maybe like a black option, it'll certainly flow well with that as well. Now, finally guys, the lights are backed by a limited warranty just in case you happen to run into any issues.But now, we want to shift gears and get into the install portion of the video. And again, very straightforward job here, guys, even with all of the modern LEDs, everything is still going to be completely plug-and-play. So, to give you a better idea of just how things will go down, feel free to check out our detailed walkthrough and tool breakdown now.Man: Tools required for this installation: clip removal tool, 1/4-inch drive ratchet, 11-millimeter socket.First thing we're going to do once we get our trunk lid open, we're going to remove our two nuts here that hold the top of the panel off. Ours are actually missing. So, they're out. Then you're going to have two clips down in here. We're going to take our clip tool, pop our two clips out there, reach under here, pry up our Christmas clips, and we can lay this back inside the trunk. You can disconnect your light if you want, so it don't drain the battery. For our case here, I'm going to do that so we don't drain the battery down. Now, we're going to remove the three nuts on both sides of the tail lights to pull our tail lights out. Now, we're going to remove our three 11-millimeter nuts that hold tail light on.And we've got our three nuts loose, we're going to disconnect our wiring harness and push it through the grommet. Now, we're going to remove our tail light, should just come right out. And we're going to repeat the same procedure on the other side. Now, we're going to start installing our new tail light. We're going to take our wiring harness, push it through the hole, and then push our grommet into place. And once we have our grommet in, then we're just going to slide our tail light back up in. You'll feel it slide into the holes.Now, we'll want to install our nuts on the backside, tighten them up. And then put our connector in, and then put our plastic shield back on. Now, we'll install our three nuts. I'm going to get them started, then I'll tighten them up. Now that we've got our three nuts installed, we'll hook our connector up here, that's in place, put our cloth material back in. Now, you're going to want to repeat this same procedure on the other side and then we'll stick our plastic trunk panel back in.Now that we have both tail lights in, we're going to reinstall our trunk light, reinstall our panel, put our plastic clips back in. Now, if you have the nuts that go up top here, we would put them in, tighten it up, and our installation of our new tail lights is finished.That wraps up our review and install of our Light Bar Sequential Turn Signal LED Tail Lights, Black Housing, Smoked Lens for '10 to '12 Mustangs. Thanks for watching. And for all things Mustang, keep it right here at americanmuscle.com.
Subscribe to our YouTube Channel
Features, Description, Reviews, Q&A, Specs & Installation
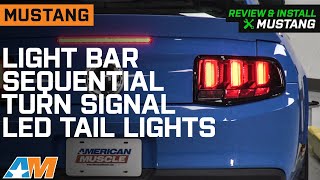
Quality Lighting Upgrade. Keep those dark trails illuminated with the Light Bar Sequential Turn Signal LED Tail Lights; Smoked. This LED taillight includes a smoky finish for a rugged appearance and a sequential turn signal for road safety.
Plug and Play. This unit is designed as a direct, plug-and-play installation without the need for modifications.
Warranty. This product is protected by a limited warranty, which protects against defects in materials and workmanship from the manufacturer. The manufacturer accepts no responsibility for lack of maintenance or improper use.
Installation. It takes no more than 20 minutes to install this product if you have moderate to expert level mechanical skills.
Application. Light Bar Sequential Turn Signal LED Tail Lights; Smoked is compatible with the 2010-2012 Ford Mustang.
Fitment:
CA Residents: WARNING: Cancer and Reproductive Harm - www.P65Warnings.ca.gov
Installation Info
Installation Time
(approx) 20 Minutes
Difficulty Level:
Simple installation for anyone.
What's in the Box
10 More Questions