FREE 1 to 3-Day Delivery on Orders $149+ Details
How to install a Pypes Off-Road X-pipe on your Mustang
Installation
XFM10/XFM30: 79-86 LX, 87-95 GT (79-86 owners require a dual hump cross-member)
XFM13/XFM33: 96-98 GT
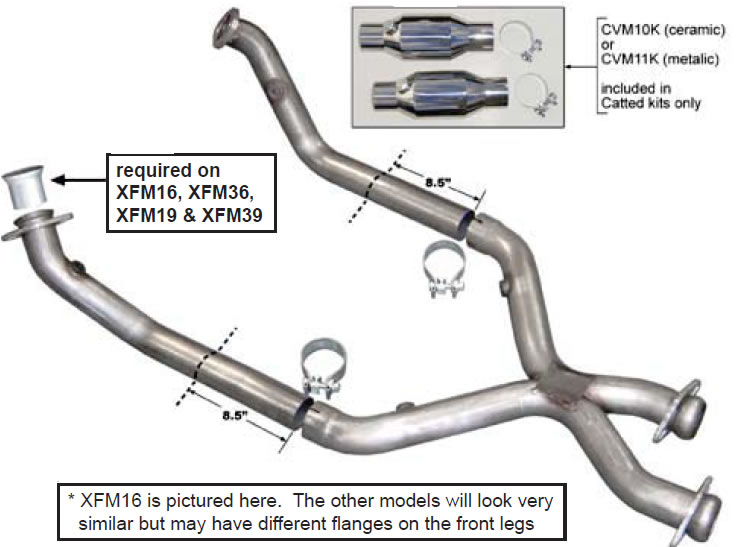
XFM16/XFM36: 99-04 GT
XFM19/XFM39: 96-04 V6 (GT style cat-back and 24” o2 extenders are required)
Thanks again for purchasing your new 409 stainless steel Pypes Performance Exhaust Ford Mustang off-road or street legal xpipe. Please be sure to confirm all the components in the kit were received in your shipment before beginning installation. All kits will include your new x-pipe with 02 bungs, installation hardware, and header sleeves (if required). If you purchased a street legal version, you should have also received a CVM10K or CVM11K cat kit. If you purchased XFM16, you received (1) small sleeve for the drivers side leg. If you purchased XFM19, both mounting points at the headers require the (2) small sleeves supplied. If you find any component missing, please contact our office at 800-421-3890 for replacement. Installation of this kit will require a few simple hand tools, a cutting device and penetrating oil. For a quicker and tighter installation, air tools are recommended. Technical assistance is available both online at www.pypesexhaust.com or 800-421-3890.
XFM10/ XFM13/ XFM16/ XFM19
1. Begin by disconnecting your negative cable from your battery, as you will be disconnecting some electrical components. Place the vehicle on a lift or (4) jack stands at maximum height. This will aid in an easier installation. Note: Make sure to support your catback just past the connection point between the factory h-pipe.
2. Unbolt the factory h-pipe from your cat-back. Soaking your factory mounting points with penetrating oil will allow for easier removal. Next, disconnect your 02 sensors from the factory wiring harness and remove them from the h-pipe using a 22mm wrench. Remove the bolts at the manifold/header end. Be careful, as old or rusty parts tend to break easily. On the 96-04 GT, the passenger side header has a thin metal gasket which can be reused if not damaged. Any slight mark or bend in the metal will cause a leak at the header. A new gasket can be purchased from your local Ford Dealer.
3. Begin by installing the driver and passenger side down-pipes/front legs ( Street legal versions using cats will require 8-1/2” to be cut off the down-pipes legs, further instructions below), snug the bolts but do not tighten. Note: 96-04 GT owners, make sure to install the metal gasket on the solid flange and the sleeve (99-04 GT) in the driver side leg. A small amount of RTV silicone will help hold the gasket in place. Note: V6 owners, make sure both legs closest to the header connection have the small sleeves installed.
4. Next, install the x-pipe portion. Position the ball portion so that the long leg is on the driver side and the short leg is on the passenger side. Slide the (2) HVC21 band clamps on to the front legs of the x-pipe.
Now, slide the x-pipe on to the driver and passenger down-pipes matching the ball ends to the cat-back. Re-install the factory cat-back hardware and snug tight. If hardware is necessary, you can purchase an HVC35 kit or 3/8-16 x 2-1/2” bolts, nuts and washers from a local hardware store.
5. Supporting or jacking up on the center of the x-pipe will aid in the system having the most possible ground clearance. Finish by tightening all the hardware and then the (2) clamps, making sure the x-pipe is adjusted properly. Last, install all the 02 sensors and connect the wiring to the factory harness. Note: 96-04 owners should consider MIL Eliminators to insure proper computer and 02 sensor operation. 04 owners will require 24” 02 extenders.
6. After all the connections are tight, start the engine. Check and listen for any leaks. Make sure to check your connections periodically as they may come loose.
XFM30/ XFM33/ XFM36/ XFM39
These 49 state street legal versions will follow the same instructions as above aside from two cuts in the down-pipes, the installation of the cats and (2) additional HVC21 band clamps. These additional instructions happen between steps 3&4 above. You will need to cut 9-1/2 inches off the back of the two down-pipes before installation. Next, install the clamps on the expanded/slotted end of the cat. Make sure the O2 sensor plugs are tight on the cats. 04 GT owners can use the cats 02 sensors and plug the ones in the x-pipe.
Finish the install by sliding the cats on to the down-pipe legs and the x-pipe into the back of the cats.
*** Federal laws prohibit the use of XFM23 for street use.
Check with local and state authorities for the legal use of XFM26 and XFM23.