FREE 2 or 3-Day Delivery on Orders $119+ Details

Talk to a Challenger Enthusiast
1-877-887-1105
M-F 8:30A-11P, Sat-Sun 8:30A-9P
Win $3,000 in Store Credit! Enter Daily >

Pypes Pype-Bomb Axle-Back Exhaust (15-23 6.2L HEMI, 6.4L HEMI Challenger)

Item CH3736
Call a Challenger Enthusiast at 1-877-887-1105
M-F 8:30A-11P, Sat-Sun 8:30A-9P
$0.00
Our Price

$198.75 (kit)

FREE Shipping Market Price $228.56 You Save 13% ($29.81)

Will this fit your Vehicle?

Select a different vehicle Help?
Update or Change Vehicle
Ship to: Ashburn - 20149
Sorry, please enter a valid US or CA postal code
We're sorry, zip can't be updated at this time.
Recommended Install Shops
How It Works

Add Local Shop Installation

Install Shops are available near Ashburn - 20149
Total cost of service $229.00
    Create a list
    Add to New List

    Saved - View your saved items

    We're sorry. We couldn't save this product at this time.

    or use

      Video Review & Installation

      Jake: Jake here for americanmuscle.com. And today, I'm taking a look at the Pypes Performance Exhaust Pype-Bomb Axle-Back for 2015 and newer 6.2 and 6.4-liter Hemi Challengers. If you're looking to get a lot more sound out of your 6.2 or 6.4-liter Hemi without spending a lot of money, then this Pype-Bomb Axle-Back setup is going to be just your speed. This is essentially a resonator delete. So, it's designed to take the place of the large resonators at the back of your Challenger's stock exhaust, and it basically becomes a straight pipe from the axel-back. So, if you want to bring on the noise, this is your setup. On our loudness meter, these are going to be a five out of five. As you heard from the clips in the beginning of the video, these really wake up the sound of the 6.2 and 6.4-liter Hemis. It might also wake up your neighbors, so, fair warning on that one. However, you are gonna get that awesome, aggressive, loud muscle car sound, something befitting the pedigree of the Hemi engines.Now, as with most resonator or muffler deletes, you should expect a bit of drone in the cabinet as well, especially when cruising, since that's when the MDS or cylinder deactivation system is going to kick in. However, if you like the noise, then a little drone is probably not going to bother you too much. Now, these pipes are designed to use your stock exhaust tips, and your stock exhaust hanger locations. So, the whole thing is going to appear stock, though the sound will be anything but. Now, the pipes themselves are made from 3-inch mandrel bent 409 grade stainless tubing, so they're going to provide good exhaust flow for the gases, as well as some decent rust and corrosion resistance, though not quite as much resistance as something made from T-304 stainless.However, you're also not paying a whole lot for these. Coming in at around $250, this is about the least expensive option you have as far as axle-back exhaust go for these cars. And you're still getting a good quality item with integrated exhaust hangers, these fantastic looking welds, which you probably can't see too well on camera. And if you're looking for more volume and more noise on a budget, this is going to be the right setup for you. Now, as far as install goes, these will get a two out of three on our difficulty meter, and it will probably take you around two hours to get everything squared away. Now, there's one particular reason for that rating and the time, and that's because you're only replacing a small section of the exhaust, so you will have to make a cut on each side of your stock exhaust in order to remove those resonators from the car.However, once you get that done, simply clamp these new pipes on, and clamp down your stock tips using the included clips in the package. And this is certainly a job that you can accomplish at home in your driveway or garage. Just make sure you've got a tape measure and a good saw handy. And now to show you just how that process goes, let's throw it over to one of our AM customers who's going to install these on their own Challenger.Male: All right, so this is going to be a little explanation of the tools that I had to use today. So, the main tool is obviously your Sawzall here. You need to make sure that you have a metal blade. There are different types of blades. There's ones for cutting wood and ones for cutting metal. So, the way you can tell the difference is your metal blade has very fine teeth on it. They're not very big. Nice and short. I mean, it's a metal blade. So, make sure you have a metal blade for your Sawzall. Then you need some sort of marking tool. Sharpie works well, doesn't come off. Then this is just a deburring tool to deburr the inside of the pipe, and preferably the outside, but this will not work very good for the outside. You would want to file. I didn't really worry about the outside just because there's no...and the pipe slid perfectly fine over it. So, I would just use something like this to deburr the inside. It's got some sort of little hook on the end there that is made for deburring pipes.And the next set of tools is you're going to need a socket. This is a 3/8 inch socket wrench. Then you're going to need a half-inch socket, preferably a short one. Works pretty well. And then you're going to need a 15-millimeter short socket. And then you're going to also need a 15-millimeter deep well socket. The half-inch is used for taking out the hangers, and the loosening the clamps on your exhaust tips. The 15-millimeter is for tightening the exhaust clamp that clamps the new exhaust to your existing exhaust. Also, you're gonna need the 15-millimeter depot for that as well, as when you're tightening it on, the short socket will run out room, and you'll eventually start stripping the end of your nut for them exhaust clamps. So, you're gonna want this to at least finish it. This works pretty well to get it started because then you're not using something super long, and helps get it started. And then to finish it, I would recommend using this so you can get it nice and tight.And then this is also, like I said, used to remove the hangers from your car, which that's kind of an option. But for me personally, it made the install a lot easier, actually just removing the hanger itself from the car. But it is also used for the new exhaust tip clamp. Then you're gonna want maybe some sort of pair of gloves. It definitely helps, especially if you just drove your car and your exhaust is hot. That's nice for this, but it's also nice because the end of your exhaust is going to be sharp, so you don't want to cut your fingers. I mainly use them just because of how cold it was today.And then this is kind of an option, I only used the hammer for removing the exhaust tips, just because they were a little corroded on there. And just tapping the pipe, not the actual exhaust tip, helped break the corrosion and free up my exhaust tips. So, this is going to be kind of dependent on whether your exhaust tips are actually corroded onto the pipe or not. If they're not, then this...your hammer, you probably won't need it. They should just come off by being able to wiggle them off with your hands, or maybe just tapping them with your hand, tapping the exhaust tip. But yeah, that is a little simple rundown of the tools that you need to do this. It's really not a bunch of crazy special tools. Pretty much simple tools that most people should have.So, the first thing we need to do is go under the car and mark where we are going to cut off the factory exhaust. So, per the instructions, it wants us to cut it right after the active exhaust valve, which is this here. So, we're going to cut it off just before the bend of our factory exhaust after the exhaust valve. Okay. And that will be just mirrored onto the other side as well. All right, I don't have the other side marked out yet, but when I do, I will show you. But I'm going to start by cutting off the passenger side. For this I'll be using a Sawzall with a metal blade.Now, all we need to do is slide the old factory exhaust out of the grommet that's up here. So, there is one bolt up here alongside the exhaust. So, right there. When we take that guy out, that'll release all of this stuff, which will allow me to pull that out because we're going to reuse that with...when we install the pipes and all the stuff. Now, be careful too, because once this bolt comes out, it's gonna fall. So, try not to be under it. Or this might be a good spot to have somebody help you to catch it when it falls. There it goes. See that? Pulled out all of this, and it's got a big knob on the end. So, that's why it's kind of a pain in the butt to get it out. So, we'll deal with that in a little bit here. Let's do the other side first.We're going to come in here. We're gonna mark just before the bend again, like we did on the other side. Doesn't need to be perfectly straight, but as straight as you can. There we go. That number two cut off. Another tool that could potentially be useful is use an impact wrench with a socket adapter to get this out if you can snag it in there. Same thing as the other side. Big knob on the end. You got to pry it out of there. Okay, that was a lot easier for some reason. Let's just wiggle it back and forth while you're pulling it and it'll come off. So, I don't know if you guys could see very well with the last one, but what I did is kind of rested my leg on the muffler, and used the end of the exhaust tip, and just kind of wiggled it left and right. And that seemed to get it to come off. See, just like that.So, one thing before we actually put the exhaust in after cutting it, there's going to be a bunch of burrs on the inside here. So, I'm going to use this. This is called a deburring tool. You can find them in your Home Depot stores, or any hardware stores. They should be in the plumbing section. So, what it does is it goes on the inside, and it scrapes the burr off. Then you end up with nice clean inside. And that's the main one that we're worried about, is the inside. Okay. On this, it'll little slide right over your factory exhaust. I am going to put this on the exhaust. And then we'll bring the exhaust up in the place, and get that bracket back where it's supposed to be, like that. All right. So, now, I've got the bracket back in the car with the exhaust pipes through it. And then I'm just gonna crank it back up into place. Perfect.All right. So, that is done. Now, we need to go up and tighten the actual exhaust clamp up front here. And personally, what I would do is make sure that you're not past the end of the new pipe, which is this here, and keep it to the side, because you don't want this to scrape on the ground by chance or anything like that. And this is also...these clamps use a 15-millimeter bolt. So, what I would do is take a clamp, tight it up nice and tight, up to the top. Make sure that you are close to the end of your pipe because as you're tightening this, it is actually going to clamp the end of the pipe. That's why there's those little cutouts in it. So, make sure you're as close to the end of the pipe as you can. And you want to know what? You might want to use a deep well socket for this, as you got a bunch of stick out here. I think mine is long enough and it'll work. So, I would recommend using a deep well, 15-millimeter socket.So, we're going to finish tightening this. Perfect. That side is all done nice and tight. Now, we move on to the other side. So, what we're going to do, start by sliding this over your factory pipe. Like so. We'll slide our little clamp thing here...or I mean hanger over the end of our new exhaust. Lift that up in the place. Yep. Just like that. Then, we shall bolt it back up in place. Also, for all of the factory bolts to take the hangers out and...which I'm pretty sure you're gonna need to do, as I needed to do. I really wouldn't have been able to get the stuff out without that, is a half-inch socket. Boom. Got it in there with the hanger now. Do the same thing. Started out with my hand and make sure it's tight, because the socket doesn't like to work very well if I don't.All right, so just before it gets super tight, just kind of adjust it and get it to where you want it to. And then you can just kind of send her home. That's got to be good and tight. It's a five...or a half-inch socket to loosen these original exhaust clamps. But you need to loosen them, because they're gonna save the tips. Whereas I thought originally that they are welded on, but it seems they are not. So, I will save them and reuse them on my new exhaust. Hopefully, they line up okay. I don't know how they're gonna line up, and I don't really think there's a way I can adjust them.So, what I am doing is I am taking this clamp all the way apart, just so that I can get to the exhaust tip, because my other one was really stuck on there. And what I was doing is I went and took the bottom part of this clamp, and just kind of bent it up out of the way so that I can kind of, in a sense, shock [inaudible 00:20:00] break the exhaust tip loose because there is some rust under there. Which most people probably won't have to deal with this, but I live in Minnesota, so I do because I drove my car in the winter. Okay.So, I can get that clamp bent out of the way a little bit. And I'll just kind of hit here. I'm not hitting the exhaust tip, I'm just hitting here. And it kind of breaks a little bit of corrosion there free. You can see how I was hitting right here. I wasn't hitting the exhaust pipe. Our tip popped it free. So, if you look at this one, this is pretty straight, you can see that this kind of has a curve this way, which if you look at it from the...if you look at it from this...I guess it's kind of hard to tell. But if you look at them like this, you can kind of see one goes off to the left and one kind of goes off to the right. That's how you tell the difference between your left and your right side.All right, so let's actually put the right side on the right, and the left side on the left. So, again, see, if you put it on like this, your nut's going to be off to this side of the car, and you're not really going to have access to it. You got to make sure that you can put it over there like that, and that you've got to access. All right. Now, this should hopefully fit a little bit better than the other side did. I was kind of wondering why it looked a little funny. Yeah. That looks better. Okay. So, again. Yeah, that fits better and looks better. Now, that we've got it the right side, and we've got it where we want it, just crank it down nice and tight. Because you don't want that exhaust tip moving. I'm gonna just make sure that's nice and tight, because I don't want it falling off on the road for obvious reasons. One, I don't want to lose it, and two, I don't want to cause somebody's car damages.Okay. So, now that we're gonna move...we're gonna move to the other side. And just before I move, we're gonna do the opposite now. Now, we want that nut on that side, so that we've got more room to get our wrench in there. And again, this uses a half-inch socket and just your eyeballs. And honestly, if you don't like getting your hands dirty, I recommend wearing gloves. But then again, if you're working on the car, then you're pretty used to getting your hands dirty. So, really before you do any adjustments, I noticed that if you get your...the bolt roughly about a half inch screwed through the other side, then it kind of starts to hold itself in place a little bit better for you. So, you can kind of adjust it, and it not move so much. I'm gonna go right there. As long as it doesn't move, that will be perfect.You can see my clamp is past the hump, and it's on the little bubble from the exhaust too. So, just gonna be careful to not bump my tip. And then you're just going to send it home. I'm not going to do it all the way. I want to double check before I'm fully done just to make sure that it looks good. Get it nice and tight. Remember, you don't want this thing coming off on the highway or something. All right.Jake: That about does it for our review of the Pypes Performance Exhaust Pype-Bomb Axle-Back for 2015 and newer 6.2 and 6.4-liter Hemi Challengers. Thanks so much for watching. And for more products and videos just like this for your Challenger, be sure to stick with us right here at americanmuscle.com.

      Product Information

      Features, Description, Reviews, Q&A, Specs & Installation

      Features & Specs

      • Aggressive Exhaust Note
      • Muffler Delete Design
      • Mandrel Bent 3-Inch 409 Stainless Steel Piping
      • Reuses Factory Tips
      • Cut and Clamp Installation
      • Made in the USA
      • Fits 2015-2023 6.2L and 6.4L Dodge Challenger Models

      Description

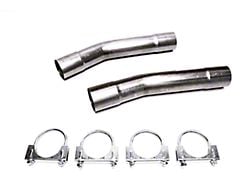
      Aggressive Sound. If your looking to wake up the sound of your Challenger and the entire neighborhood for that matter, the Pypes Pype-Bomb Axle-Back Exhaust is for you. By replacing the factory mufflers with a set of straight pipes you will add an extremely loud and aggressive exhaust note to your HEMI powered Challenger. This Muffler Delete Axle-Back won't only improve the sound of your HEMI, but it will also improve its power as well. By eliminating the restrictive stock mufflers you will increase exhaust flow for a noticeable increase in both power and performance.

      Quality Construction. Pypes manufactures their Muffler Delete Axle-Back from 409 stainless steel tubing for superior strength and long lasting corrosion resistance. Featuring mandrel bent 3.0-inch diameter tubing, this Axle-Back will dramatically out flow the stock exhaust system. This Pypes "Pype-Bomb" axle-back exhaust is designed to reuse your original factory exhaust tips.

      Cut & Clamp Installation. The installation of this Pypes Axle-Back Exhaust system will require cutting and removing the stock resonator assemblies. The new piping assemblies will install in place of the old. Clamps and instructions are provided.

      Application. This Pypes Pype-Bomb Axle-Back Exhaust fits 2015-2023 Dodge Challenger models equipped with the 6.2L or 6.4L HEMI V8 engine.

      Fitment:

      Details

      Pypes SMC31MS

      CA Residents: WARNING: Cancer and Reproductive Harm - www.P65Warnings.ca.gov

      Installation & What's in the Box

      Installation Info

      What's in the Box

      • (2) 3-Inch Tailpipes
      • Stainless Steel Clamps
      • Hangers
      4.6

      Customer Reviews (500+)

        Questions & Answers

        10 More Questions

        Will It Fit My Challenger

        • 392 Hemi Scat Pack Shaker - 16
        • R/T 392 - 17, 18
        • R/T Scat Pack - 16, 19, 20, 21, 22, 23
        • R/T Scat Pack Shaker Widebody - 21
        • R/T Scat Pack Widebody - 19, 20, 21, 22, 23
        • Scat Pack - 15
        • SRT 392 - 15, 16, 17, 18
        • SRT Demon - 18
        • SRT Hellcat - 15, 16, 17, 18, 19, 20, 21, 22, 23
        • SRT Hellcat Redeye - 19, 20, 23
        • SRT Hellcat Redeye Widebody - 19, 20, 23
        • SRT Hellcat Widebody - 18, 19, 20, 21, 22, 23
        • SRT Jailbreak - 23
        • SRT Super Stock - 20, 21, 22, 23
        • T/A 392 - 17, 18
        • T/A 392 Widebody - 21