Talk to a Mustang Sales Tech
1-877-887-1105
M-F 8:30A-11P, Sat-Sun 8:30A-9P
$20K Sweeps! 10 Chances to Win! Enter Daily >

Raxiom Icon LED Tail Lights; Black Housing; Smoked Lens (99-04 Mustang, Excluding 99-01 Cobra)

Item 100807
Verify parts fit and get product recommendations.
Mustang Sales Techs: Connect Now M-F 8:30A-11P, Sat-Sun 8:30A-9P
$0.00
Our Price

$299.99 (pair)

FREE Shipping Market Price $350.99 You Save 15% ($51.00) Up to 10% off for Military & First Responders! See Details

Open Box from $179.99

Will this fit your Vehicle?

Select a different vehicle Help?
Update or Change Vehicle
Ship to: Ashburn - 20149
Sorry, please enter a valid US or CA postal code
We're sorry, zip can't be updated at this time.
Recommended Install Shops
How It Works
Install Shops are available near Ashburn - 20149

Add Local Shop Installation

Total cost of service $125.00
    Create a list
    Add to New List

    Saved - View your saved items

    We're sorry. We couldn't save this product at this time.

    or use

    Get a $30 Prepaid Visa Card!

      Video Review & Installation

      Hey, guys. Adam here with americanmuscle.com. Today we're taking a closer look at and installing the Raxiom Icon LED Tail Lights fitting all '99 to '04 Mustangs excluding the '99 to '01 Cobra models. You should be checking these out for your New Edge if you're looking to ditch the factory traditional style tail lights to pick up something that's not only gonna modernize your rear end but give you a stealthier more aggressive look. These tail lights completely change that look by swapping out the factory traditional really outdated technology in the chrome reflective red clear lens factory lights. These are a black interior with a smoked exterior lens giving you that really dark, really stealthy look. You're also seeing the gen 5 or Coyote style tail light design as far as the tri-bar goes. In my opinion, the New Edge tail lights do look pretty good. I'm a big fan of those tail lights but we all know the Coyote tail lights from that S197 generation are arguably one of the best Mustang tail lights we've ever seen. If you're looking to get something similar but more on an LED, this is a great way to go for the older New Edge. Older New Edge does get pretty outdated so it might be time to make that switch. Inside of this is your LED technology giving you the actual tail light you see here around the tri-bar. Inside those lenses you will see your factory bulbs is what you're gonna be reusing. You'll have the tail lights light up for the inner two, turn signal is gonna be on that bottom left. You're also getting those in an LED technology as well. So, all the LEDs are a lot brighter and gonna be a lot more attractive. These do come in a pair and given that they do have the upgraded technology, you can expect a little bit of a higher price tag coming around 350 bucks. In my opinion, it isn't too bad but it is a more premium price tag rather than a factory replacement or something similar.Now, before we jump into the install, guys, know that these do work with the Raxiom sequential tail light harness. Now, if you already have that in your New Edge or if you're looking to pick that up, you'll be able to use those with the Icons you see here. We don't have them installed on our New Edge but know that the Raxiom harness, the sequential harness is compatible with these tail lights. They do come in the pair and getting them installed, you'll get one out of three wrenches on our difficulty meter to get these on. It'll take you about an hour from start to finish. You're gonna need very simple hand tools and I'll talk about that in just a second. I'm gonna walk you through every single step of the process getting these on. Just know that there's gonna be no splicing required. All of the harnesses are pre-configured for you, especially when it comes to those LEDs. So, what do you say we pop the trunk? I'll show you guys how the uninstall works and then we'll get to it.Tools used in this install include: A ratchet, 11-millimeter deep socket, a small flathead screwdriver, pair of snips, panel removal tool, and electrical tape.First step here, pop your trunk, grab a panel removal tool and we're going to remove this plastic trim by the trunk latch. Now, you can get around this by just pulling back the liner on the left and right side but you may end up cracking it. Now, to avoid that, you wanna remove this, and then the liner in one piece. So, we're gonna grab our panel tool, we're gonna pry up, and remove these push pin clips. These are pretty much Christmas tree clips. And, by pulling them back, you can see they come straight out. Get all four of them off. All right. From there, this panel comes off. Now, what we wanna do is on the top left and top right of this entire trunk liner piece, we're going to remove those clips as well. So, you can see we have one here and then the same on the other side. Pops right off. All right. It might be easier for you. If you're having trouble you can unthread it. Sometimes they're threaded in and you can pull back. All right. From here, this piece comes off in one piece. And what I like to do is just push it forward. You don't have to do too much with it. Just push a little bit forward.Now, there are four nuts we wanna remove. One here, one here, and then if we pull this down, you can see one at the top and one on the far side. Grab an 11-millimeter socket and get these off. Really once you break them loose, you can get them off by hand. You wanna set these aside to be reinstalled later. All right. Once you have all four of these off, you're gonna come back your tail light harness here. What you're gonna do is pull back and disconnect. There's a little tab there that you just need to pull back on and you pull and disconnect it. It's pretty simple. At this point, we can pull our tail light. All right. From here what you'll do is pull straight back. And you can see this is still connected. What we wanna do is disconnect the harness completely. Now, as you can see, there's a rubber grommet going through the hole. From the inside, you can really just push and also pull back on that grommet and it'll disconnect. Just like that. All right. We can set our factory one aside.All right. So, we got our factory tail light off of the driver side of our '99 GT behind me. It's on the table next to our Raxiom Icons. I wanna take you through the similarities and differences between the two and really it's all different with the exception of the construction. The factory construction is replicated here in your Raxiom, the fitment is replicated as well, but other than that, it's a complete redesign. You're going from a traditional red interior with a lot of chrome reflective insides and designs with a clear lens. You're switching that over to a black interior housing with a smoked lens. And the smoked lens gives you that nice stealthy aggressive rear-end design. And the black on the inside gets rid of some of that traditional chrome, traditional reds, and switches things up to something a little more stealthy.Now, aside from that, the actual lighting design is completely changed as well. You're getting red LED surround lights, these little bars going around each of the three tri-bar lights. Inside of that, you are reusing the factory halogen bulbs. But inside of that housing, they do look completely different. So, as far as brightness is concerned, of course, there's a smoked lens so it may not be as bright as some of the other ones out there with a clear lens but it is still DOT compliant and is still very much visible. On the backside, guys, what you're seeing here is something similar in the way the sockets will install because we're gonna transfer over those factory bulbs, they'll pop right into the three sockets you see there. Because there are LEDs, there's a little bit of extra wiring going on here but nothing you have to do at home. The wiring is already done for you, they're already connected. So, what you're gonna do is pop your bulbs over to here, the harness on the back of that will connect here, the harness on the back of that will connect to the factory harness. It's very, very simple. What we're gonna have to do next is transfer over those bulbs. So, we're gonna disconnect and in exactly the same order that they're in, we're just gonna pop them into the new housing. So, let's do that. All right. So, here as you can see, we have a black socket on the left, black in the middle, and a tanish-beige one on the right. Keep that same momentum going. We're gonna twist, twist, and twist that last one, we'll pull them out. On the bottom is another tan bulb, your reverse light. Pull that out as well. So, we're gonna slide this harness over and plug them in in that same order. Black here, twist and connect. Black in the middle, twist and connect. And finally, on the end. Because our new reverse light is built into the housing with LEDs, we have an extra socket here. Now, I don't wanna have this bulb rattling around on the inside, I also don't want it to shatter on the inside if it makes contact with any of the metal. So, what we're gonna do is just pinch and disconnect that bulb. It's okay to leave the socket open, I would just hate to see this get broken up inside the vehicle. So, once that's taking care of, guys, we're gonna transfer this on over to our vehicle.All right, guys. Now, getting to the install, you'll notice your wiring is zip tied. If you can squeeze this through that hole, definitely go for it. But I'm gonna recommend cutting the zip tie out so you can make life a little easier for you. All right, guys. So, what we're gonna do next is route our wiring to the inside. Now, what I'm gonna suggest doing is unplugging the pre-plugged in wire for your LEDs and your reverse light. Now, that plugs right here and you can use a little flathead screwdriver to pry back on each of the four corners to disconnect it. I will say it's a little bit challenging. I know I just did it. I did it beforehand. What you wanna do is use the flathead and pry up on this side, then this side, and then the other side and it disconnects there. So, take care of that. And we're gonna set this aside for a moment. This will be routed to the inside. Now, the reason I have you do this is because it won't otherwise fit through the open hole here and we really need it on that side. So, let's set this aside.The next step is to cut a slit in the grommet here in order to tuck that reverse light in. Now, we really want this to be a part of the grommet and we really need it on the inside. And if we don't plug it through the grommet, then the grommet is essentially useless. This wire is gonna push up on it and it's not gonna have a weather seal. So, what we're gonna do, I'm gonna use wire cutters and just go down this guy to cut this thing open. All right. Afterwards, we'll be able to tape it back together. All right. So, you just wanna make sure you're not cutting any of the wires on the inside. From here what we're gonna do is take the reverse light and route it in inside. We really want this to be a part of that grommet. Once you have that inside, we could take electrical tape and seal this back up.All right. From here we're gonna route the wiring straight through one at a time. Pull our grommet through and make sure it seals all the way through. Perfect. So, now the grommet is all the way through, we got all of our wires set. Before we move on to plugging things in, what's recommended and you'll see this in the instructions there, guys, that last socket that's open, it might be a good idea to just wrap electrical tape around it just to make sure no moisture gets into there. All right. Perfect. When you install your tail light, you can if you like electrical tape it to the corner here or up at the top may be recommended just to make sure it's not rattling around on the inside.All right. So, next up, the harness that we unplugged, we're gonna plug back in. So, find the one that you unplugged, we're gonna clip that together. All right. Once that seats, the factory harness is gonna plug into your new harness. Find the two that connect. And then finally, that last one is gonna plug into the factory harness that's still on the vehicle. Perfect. All right. So, now what we can do is mount our tail light. Grab those factory 11-millimeter nuts, thread those guys on my hand. All right. With all four of those tightened down by hand, grab your socket and get them nice and snug. All right. Once that's done, test out your light. Repeat for the other side. Well, guys, that's gonna wrap up my review and install for the Raxiom Icon LED Tail Lights available for the '99 to '04 Mustang excluding the '99 to '01 Cobras. These come in right around 350 bucks. You can get your pair right here at americanmuscle.com.

      Product Information

      Features, Description, Reviews, Q&A, Specs & Installation

      Features

      • Bold Iconic Styling
      • Aggressive Smoked Lenses
      • Modern LED Technology
      • Provides Additional Safety
      • Compatible with Raxiom Sequential Harnesses
      • DOT Compliant Under Compliance# QR1300191
      • Sold as a Set of Two
      • Fits All 1999 to 2004 Mustangs, Excludes 99-01 Cobra

      Description

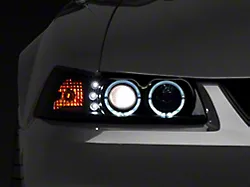
      Iconic Styling. Add the bold iconic styling of the late model Mustang to your New Edge Pony with a set of Raxiom Icon Tail Lights. These tail lights feature built-in modern LED technology that is used for both the reverse lights and running light rings to dramatically transform the appearance of your 1999-2004 Mustang.

      Modern Electronics. Raxiom Icon LED Tail Lights are manufactured using state of the art LED electronic components with a simple plug-in connector that easily inserts into the stock wiring (or Raxiom sequential) tail light harness for a simple straight forward installation.

      Additional Safety.
      The high intensity LED running light rings of these Raxion Icon Tail Lights not only look great, but they also improve your driving safety as they are much brighter than the standard factory incandescent bulbs making sure you are clearly seen at night.

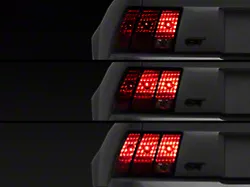
      Sequential Harness Compatible. These Raxiom Icon LED Tail Lights are designed to work with your existing Raxiom Sequential Tail Light Harness to give your New Edge Pony the high tech styling of the late model Mustangs.

      Recommended Sequential Upgrade. If you would like a slower speed for the sequence of your tail lights after you install the optional Sequential Tail Light Harness, to get that modern muscle car styling, combine the Harness with the Raxiom Turn Signal Flasher V1 (For Incandescent Bulbs) or Raxiom Turn Signal Flasher V2 (For LED Bulbs).

      DOT Compliant. Raxiom Icon LED Tail Lights not only improve the appearance of your Mustang, but they also meet or exceed the strict guidelines set forth by the U.S. Department of transportation (DOT) making them DOT compliant under compliance# QR1300191.

      Application. This set of two Raxiom Icon LED Tail Lights are specifically designed to fit 1999 to 2004 V6, GT, Bullitt, Mach 1 and 2003-2004 SVT Cobra Mustangs. They will not fit 1999-2001 SVT Cobras equipped with amber turn signals.

      Technical Note. Bulbs are not included. These tail lights reuse the stock bulbs or you can upgrade to Raxiom LED Tail Light Bulbs. Raxiom LED Tail Light Bulbs will require the use of a Raxiom Modified Turn Signal Flasher for proper operation.

      Raxiom

      Fitment:

      Details

      Raxiom 100807

      CA Residents: WARNING: Cancer and Reproductive Harm - www.P65Warnings.ca.gov

      Installation & What's in the Box

      Installation Info

      What's in the Box

      • (1) Left Hand - Driver Side Tail Light Housing
      • (1) Right Hand Passenger Side Tail Light Housing

      Tech Specs

      4.8

      Customer Reviews (420)

        Questions & Answers

        10 More Questions

        Will It Fit My Mustang

        • Bullitt - 01
        • Cobra - 03, 04
        • GT - 99, 00, 01, 02, 03, 04
        • Mach 1 - 03, 04
        • V6 - 99, 00, 01, 02, 03, 04

            Related Mustang Categories