 FREE 1 to 3-Day Delivery on Orders $149+ Details
How to Install Roush Rear Spoiler - Fastback - Unpainted on your Mustang
Tools Required
- Isopropyl Alcohol Packets or 50/50 Alcohol/Water Solution
- Drop Cloth
- Scissors
- Masking Tape
- Drill
- Drill Bits: 1/8", 5/16", 3/8", 1.0" Hole Saw,
- Deburr Tool
- Corrosion Inhibitor (Motorcraft PMP-19500-6000 Clear Topcoat recommended)
- • 1/4" Drive Ratchet
- 1/4" Extension
- 1/4" 10 mm Socket
- Round File
- Rubber Roller
- Trim Panel Remover

Shop Parts in this Guide
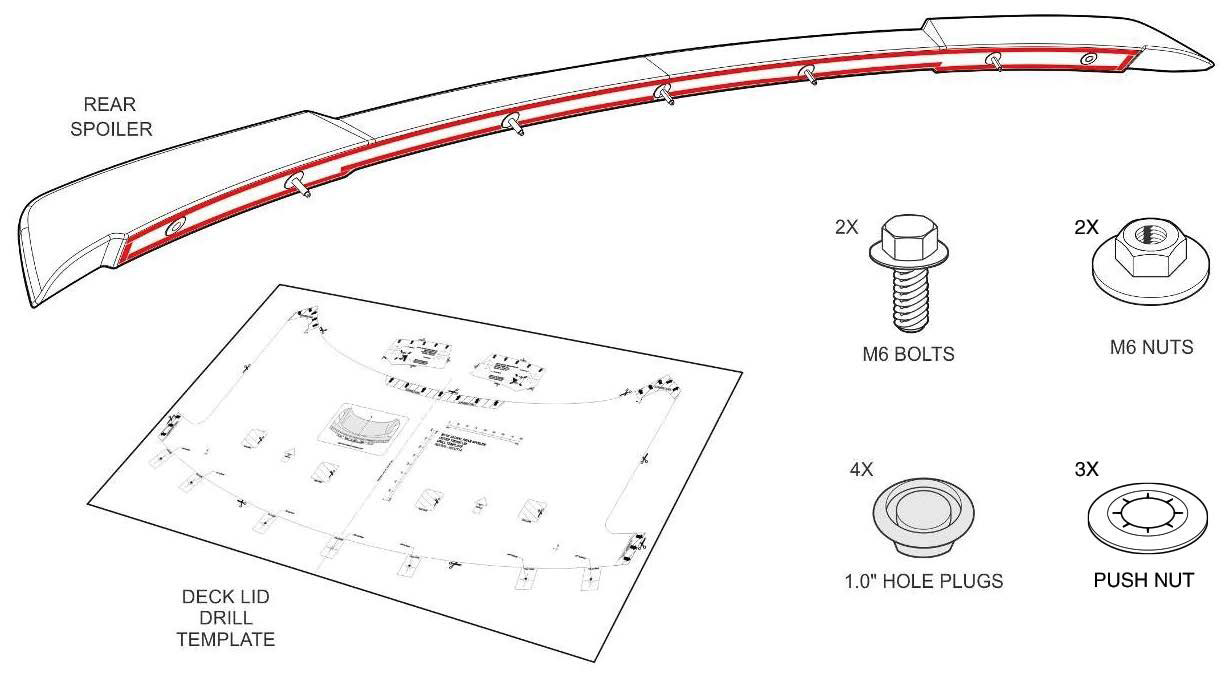
REAR SPOILER INSTALLATION
1. Make sure the vehicle’s sheet metal is clean and dry. The sheet metal should be between 61°-81°F (16°-31°C).
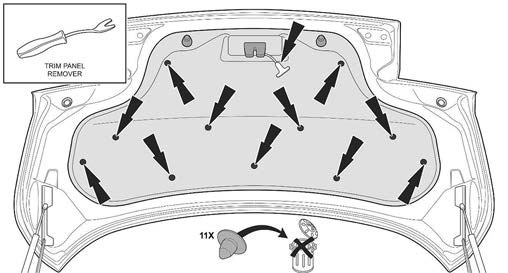
2. Open the trunk lid and remove eleven (11) plastic clips from the liner and the two (2) rubber bump stops (twist off). Remove the inner trunk lid liner and gently pull around the trunk release mechanism. Keep these items to re-install later
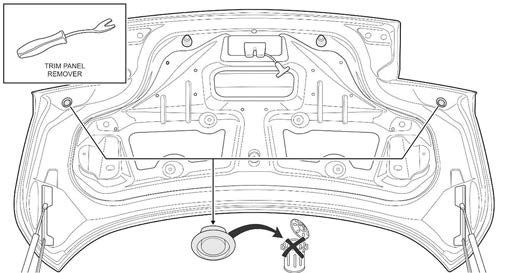
3. Remove and retain the two (2) OE rubber hole plugs, one (1) per side.
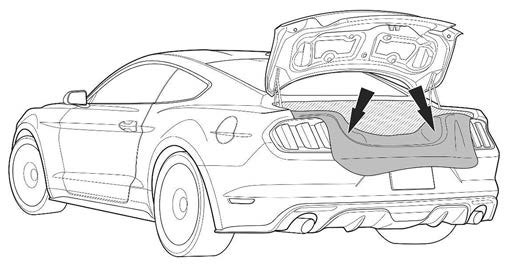
4. Place a large drop cloth into trunk luggage area underneath where you will be drilling the trunk lid.
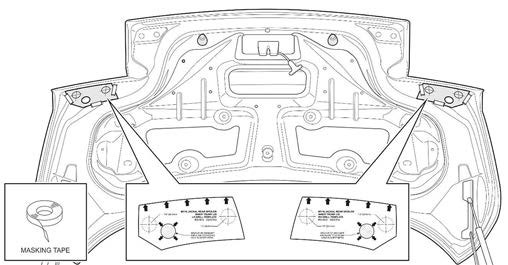
5. Carefully cut out the LH and RH inner drill templates from the larger template sheet (1315-SPLRTMPL).
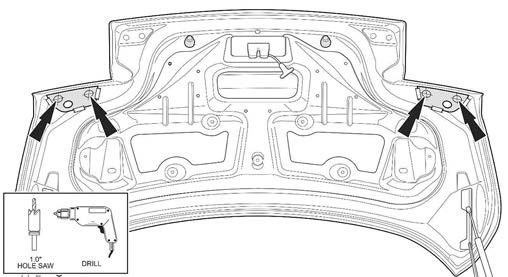
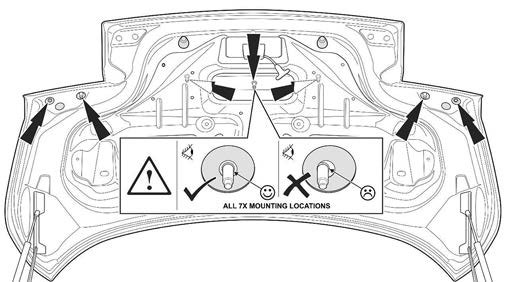
7. Create four (4) access holes in the trunk’s inner sheet metal by center punching four (4) hole locations, two (2) per side. Drill each center punched location with a 1/8" drill bit. Enlarge each 1/8" hole with a 1.0" hole saw.
Care should be taken not to damage the outer sheet metal of the vehicle trunk lid.
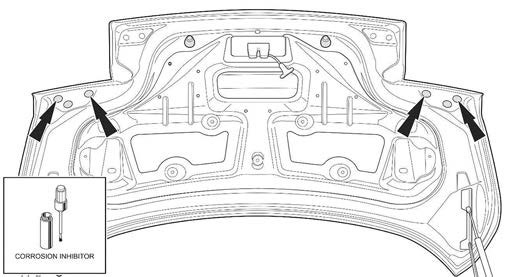
8. Deburr and apply corrosion inhibitor to each of the four (4) 1.0" access holes. Allow to dry
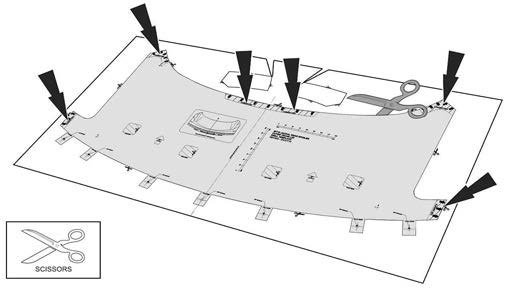
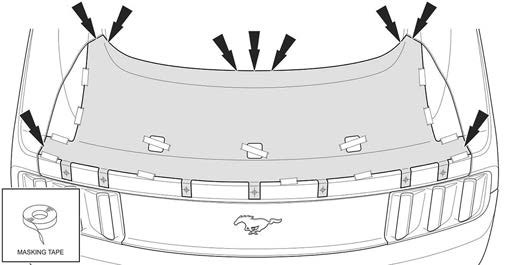
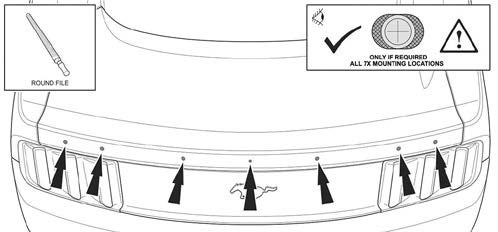
9. Carefully cut out the large outer drill template. Take extra care in the areas indicated with the black arrows. These areas are crucial to the correct alignment of the template.
10. Install the trunk lid outer sheet metal drill template. With the trunk lid closed, align the large outer drill template onto the outer sheet metal of the trunk lid as shown. Secure template to trunk lid with masking tape. Attention: Confirm template is properly centered and aligned before continuing to the next step
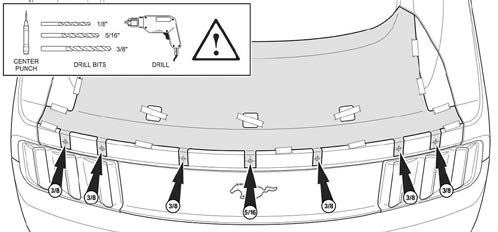
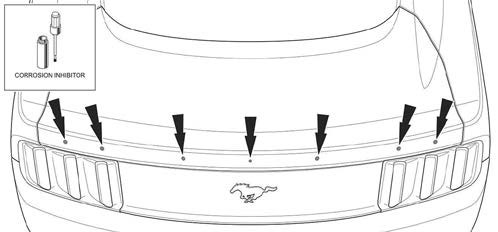
11. Drill seven (7) rear spoiler mounting holes. Center punch the seven (7) hole locations indicated on the template. Drill each center punch location with a 1/8" drill bit. Enlarge each 1/8" hole to the size indicated on the template. Note that the center hole should be enlarged to 5/16" while the other six (6) holes should be enlarged to 3/8".
12. Test fit the rear spoiler. Align the five (5) studs on the rear spoiler through the holes drilled into the trunk lid. Secure the rear spoiler to the trunk lid with masking tape.
13. Open the trunk lid and inspect each of the seven (7) mounting holes. Confirm that the rear spoiler fasteners are properly aligned with the holes drilled in the trunk lid outer sheet metal.
14. If the fasteners and holes are not aligned, remove the rear spoiler and use a round file to adjust the holes in the trunk lid outer sheet metal accordingly.
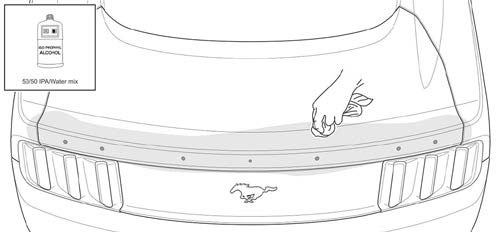
15. Close the trunk lid and remove the rear spoiler. 16. Clean the trunk lid with 50/50 (alcohol/water) solution and allow to dry
17. Deburr and apply corrosion inhibitor to all the holes drilled in the outer sheet metal. Allow to dry
18. Prepare rear spoiler for installation. Peel back 2.0" (50.0 mm) of each tape liner and secure each liner to the outer surface of the rear spoiler using masking tape.
19. Install the rear spoiler through the holes drilled into the trunk lid. Do not allow the exposed double-sided tape to adhere to the sheet metal until you have conf
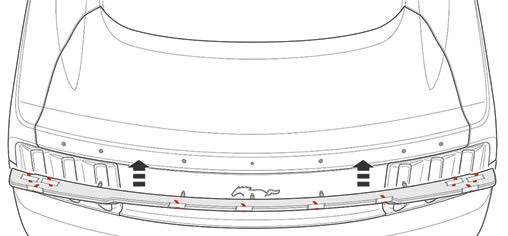
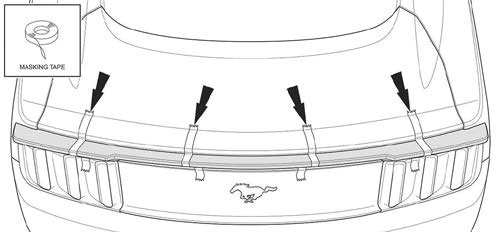
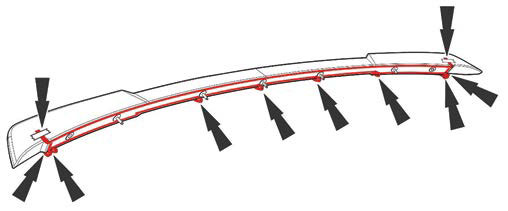
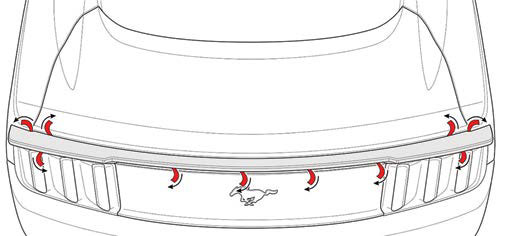
20. Remove all ten (10) tape liners in the direction indicated below.
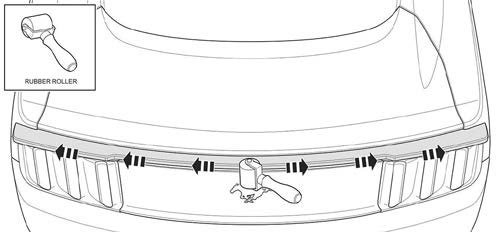
21. Using a rubber roller or the palm of your hand, apply 15 ft-lb of force to the tape area to ‘wet-out’ the tape. Start from the center of vehicle and work outwards.
22. Fasten the rear spoiler to the trunk lid. Open the rear trunk lid and install the two (2) M6 nuts at position 2 and two (2) M6 bolts at position 3. Install the three (3) M6 push nuts onto the studs in position 1. Tighten all fasteners to 3.5 Nm in the order shown below.
22. Fasten the rear spoiler to the trunk lid. Open the rear trunk lid and install the two (2) M6 nuts at position 2 and two (2) M6 bolts at position 3. Install the three (3) M6 push nuts onto the studs in position 1. Tighten all fasteners to 3.5 Nm in the order shown below. 23. Re-install the two (2) OE rubber hole plugs removed in step 3. Install four (4) new 1.0" rubber holes plugs into the access holes drilled in Step 7. 24. Re-install the trunk lid inner liner and clips, rubber bump stops and re-route the rear trunk latch wire. 25. Carefully remove the drop cloth, making sure not to spill any of the metal shavings into the trunk luggage area. Vacuum up any stray metal shavings. Congratulations!!! You have completed the installation of the ROUSH Performance Rear Spoiler 22. Fasten the rear spoiler to the trunk lid. Open the rear trunk lid and install the two (2) M6 nuts at position 2 and two (2) M6 bolts at position 3. Install the three (3) M6 push nuts onto the studs in position 1. Tighten all fasteners to 3.5 Nm in the order shown below.
23. Re-install the two (2) OE rubber hole plugs removed in step 3. Install four (4) new 1.0" rubber holes plugs into the access holes drilled in Step 7.
24. Re-install the trunk lid inner liner and clips, rubber bump stops and re-route the rear trunk latch wire.
25. Carefully remove the drop cloth, making sure not to spill any of the metal shavings into the trunk luggage area. Vacuum up any stray metal shavings. Congratulations!!! You have completed the installation of the ROUSH Performance Rear Spoiler

