 FREE 1 to 3-Day Delivery on Orders $149+ Details
Tokico D-Spec Adjustable Strut & Shock Kit ('94-'04 excl. IRS Cobra) - Installation Instructions
Installation Time
2 hours
Tools Required
- Large Flathead Screwdriver
- 13mm, 17mm, 19mm, 21mm, 22mm Open/Closed End Wrenchs
- 17mm, 18mm, 21mm Deep Sockets
- Breaker Bar or Large Pipe
- Ft-lbs. Torque Wrench
Installation
Front Struts Installation:
1. Loosen wheel lug nuts, raise vehicle, and remove wheels. Support vehicle securely on jack stands.
2. Place a floor jack under the front control arm and raise until the weight of the control arm is supported by the jack. This jack needs to remain here for the whole process, as the control arm is constantly being pushed down by the tension in the spring.
3. If your vehicle has ABS, remove the nut which attaches the ABS lead bracket to the strut.
4. Remove the strut to the steering knuckle bolts, using 18mm and 21mm deep sockets. These are on quite tight, so a breaker bar or large pipe is necessary.
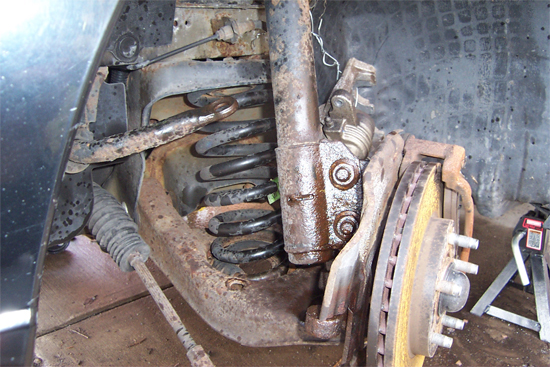
5. Carefully remove the three strut-to-body mounting nuts/bolt. When these are detached, the strut is free to drop out, so use one hand to cushion its fall so that it does not damage any front end parts. Keep the square mounting plate from the strut-to-body nuts/bolt and reuse.
6. If the strut does not drop out so easily, use a large screwdriver or pry bar to remove it from the steering knuckle. Support the steering knuckle so that it does not fall forward, doing damage to the brake lines or ball joint. You can used an extra jack stand or a cement block for this.
7. To remove the strut mount from the old strut, use a very large flathead screwdriver to keep the strut shaft from spinning. Use a 2mm open/closed end wrench to remove the nut.
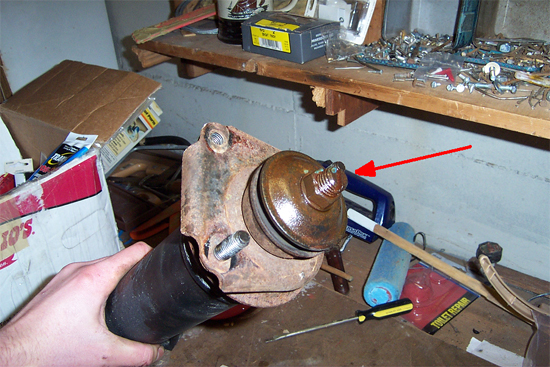
8. Attach the strut mount to your new Tokico D-Spec strut with the provided strut mount nut. You will need a 22mm open/closed end wrench to torque the nut and a 13mm open end wrench to keep the strut shaft from spinning.
9. Feed the new strut up through the cavity it was removed from and attach the old nuts/bolt to the strut mount. Hand tighten these, so that the strut cannot fall back out.
10. Align the steering knuckle into the strut so that the two old bolts can be inserted. This alignment is easier when the strut-to-body nuts/bolt are not fully torqued. Tighten these bolts once again, using 18mm and 21mm deep sockets.
11. Torque all bolts to the required specifications. Remove the jack from under the front control arm. Install wheels, remove jack stands, lower the vehicle, and torque the lug nuts to the required specifications.
12. Adjust stiffness setting using the included tool. Screw on the included cap covering the adjustment hole.
Rear Shocks Installation
1. Loosen wheel lug nuts, raise vehicle, and remove wheels. Support vehicle securely on jack stands.
2. Support the rear axle underneath the differential, using a floor jack. This prevents it from dropping when the shocks are disconnected from the axle.
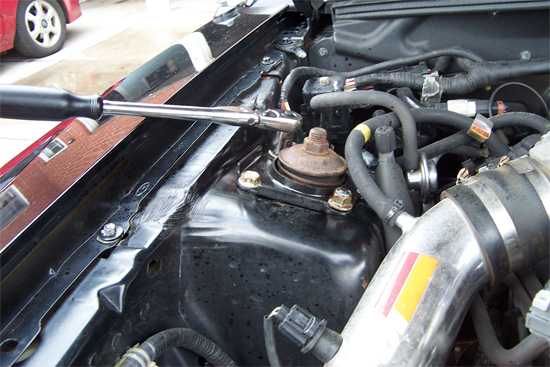
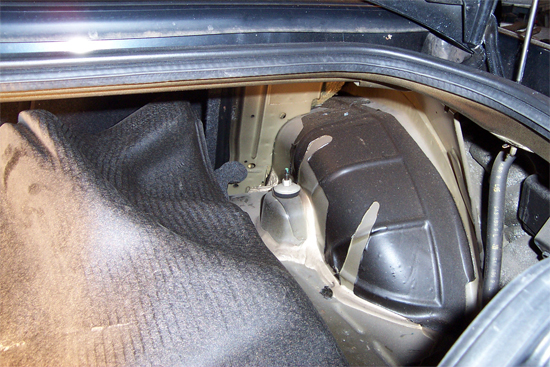
3. Remove the side lining of the trunk. This is held in place with two plastic clips for each side. This exposes the shock upper mounting nut. Hold the piston rod in place with a 1/4" open end wrench, or with pliers. Remove the nut with a 17mmopen/closed end wrench. You will not reuse this nut or the rubber bushing.
4. Remove the lower retaining nut and bolt with a 17mm socket and remove the shock absorber from the vehicle. Once again, you may need a large screwdriver to pry it free.

5. Insert the new shock up through the mounting hole. Use the mount, nuts, and polyurethane bushing that are included to fasten the shock to the vehicle body. Only hand tighten these so that the shock can be more easily maneuvered.
6. Attach the shock-to-axle bolts, which were provided in the kit, using a 18mm socket and a 19mm open/closed end wrench. Torque all nuts and bolts to the required specifications.
7. Remove the jack from under the axle. Install wheels, remove jack stands, lower the vehicle, and torque lug nuts to the required specifications.
8. Adjust stiffness setting using the included tool and screw on the included cap covering the adjustment hole. Reinstall trunk interior panels.
Torque Specifications:Front Suspension
- Strut to Steering Knuckle Bolts/Nuts - 141 to 191 ft-lbs.
- Strut to Body Nuts/Bolt - 25 to 32 ft-lbs.
Rear Suspension
- Shock Absorber to Axle Bolt/Nut - 57 to 75 ft-lbs.
- Shock Absorber to Vehicle Nut - 25 to 34 ft-lbs.
Installation instructions provided by AmericanMuscle customer Kyle Weis 3.13.09
