FREE 1 to 3-Day Delivery on Orders $149+ Details
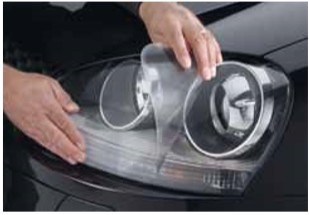
How to Install Weathertech LampGards (07-09 GT500) on your Ford Mustang
Important: Read these instructions before attempting installation. Required for Installation: Spray bottle, isopropyl (rubbing) alcohol, water, lint free cloth and a blow dryer
NOTE: Your WeatherTech® LampGard™ is shipped to you with the left and right sides stuck together face-to-face. To verify this, check to see that the 3M backing paper is present on both sides of each set. This is done to help prevent damage during shipping. The pieces can be easily separated by inserting your thumbnail between the two pieces and pulling them apart.
1. Mix 1 part alcohol to 3 parts water in the spray bottle.
2. Thoroughly clean the surface of the lenses using the alcohol solution. The lenses MUST be free of all grease, wax, tar, or dirt. Dry with a lint free cloth.
3. Before removing any of the paper backing from the LampGard™, test each piece to assure proper location and fit.
4. For best results, the lenses and the LampGard™ should be warm to the touch. This can be accomplished by turning on the lights to warm the lenses and using a blow dryer to heat the LampGard™.
5. Wet hands and fingers with the alcohol solution and make sure they stay wet throughout the installation process. Warning: Handling the adhesive with dry fingers will leave permanent visible marks.
6. Carefully remove the backing from the adhesive side of the LampGard™, spray the adhesive with the alcohol solution, and apply the LampGard™ to the lens and align with the outer edges of the light. Starting from the center, use the supplied squeegee to force excess alcohol solution and air bubbles out to the edges of the LampGard™. Use the blow dryer as necessary to evaporate the excess alcohol solution and to keep the LampGard™ warm and pliable.
Important: To avoid excess moisture from being trapped under the LampGard™ and increasing drying time, be sure to squeegee the entire LampGard™ several times from the center out using increasingly firm strokes.
7. On curved and contoured surfaces: It may seem as though there is excess material around the edges. This is normal and is no cause for concern. Keep the material warm and continue making short squeegee strokes from the center outward, gradually working toward the edge of the lens. When working toward the edge, spread the excess material out rather than working it all into one spot. Once the excess is properly spread about the perimeter of the LampGard™, the material will easily lay flat on the lens.
Note: LampGard™ may have a slightly hazy appearance after the initial installation. This is caused by residual moisture being trapped under the LampGard™ and is normal. The moisture will dissipate over a period of time depending on ambient temperature and humidity levels. Assuming the installation was done correctly (as much moisture as possible forced out with the squeegee), the haziness should last no longer than 2 weeks. If too much solution was left beneath the LampGard™ and all the moisture has not evaporated by this time, there is no cause for concern. The drying time will simply take longer. This condition will not affect the eventual appearance or performance of the LampGard™.
HELP!! If you have questions regarding installation of this or any other WeatherTech® product, please call our customer service department at (630) 769-1500, Monday through Friday, 9 a.m. to 5 p.m. central time. We want to help you get the most out of your new WeatherTech® product. Please visit our website at www.WeatherTech.com