 FREE 1 to 3-Day Delivery on Orders $149+ Details
How to install an 8-Point Roll Bar on your Mustang
Installation Time
1 days
Tools Required
- Common hand tools, gasket scraper.
- Jack stands, 6 (optional).
- Floor jack (optional).
- Measuring tools: tape measure, carpenter’s square, level, felt tip pen or soap stone.
- Cutting tools: bench grinder, hand grinder, belt sander, oxy-acetylene torch, tubing notcher, power hacksaw .
- Mig or Tig welder. If you purchased a mild steel roll bar or cage we recommend Mig welding. If you purchase a chrome moly (4130) roll bar or cage YOU MUST install it using the Tig welding process.

Shop Parts in this Guide
Installation
Important!!
All S&W Race Cars roll bar and roll cage kits come packaged with eight (8) 6” x 6” floor mounting plates. If your vehicle has a full frame you MUST cut through the floor and weld the roll bar or cage to the frame! The 6” x 6” floor mounting plates are for use on unibody cars only! We also highly recommend you refer to your racing organizations rule book for installation guidelines or regulations required by that organization!
IMPORTANT NOTICE!!
S&W Race Cars sells roll bars and roll cages in either mild steel or chrome moly steel. Sanctioning body rules require that EVERY chrome moly bar or cage be TIG welded!! Mild steel bars and cages may be MIG or TIG welded. It is yours and the installers responsibility to make sure your bar or cage is installed by the approved welding process
Introduction
This S&W Roll Bar or Roll Cage performs both a safety and performance function. As a safety device, the main hoop of the cage protects the driver from impact. The rear braces and side bars tie the main hoop and chassis together to strengthen the car. From a performance standpoint, the cage will improve your car’s traction and performance by greatly reducing chassis flex. This benefit will also increase the useful life of your car. The addition of a 10-point will further increase the rigidity of the chassis and provides a secure mounting location for an S&W Window Net. The Sportsman Package is the final stage of a complete chassis building project. S & W Race Cars 8-point roll bar or 10-point roll cage kits are not designed to be used by themselves in an application where the stock floor has been removed. If this is your intention, call S&W for information regarding the additional chassis components you will need. Remember that the quality of your workmanship will have a direct relationship on the ultimate strength of the cars chassis. During the tube fitting phase of the cage construction the notching should be done as carefully as possible. If a torch is used, make the initial notch small so that you can completely dress the notch before welding. A hand grinder or large bench grinder is slower for the novice, but much more predictable. The notches do not have to be "air tight", a small gap is acceptable and will help to maximize penetration during welding. Chamfering each notch will also improve the weld-ability of the fit. During the installation of the roll cage it is critical that the car is not drooping in any way. This condition will remain in the car after the cage has been installed and may create chassis tuning and handling problems. Be careful. While grinding, sawing and welding, always wear eye protection.
For the best results this work should be performed in a dry, well lit area with a level or near level floor.
INSTALLATION STEPS
The first element of a successful installation is to have a correct overview of the job. Understanding the steps ahead of time will result in an easier better installation.
I. Preparation
A. Remove the seats, carpets, carpet pads, head liner and any other flammable material. Remove or protect all electrical wires or switches that may be damaged by cutting and welding.
B. It is not always necessary to raise the car for this installation. Whether or not the car is raised it is critical that it be level. If the car is raised it is critical that it is not drooping when any chassis components are installed. Any droop in the car will become permanent once the cage is installed and final welded. While leveling and supporting the car, keep an eye on the door alignment, this is a good indicator of whether or not the car is drooping.
II. Main Hoop Installation
S&W main hoops are individually designed for each body style to provide protection to the driver without obstructing vision.
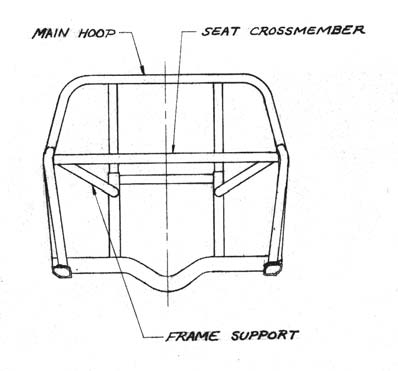
Proper placement of the main hoop is both a safety and appearance consideration. If you are installing a roll bar or cage in a 79-92 Mustang (Fox bodies part #’s 11-3066, 11-3066DOM, 11-3066CM, 11-3566, 11-3566DOM & 11-3566CM ) Please refer to the drawing at the top of page 8 for special instruction regarding the main hoop installation angle.
A. If your S&W Cage Kit was shipped to you via a freight company, there is a chance that the main hoop (and roof hoop) was twisted during shipment. Check the main hoop for flatness by laying it down on a flat surface. If it was twisted at all, straighten it now.
B. With the seat installed, and the driver seated with a helmet on, determine the position of the main hoop. It is required that the forward edge of the main hoop be no more than 6 inches from the back of the helmet. Measure from the mounting location on the floor to the roof to determine the height of the main hoop. It may be necessary to cut the bottom on an angle to match the floor contour. After the legs of the main hoop have been cut , the main hoop should be trial fitted, making sure that the top is level. For appearance, try to align the vertical portions of the main hoop with the door pillar or window seam. Check the sideto- side position by measuring from the outer edges of the hoop to the door jam.
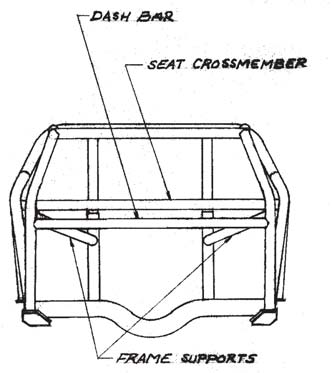
C. Determine the height of the seat crossmember. It should be installed level and at a height that is, not above the drivers shoulders and no more than 4 below them and below the point where the door bar meets the main hoop. Note, some sanctioning bodies require the shoulder belts to be at an angle between 0 to 15 degrees down when attached to the seat crossmember. After establishing the height fit the crossmember in the main hoop. It may be necessary to trim and refit one end. Mark the crossmember location on the main hoop.
D. Once the seat crossmember main hoop position has been determined, remove it from the car. If you are installing this roll bar or roll cage in a unibody vehicle, form two of the floor plates to match the contour of the floor under the area where the main hoop will be located. This can be done by tacking one edge of the plate to the floor, then heating and hammering the plate to match the contour of the stock floor. The mounting location on the floor should be clean, free of paint, carpet glue, sound deadener and rust. If you are installing this roll bar or roll cage in a full frame vehicle, cut an access hole in the floor above the frame rail. Warning!! Before cutting though the floor inspect the bottom of the car for any brake lines, fuel lines or electrical wiring that may have to be removed!! The mounting location on the frame rail should be clean, free of paint and rust. Tack weld the seat crossmember to the main hoop. Recheck the main hoop’s position and tack in place on the frame rails or floor plates.
III. Rear Brace Installation
A. The rear braces connect the main hoop to the rear frame rails or stock floor pan. They should be installed so that they are parallel to each other and located directly over the rear frame rails or subframe. Place the front of the brace against the main hoop set the back of the brace on the frame rail and check the fit. If you are installing this roll bar or roll cage in a unibody vehicle, the back of the rear brace is going to sit on the stock floor, install a floor plate between the brace and the floor. If you are installing this roll bar or roll cage in a full frame vehicle, cut an access hole in the floor above the frame rail. S & W precuts the ends of the rear braces but you may have to do some final fitting to minimize the gap. When you are satisfied with the fit tack weld the braces in place. Note: The rear braces on some applications have a bend at one end. This bend is typically placed closest to the main hoop.
IV. Lateral Frame Support Installation
These braces will improve the chassis reaction time, increase the response to chassis tuning and make the car less flexible.
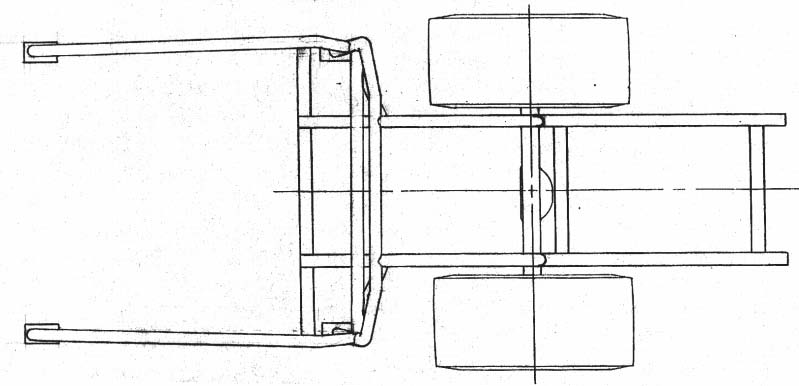
A. The frame supports span from the seat crossmember/main hoop junction to the frame rails or floor pan, near the suspension mounting points, such as the ladder bar or four link brackets. If these supports are installed on the floor pan or transmission tunnel they must be welded to 6” x 6” x 1/8” steel plates. The notch for the seat crossmember/main hoop junction is more complicated than a typical 90 degree notch, Take your time if you have to adjust this notch. You may wish to make a paper pattern first, then transfer the pattern contours to the metal tubing. Tack weld in place. If you are installing your roll bar or cage in a front wheel drive vehicle , please refer to the drawing at the bottom of page 8 for special instructions for installing lateral supports an the corresponding required crossmember in these vehicles.
V. Door Bar Installation
These are the last parts of the roll bar or cage to be installed. If you are going to install a 10 point, or other cage accessoriesinstall those steps first and then return to this step. The standard door bar is a continual bar that spans from the main hoop to the forward floor area of the passenger compartment. Some door bars have a bend in them which is to provide additional room for the driver. This bend is typically placed so that it is closest to the main hoop. Keep the location of this bend in mind when you trim and fit the door bars.
A. For drag racing, the door bar must pass by the driver at a point between the shoulder and elbow. The driver should be seated in the car to properly locate the door bar. Mark the point where the door bar will be located on the main hoop. Fit the front of the door bar first.
8 Point - The front of the door bar is to be located on the area of the floor were the fire wall starts to kick up. If it is easier to place the bar on the firewall this is acceptable but keep the tube as close to the floor as possible. If you are installing this roll bar or roll cage in a unibody vehicle, the front of the door bar sits on a floor plate. After determining the location of the front of the bar fit a floor plate into place. If you are installing this roll bar or roll cage in a full frame vehicle, cut an access hole in the floor above the frame rail and locate the front of the door bar on the frame rail.
10 Point - If you are installing a 10 point roll cage skip to steps VII and VIII and then return to this step. The front of the door bar is to be located at the bottom of the windshield post runner were it meets the floor plate. If you are installing this roll bar or roll cage in a unibody vehicle, cut an access hole in the floor above the frame rail and notch and fit the front of the door bar so that it gets welded to both the floor plate and the windshield post runner. If you are installing this roll bar or roll cage in a full frame vehicle, cut an access hole in the floor above the frame rail and notch and fit the front of the door bar so that it gets welded to the frame rail and the windshield post runner.
B. Notch the back of the door bar to fit against the main hoop. Work slowly and carefully here, mistakes happen fast on this type of notch. Tack weld door bars in place.
NOTE: If you are installing an S&W 8 Point Roll Bar you can now CHECK your work and finish WELD all tubes and plates.
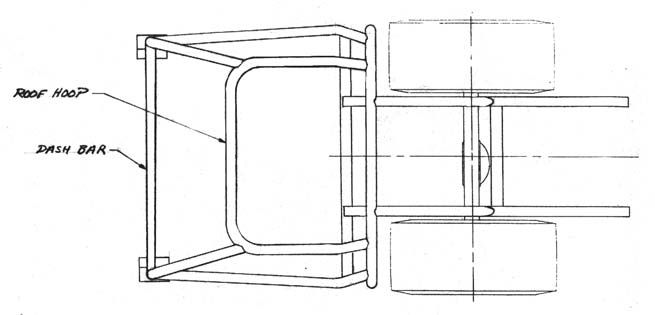
VI. Roof Hoop Installation
One common mistake in cage installations is to overlook the roof hoop/A-pillar weld. It is critical that all areas of the upper cage structure get welded .
A. Check the roof hoop for flatness as you did with the main hoop.
B. The roof hoop should be installed so that the forward edge is level and pushed up as high into the roof as possible. It should not limit the driver’s vision. Measure from the main hoop to where the front edge of the roof hoop will be. Mark the location of the cut to shorten the roof hoop, remember to add approximately 5/8 of an inch for the depth of the notch before making the cut. Notch the rear of the roof hoop to match the main hoop.
C. If you are working alone, you can hold the roof hoop in place by several methods while you tack it in place. One method is to tie a rope around the hoop and hang it from the roof of the car. Another method is to cut a piece of wood and brace the front of the roof hoop. Once the roof hoop is tacked into place, recheck the location and fits.
VII. Windshield Post Runner Installation
The windshield runner posts support the front of the roof hoop. There position has a direct relationship to the driver’s visibility. Space them as far apart as is possible and as close to the A - pillars (the braces on the side of the windshield) as possible. If you are going to be installing front frame supports leave enough space to allow for completely welding around these joints. If you are installing this roll cage in a unibody vehicle, determine the location of the these tubes, and where they will meet the floor, clean the floor and add another set of floor plates. Care should be taken when making the notches on these tubes to assure that you have a good fit all the way around the roof hoop/windshield post runner junction. Tack weld the windshield post runners in place. If you are installing this roll cage in a full frame vehicle, determine the location of the these tubes, and where they will pass through the floor. Cut a access hole in the floor, over the frame rail, and tack weld the windshield post runners to the floor.
VIII. Dash Crossmember Tube Installation
This tubes has both safety and performance benefits. From a safety standpoint, this brace supports the door braces and windshield post runners in the event of a side impact. Performance wise, the braces reduces chassis twist, making the car more responsive to tuning changes. The dash crossmember tube spans between the windshield post runners. The height of the tube can be below or, behind the dash of the car. This depends on where the windshield post runners are install those steps first and then return to this step.
IX. Optional Front Subframe Supports (included with 14 point cage)
A. There are several clearance problems that will have to be considered when installing the front subframe supports. Depending on the application, you will want to check clearances with the headers, steering box and linkages, suspension components and brake master cylinder. Try to anticipate these problems before you cut any holes in the firewall. The rear portion of the front subframe support will be welded to the windshield post runners. The forward end will be welded onto the front frame or subframe, preferably near an upper A-arm mount. The front subframe supports can be incorporated to include the upper shock mounts for coil-over assemblies and also be used as uprights to support the motor plate.
B. Before cutting holes in the firewall for the front subframe supports you should drill a small pilot hole to check the alignment of the windshield post runner, firewall hole and mounting point on the frame. Check the alignment by running a string from the windshield post runner through the pilot hole. If any directional changes need to be made now is the time to do it, not after the final, larger hole is cut. Patience is needed for a tidy job at this part of the car. Be prepared to fit the bar several times before the hole in the firewall and the notch location line up. The forward end of the subframe support should be fit carefully to the subframe and have minimum gaps. Tack weld the subframe supports in place.
C. The front subframe supports include two uprights which further aid to strengthen the stock chassis. These tubes are to be located in the engine compartment. Position the top of the tube against the horizontal portion of the subframe support, just behind the point were the bend starts. The bottom of the tube sits on the frame rail or subframe. If you are using these tubes for mounting the front motor plate or to support the upper mounts of a coil-over shock assembly, this will be the factor that determines their location. Tack weld the uprights into place and recheck for clearance with the headers, steering and other components in.
X. Optional Rear X-Brace Installation (included with 14 point cage)
The rear X-brace tubes are installed diagonally between the existing rear braces.
A. These tubes are installed with the top located at the intersection of the main hoop and the existing rear braces and the back end against the opposite rear brace. The first tube will be installed as a single piece, the second tube will have to be installed as two separate pieces. When both tubes are in place they form an “X” between the rear braces. The compound notches needed to fit the second tube to the first tube may be difficult for a novice builder. Take your time so that when you are done the two piece tube appears as a single continuous line.
When you are satisfied with your work tack weld the rear X-braces into place.
XI. Optional Rocker Bar Tube Installation (included with 14 point cage)
These tubes improve the strength of the roll cage assembly by tieing the roll cage together from the windshield post runners to the main hoop. Both ends of this tube must be welded to a roll cage tube with a minimum diameter of 1-5/8" and a minimum wall thickness of 0.118.
A. The front of the rocker bar tubes are to be fit against the windshield runners or the bottom of the door X-brace. Fit the back of these tubes against the bottom of the main hoop where it meets the floor plate.
XII. Optional Door X-Brace Installation (included with 14 point cage)
Door x braces are installed after door braces shown in step VI. The optional door braces turn the door brace into an “X” brace. Their purpose is to provide added safety to the driver and further reduce the chassis from flexing after a wheelstand.
A. The front half of the brace goes between the windshield post runner and the existing door brace. Locate the front half behind the subframe support on a vertical portion of the existing windshield post runner. The rear half of the X-brace runs from the existing door brace to the bottom of the main hoop. The two halves of the X-brace should appear to form a continuous line from the windshield post runner to the main hoop. Tack weld the door X-brace into place and check your work.
XIII. Optional Roof Diagonal Installation
A. The roof diagonal is installed within the square defined by the roof hoop and the top of the main hoop. The forward end is located on the driver’s side of the car, the back end is located on the passenger side of the car. Positioning the roof diagonal any other way will limit the clearances above the driver. Great care should be taken to insure that these tubes are fully welded when the final welding is done.
At this time you can do the final welding.
If you will be doing tin work, you may wish to delay final welding of the door braces and rocker bars until the work is finished. It will make getting in and out of the car easier.
Component Descriptions
Item Number of Pieces Description
Seat Crossmember ................. 1 .................. Notched on both ends
Rear Runners ......................... 2 .................. Notched on one ends - angle cut on other end
Door Bars............................... 2 .................. Notched on one end, may have slight bend at same end
Dash crossmember................. 1 .................. Not notched
Make sure all tubes are installed to your satisfaction BEFORE finish welding!!
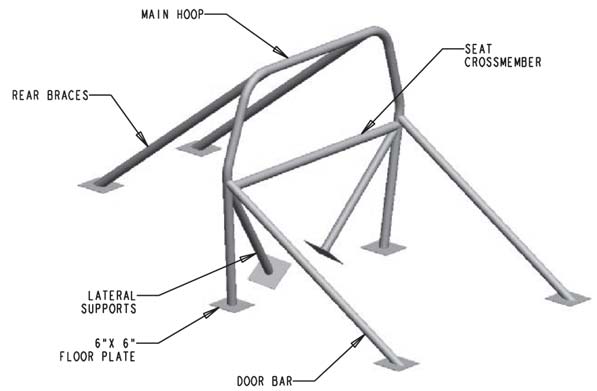
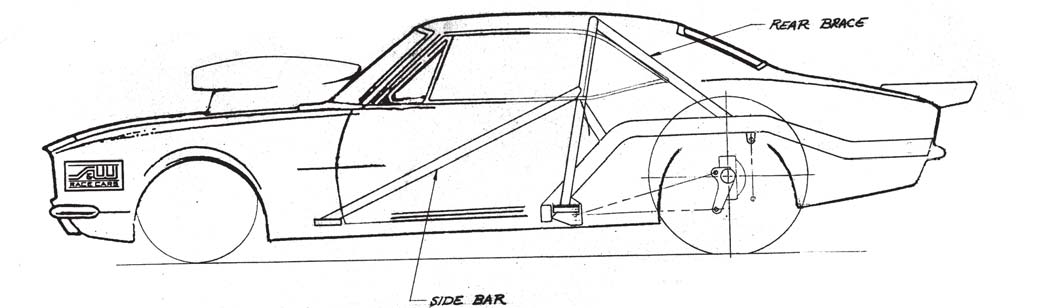
Typical 8 Point Roll Bar Installation
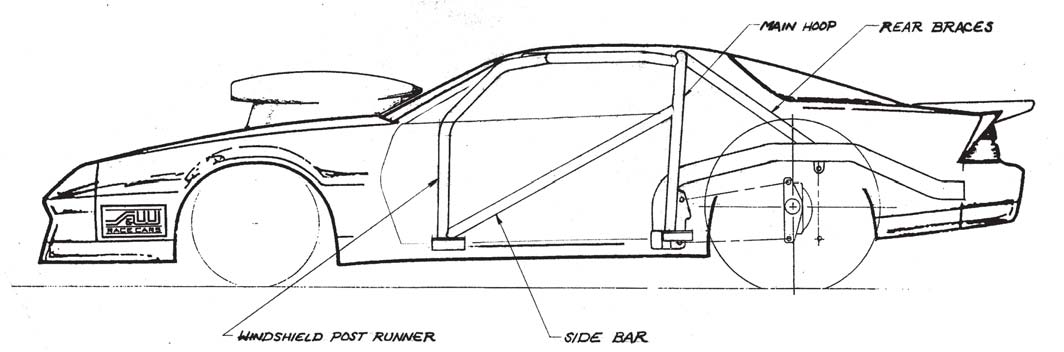
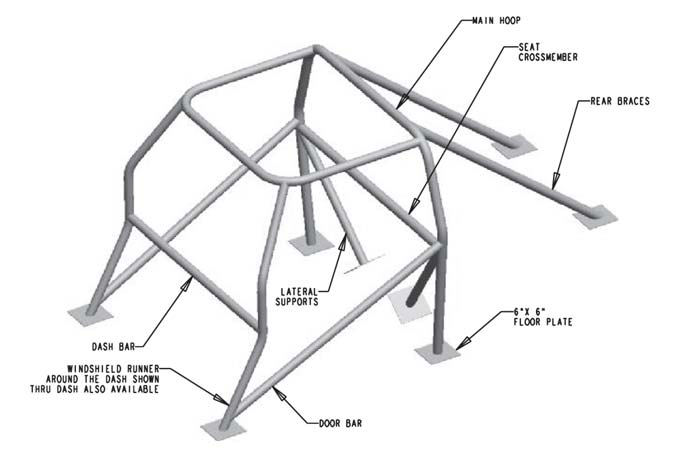
Typical 10 Point Roll Cage Installation

The drawing above shows the parts and their suggested location for part # 13-349 Sportsman Cage Conversion (mild steel) and for part # 13-606 Sportsman Cage Conversion (chrome moly)
Make sure all tubes are installed to your satisfaction BEFORE finish welding!
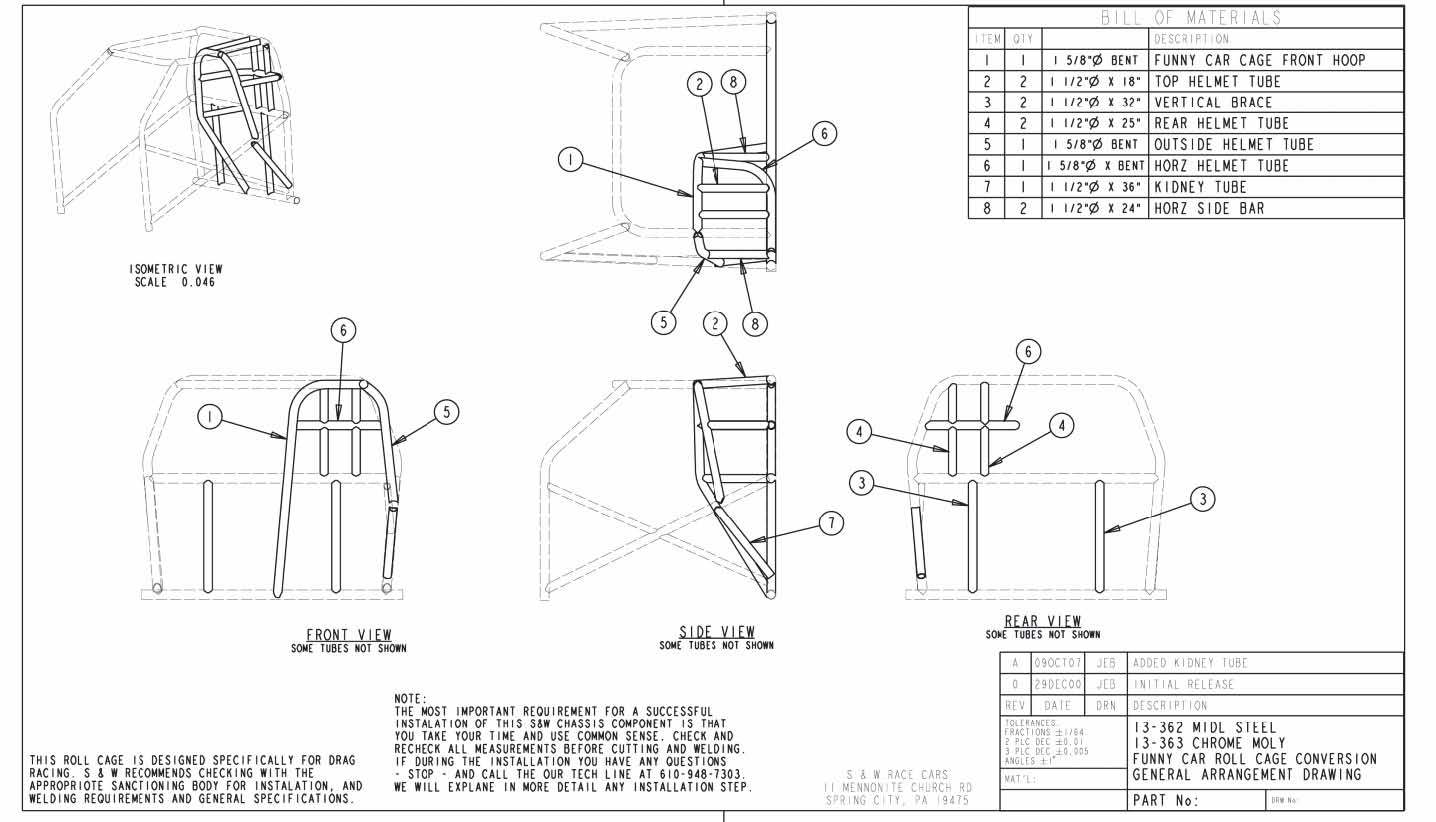
This drawing shows the parts and their suggested location for part # 13-362 Funny Car Cage Conversion (mild steel) and for part # 13-363 Funny Car Cage Conversion (chrome moly)
Make sure all tubes are installed to your satisfaction BEFORE finish welding!!
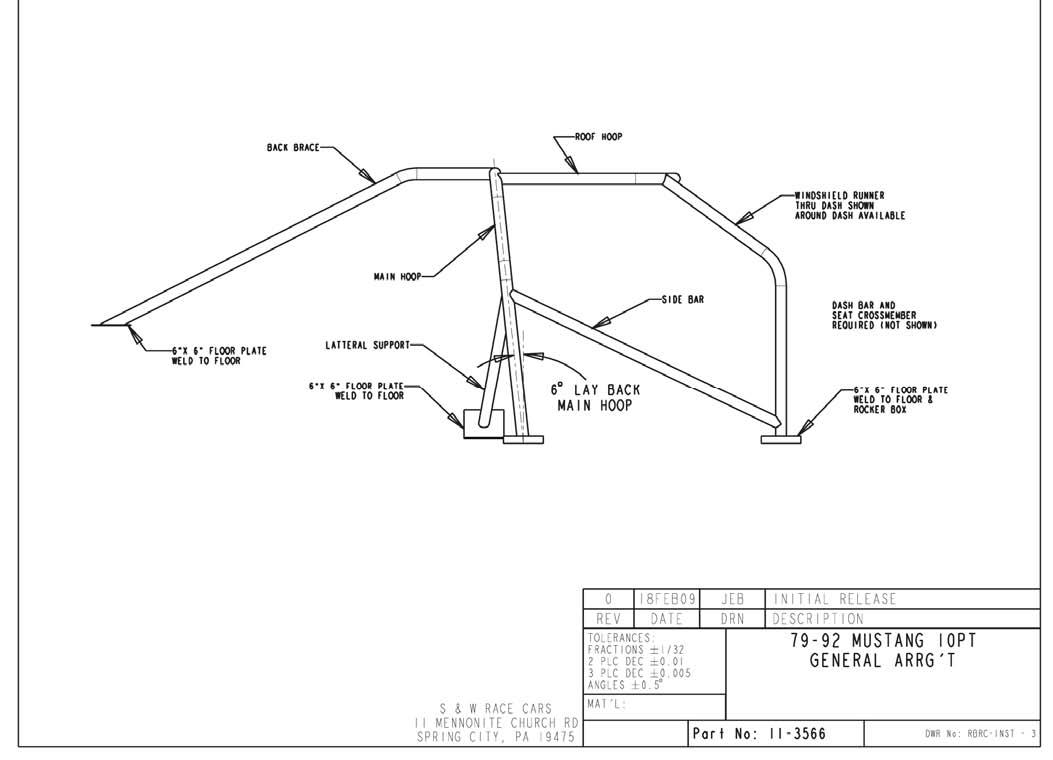
This drawing shows the recommended main hoop angle for 79-92 Mustang (Fox bodies) roll bars and cages (11-3066, 11-3066DOM, 11-3066CM, 11-3566, 11-3566DOM & 11-3566CM.
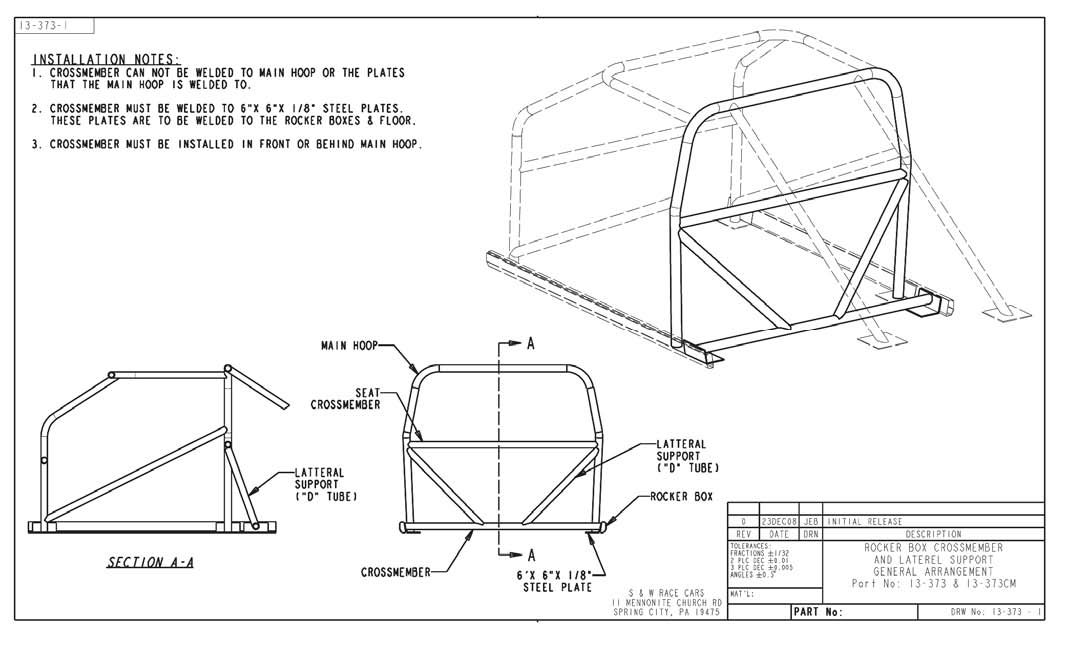
The drawing above shows the required method for installation of the lateral frame supports & crossmember now manditory on front wheel drive models

