 FREE 1 to 3-Day Delivery on Orders $149+ Details
How to Install Airaid Cold Air Intake - SynthaMax Dry Filter - Red (15-19 EcoBoost) on your Ford Mustang
Installation Time
60 minutes
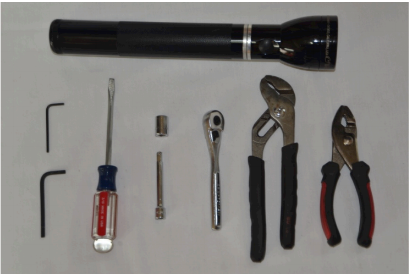
Tools Required
- Ratchet, 1/4” Drive
- Socket, size 10 (1/4” Drive)
- Medium Standard Screwdriver
- SAE Hex/Allen Wrench, 3/32”
- SAE Hex/Allen Wrench, 5/32”
- Pliers or medium channel locks or Hose Clamp tool
- Flashlight (optional)

Shop Parts in this Guide
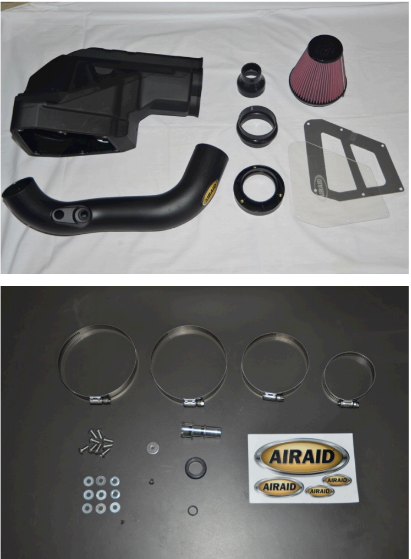
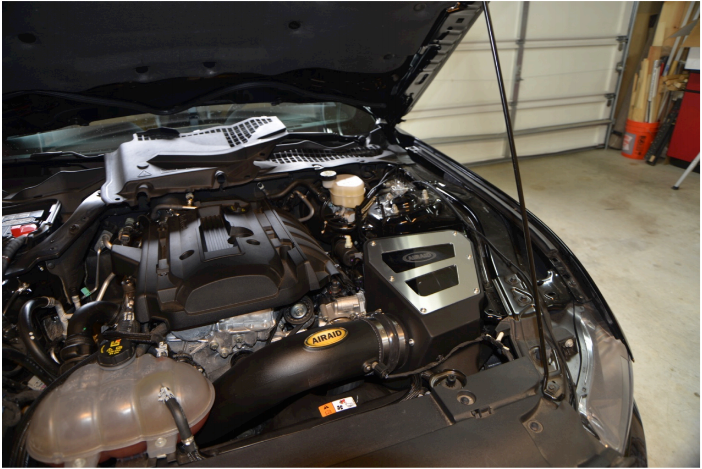
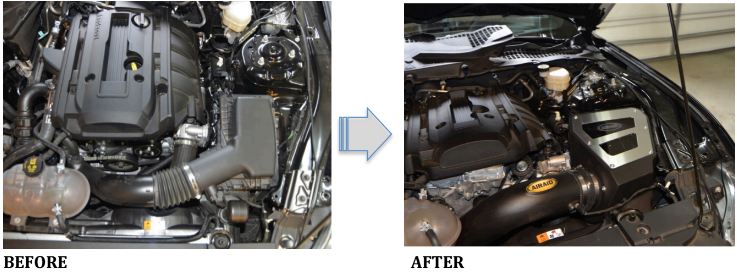
BEFORE
Removal/Installation Instructions:
First step is removal of the stock filter intake tube and Airbox.
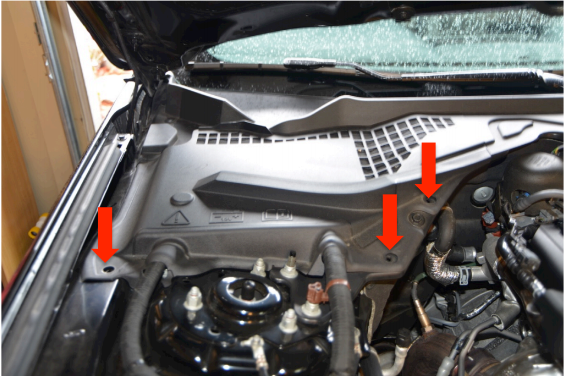
1. Open and latch hood. Place a towel or over fenders to protect your cars finish (optional).
2. Remove the battery box cover by removing (3) plastic screw retainers by hand. Note: The retainers are not attached to the cover. Place the retainers in a safe place for reinstallation later.
3. Disconnect the negative terminal on the battery with a ratchet and size 10 socket.
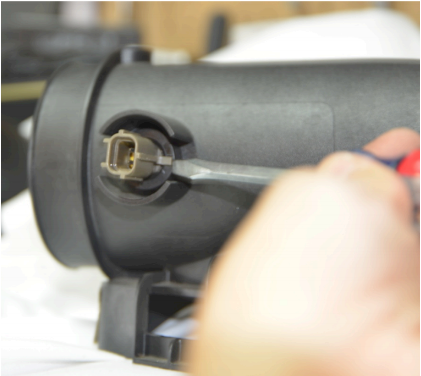
4. Locate and disconnect the Air Temp Sensor (a) from the intake tube. It is easier to use a screwdriver and put pressure on the left side of the electrical connector and slide it off.
5. Using a flat head screwdriver, locate the intake tube and loosen the hose clamp (b) and slide it off the Airbox.
6. Gently pry the intake tube out of the Airbox.
7. Locate and remove the Airbox mounting bolt (c) using a ratchet and size 10 socket.
8. Gently pry the Air Temp Sensor Wiring Harness Anchor from the Airbox. Note: Using pliers may make the job easier. Be careful not to stretch or damage the wiring harness or the anchor.
9. Remove the Airbox by gently pulling up and to the rear (away from the front grill).
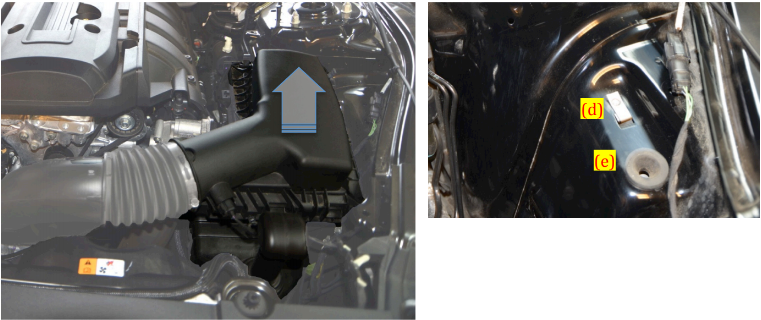
10. Do not lose the speed clip (d) or Airbox grommet (e) above. The grommet may still be attached to the Airbox, in this case, locate it and reinstall it back into the fender. The speed clip will be loose. You may remove it and set it aside for later use. Do not lose it.
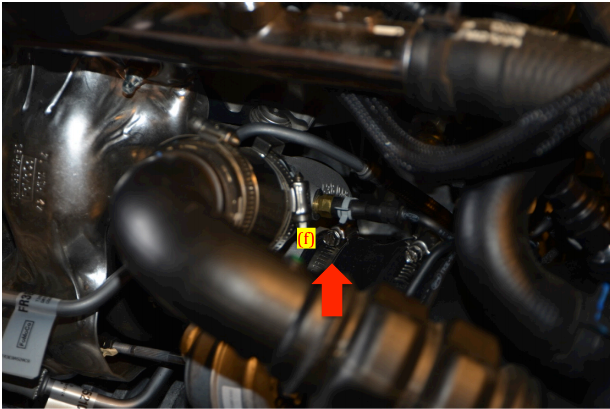
11. Locate and loosen the hose clamp (f) on the turbo inlet coupler. Note: Follow the intake tube to its end where it is connected to the turbo inlet coupler. There are two hose clamps on this end of the tube. Loosen the clamp that is attaches the tube to the inlet coupler and rotate it off its alignment notch.
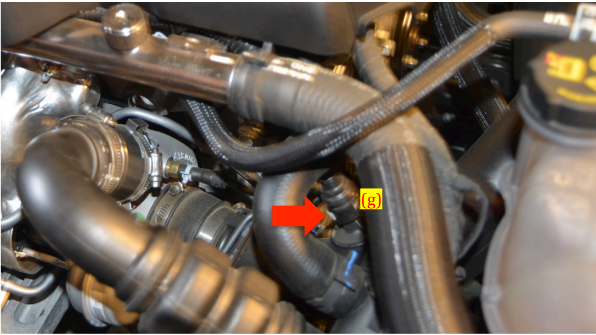
12. Locate and disconnect the PCV (g) from the intake tube. With a screwdriver, gently pry the white retainer outward releasing the PCV from its fitting. Its easiest to access the PVC from the front of the engine compartment, behind the turbo bypass line.
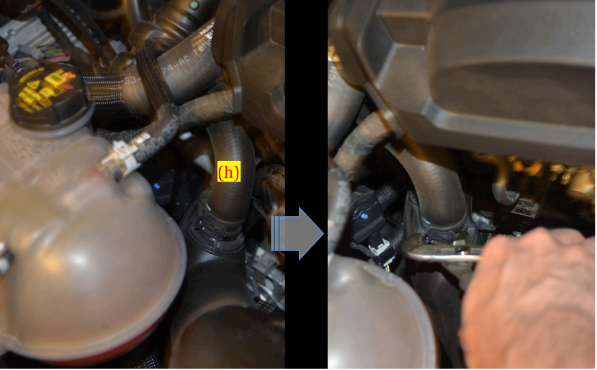
13. Locate and disconnect the turbo bypass line (h) . Using pliers or channel locks, loosen the retaining clamp by compress the clamp ends and gently remove the bypass line from the intake tube by sliding it up off its fitting. Note: If you compress the retaining clamp completely, it will lock in the open position. Retain the clamp as it will be used later during reinstallation.
14. Now that the intake tube is disconnected, gently remove it. Be careful not to damage any electrical components in the area.
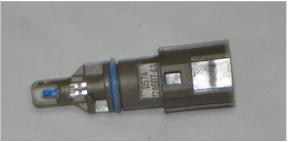
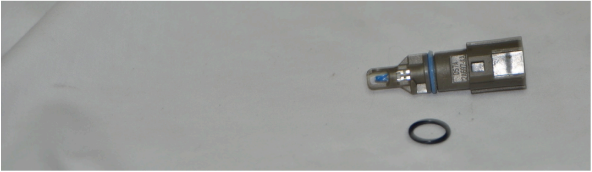
15. Take the intake tube to a clean work area. Locate and gently remove the Air Temp Sensor by lifting up on the retainer tang while gently twisting the sensor 1⁄4 turn counterclockwise until it clears the ramp and can be removed. Note: The sensor is delicate, costly and can break easily so be gentle. Set it aside as it will be reinstalled into the new airtube in a later step. Damaging the 0-ring is not an issue. It will be replaced later.
16. Wipe down any dust or debris from the intake components and Airbox well area of the engine compartment.
The next step is to assemble the Airaid intake tube and Airbox components then install them.
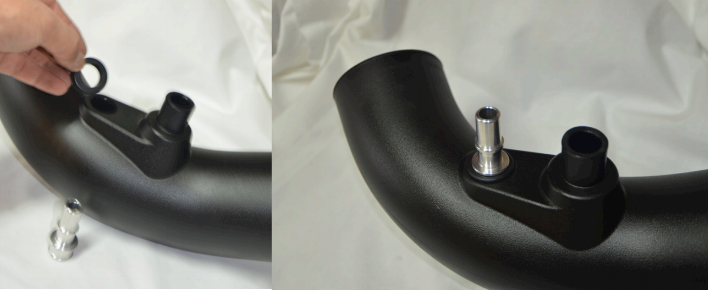
17. Insert the rubber grommet provided in the kit carefully into the Airaid Intake Tube. Install the aluminum fitting into the grommet. Be careful not to damage the grommet. It will be a snug fit.
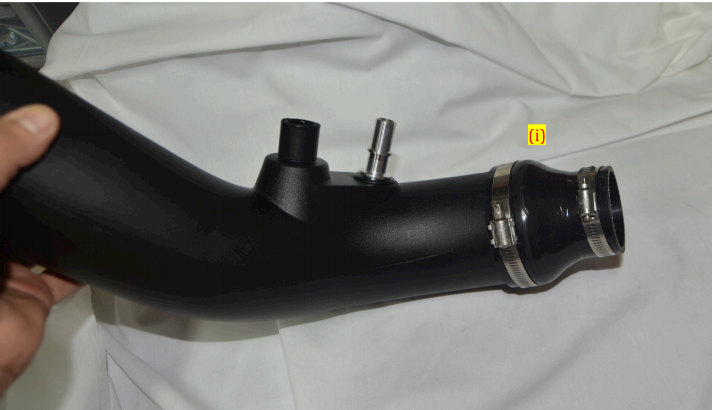
18. Slide on Reducing Coupler and #56 Hose Clamp. Make the clamp snug, but do not tighten. (you must be able to slide/rotate the clamp in a later step to tighten it). Slide on the #40 Hose Clamp on the end as shown below. Do not tighten.
19. Next step is to install Air Temperature Sensor holding bracket. On the opposite end of the intake tube, locate the air temperature sensor hole. Next to it will be a pre-drilled hole. Attach the smaller Button Head Screw and #8 Washer in the predrilled hole with a 3/32” allen wrench. Do not tighten it. Note: The Air Temp Sensor will be installed last to prevent damage to it when installing the Intake Tube. The washer is used to secure the Air Temp Sensor in place as shown below.

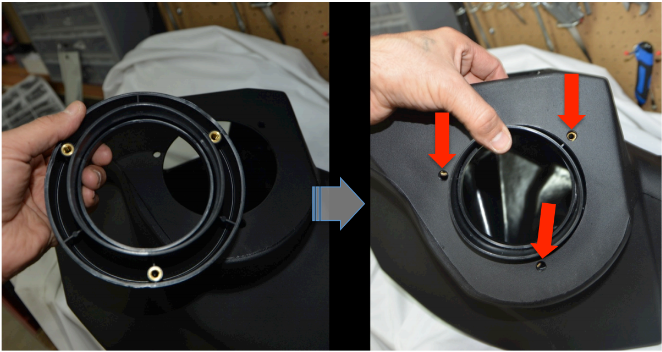
20. Install the Filter Adapter. Place the adapter inside the Cold Air Box and secure it to the inside of the box from the outside with 1⁄4” Flat Washers and three 1⁄4-20 Button Head Screws. Insert the screws through the pre-drilled holes into filter adapter and tighten them with a 5/52” allen wrench until the screws are snug. Do NOT over tighten.
21. Install the Airaid Airbox assembly into the engine compartment. Replace bolt speed clip back into fender well if you removed it earlier. Verify that grommet is in place. Align the front opening on the airbox with the vehicle air intake (j) and slide Airbox into place by aligning the bottom of the Airbox with the factory grommet and bolt speed clip.
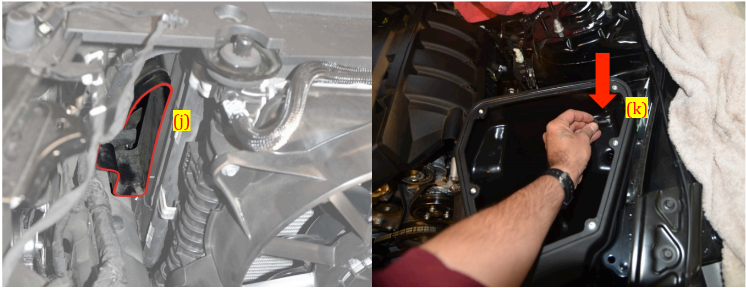
22. Secure the Airbox in place by reinstalling the factory bolt (k) through the pre-drilled hole into the bolt speed clip with a ratchet and size 10 socket. Tighten until it is snug. Do not over tighten.
23. Install Hump Hose and two remaining hose clamps onto the filter adapter protruding from the airbox. Align hose clamps so they are easily accessible. Do not tighten hose clamps.
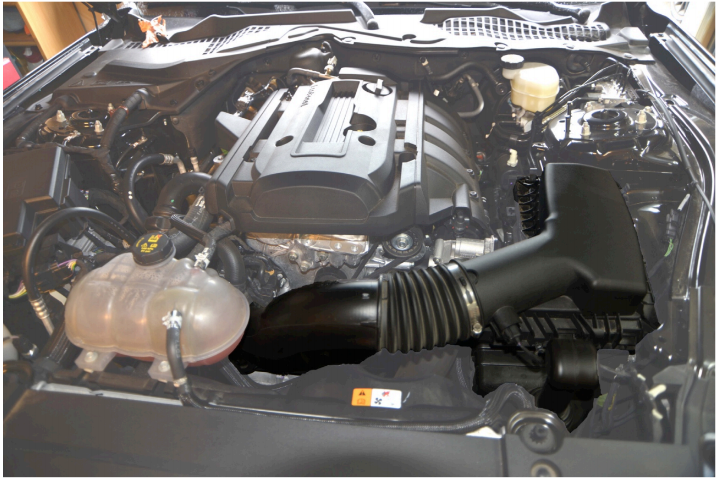
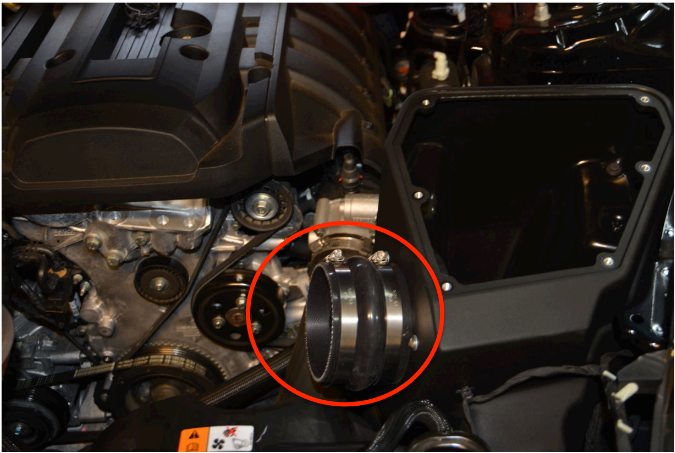
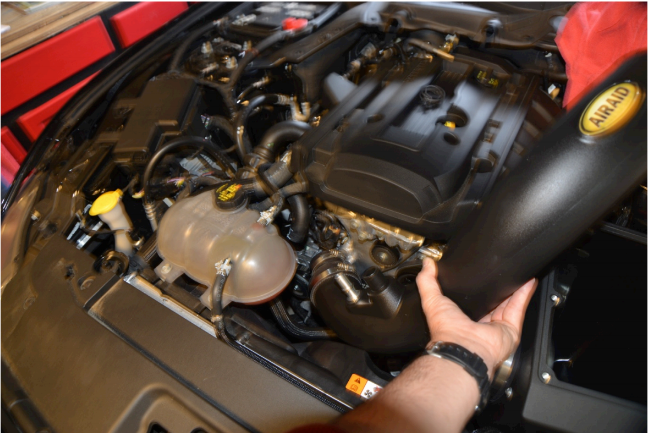
24. Carefully insert the Airaid Intake tube into position and slide the reducer onto the turbo inlet coupler. Be careful not to damage any of the other electrical connections as you position the intake tube. Ensure the reducer is fully seated onto the Turbo inlet.
25. Align the other end of the Intake tube into the open end of the Hump Hose. Ensure both ends are seated fully then tighten all four hose clamps until they are snug (2 on each end of the tube).
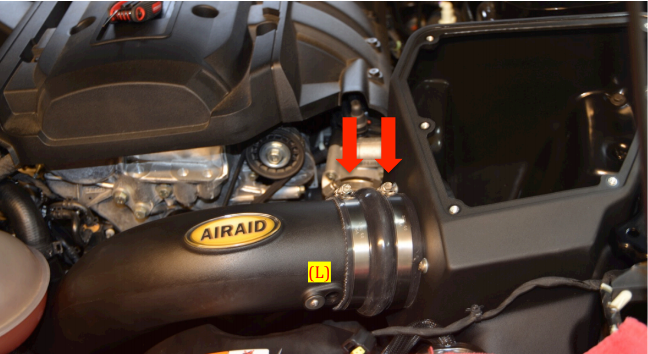
Note: Ensure that the Hump Hose is not obstructing the Air Temperature Sensor cavity (L).
26. Remove the factory O-ring from the factory Air Temperature Sensor and carefully install the new O-ring. Be careful not to break or damage the Air Temp Sensor.
27. Install the Air Temp Sensor into the Intake tube. Note: take care not to damage the O-ring or sensor during installation. Rotate the Air Temp Sensor with the lock tab finished underneath the washer. Secure the sensor in place by tightening the previously installed button head bolt and washer with a 3/32” allen wrench.
28. Carefully reconnect the PCV line. Ensure the white clip snaps into place.
29. Reinstall the Bypass line onto the Intake tube using the factory clamp. Ensure the Bypass line is fully seated before installing the clamp.
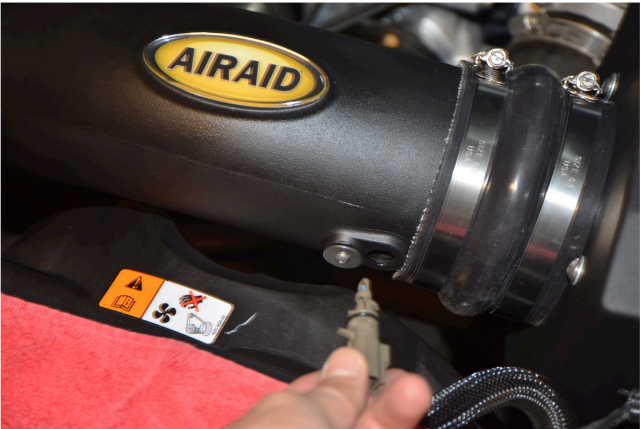
30. Plug the Air Temp Sensor Wiring Harness anchor into the Airbox (m) through the pre-drilled hole and reconnect the harness to the Air Temp Sensor (n).

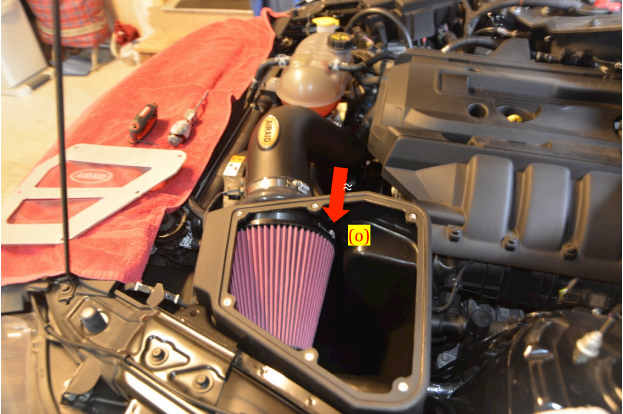
31. Position the Airaid Premium Filter so that when installed, the hose clamp (o) is facing up for easy tightening.
32. Install the Filter into the inside of the Airbox by sliding it onto the Filter adapter and secure it by tightening the hose clamp (o). Tighten the clamp until it is snug, do not over tighten.
33. Remove protective film from Plexiglas Window and Aluminum Air Box Lid.
34. Position Window in place on top of the Airbox and place the Air Box Lid on top. Secure the lid with the remaining six 1⁄4-20 Button Head Screws and 1⁄4” Flat Washers. Tighten the screws with a 5/52” allen wrench until the screws are snug. Do NOT over tighten.
35. Re-inspect all fittings for tightness. Check that all clamps, hoses, bolts are tight. Check the hood clearance.
36. Reconnect the negative terminal on the battery and reinstall the battery cover. Secure the cover with the three fasteners.
37. Start the engine. Make sure the car idles smooth and no “check engine” lights are on.
INSTALLATION COMPLETE
Installation Guide was Created and Submitted by AmericanMuscle Customer, Walton Ciferri on 9/9/16
