Installation Time
(approx) 4 Hours
Difficulty Level:
Mechanical expertise or professional installation required.
FREE 1 to 3-Day Delivery on Orders $119+ Details
$399.99 (kit)
FREE Shipping Market Price $444.99 You Save 10% ($45.00) Up to 10% off for Military & First Responders! See DetailsSaved - View your saved items
We're sorry. We couldn't save this product at this time.
or use
Justin: The Ford Performance GT350 Half Shaft upgrade here will be for the 2015 and newer Mustang owners who are looking for something a little bit stronger than those stockers but don't wanna spend the nearly $1,000 to $2,000 on an upgraded set from the driveshaft shop or the big boys from Ford Performance. Instead, this kit will be available to the S550 GT V6 and EcoBoost owners for the high $300 mark for the pair which is gonna be by far and away the most affordable upgrade currently in the category.Install will be a direct swap and require no modification whatsoever but since there is a fair amount of work needed to get everything installed, the site is gonna kick this one up to a soft three out of three wrenches on the difficulty meter and about four hours or less from start to finish. But as always, guys, if you hang till the end of the video, we'll show you how it's done.So right off the bat, guys, I do wanna point out that while, yes, this will be an upgrade over the stockers, they will not be on the same level as those more expensive DSS or Ford Performance options that we just mentioned that are rated anywhere from 800 to 1,400 horsepower. So, with that in mind, don't install these on a big power blower car on radial, drop the clutch at six grand and expect everything to be fine and dandy because that will certainly not be the case. Instead, Ford Performance is gonna state that the GT350 stuff will be a great option for the mild drivetrain modifications, bolt-on NA stuff, things like that. So, if you're looking for big power, drag radial, manual car, these will not be the way to roll.And while I know everyone wants to hear the horsepower or torque limitations of these half shafts, the reality is no one really knows, not even Ford Performance. And if they do know, they don't state it anywhere. They're obviously good enough to handle the 526 horsepower Shelby but after that, it's pretty much unknown territory. Now one thing that will test the limitations of these will be traction. So again, I'm gonna sound like a broken record here. Don't go doing any 6K clutch dumps from a dig on a radial if you want these things to live a long life. Now if you do plan on doing that, then I am certainly going to steer you or advise you to spend the money towards something a little bit stronger designed specifically for that type of abuse.So, we know these things won't be entirely bulletproof but we do know they are a marginal increase or upgrade over the stockers but in what way? Well, if you take a closer look at your driver side or basically your left side half shaft, it is going to be considerably thicker than the stocker that you are replacing. That's basically where the upgrade is coming from here, guys. Passenger side on the other hand is essentially the same diameter as the factory stuff in your S550. So again, it's an upgrade but it's not nearly as burly as the $1,000 to $2,000 option. Obviously, this kit's costing you just north of 350 bucks. So, take that as you will and use that as you will. Don't expect these things to be bulletproof at the end of the day. An addition to that, the site will recommend upgrading both your axle seals and bearings but what I'll say here is, guys, if your car is low mileage and chances are it probably is given the year range, that's gonna be up to you at the end of the day. It's probably not a necessity but we like to recommend that kinda stuff while you're in there doing the work as it's never a bad idea.But now as promised, we wanna show you how to get them in place. So, to do so, here's my man, Andrew, with your walkthrough along with a quick, little tool breakdown.Andrew: Tools used for this installation: 15-millimeter wrench, 8-millimeter socket, 10-millimeter socket, 14, 15, 18-millimeter socket, 21-millimeter impact, 32-millimeter axle nut, quarter inch drive, three-eighths inch drive, half inch drive, ballpeen hammer, soft mallet, various extensions, prybar, caliper hanger. Optional is a three-eighths impact and a half inch impact.All right, we're gonna first start by setting the parking brake and getting the car in the air.All right, now we're gonna remove our wheel.All right, now we're gonna be using a 32-millimeter axle socket. If you don't have one of these, you can get them at the local parts store or you can rent them even. And that's actually the whole reason why we set our parking brake. Now we have to get the vehicle down on the ground to release the parking brake so we can actually remove our caliper. All right, now we're gonna release our parking brake and get the vehicle back up in the air.All right, our next step is to remove our brake caliper but first, we're gonna remove the brackets holding our parking brake cable in as well as our ABS line and this bracket over here holding the brake line itself. So, it's a 10-millimeter. We're gonna separate the ABS cable from the parking brake bracket right there. Now we're gonna move on to the brake line bracket right here. Again, 10-millimeter.Now we need to take our caliper off. That'll give it room to hang. We're gonna hang it from the shock tower right here. Now we're using a 14-millimeter socket on the caliper bolts. Top and bottom. So, remove these. Then we have a bungee cord or a coat hanger or the specialty hanger that I'm about to bring in. You will need to support your caliper when you take it out of this bracket.All right, now using an 8-millimeter socket, we're going to remove the bolt holding in our wheel speed sensor. All right, now we're gonna pull this out and set that to the side. All right, now we're gonna be taking out the two bolts holding in this link to the lower and upper control arm. This is a 15-millimeter and this is an 18-millimeter. Now it's important to note I do have a jack stand supporting the weight of this whole side of the independent rear suspension.All right, now we're gonna remove this link. I do have a prybar. I'm gonna put it underneath here and just pry down with it. Maybe even use a soft face mallet. All right, now we're gonna be removing our upper control arm to the spindle using a 15-millimeter wrench on this side and a deep 18 on this side.All right, now we're gonna remove this 21-millimeter bolt holding the rear lower control arm to the spindle. Now I do have my shoulder pushing up against this brake just in case anything shifts.All right, now we're gonna be removing this 18-millimeter bolt holding the spindle to this control arm right here. With this out of the way, we can now remove this whole spindle.All right, now we have to separate the half shaft from the differential housing and you are gonna get a drip or two of differential fluid on you. And what I have here is a big prybar I'm going to stick between the half shaft here and the mating flange and I'm just gonna pry it.All right, now with that out of the housing, we can pull our shaft out. Now you will have to lift up on this upper control arm to gain a little extra clearance. Now we're able to slide this out of the way.All right, so now that we have our stock axle out and our new GT350 axle out, we can see some of the differences in the boot here. The boots do extent a little bit further down there, maybe giving it a little bit more grease. The ends of these CVs are a little bigger as well but what we really wanna see is the end right here. Make sure that this ring is seated correctly. Looks like it's good. So now we're ready to install this on the car.All right, now we're gonna install our new GT350 half shaft. Again, lift up on that control arm to get past that boot. And we're gonna slide it in to the housing now. All right, now we're gonna insert our axle into the housing, being sure that our splines are lined up. Now I'm gonna attempt to try to push it in here. Now we're gonna slide our axle into place. And then you'll hear that click. That means that your ring is now seated in that housing. Now we're ready to reassemble everything, put the wheel back on, and move on to the next side.All right, so I have the spindle back up. You'll notice a few things. I took the brake caliper bracket off as well as the rotor and the brake dust shield just so you guys can see what we're doing here. We are going to put our axle shaft in the spindle here. Make sure that the splines are lined up. All right, now I'm gonna connect this lower link to the spindle. Basically doing everything in reverse the way we took it off.All right, now I'm not gonna torque this down just yet. I'm just gonna tighten it up. Then we're gonna move on to the lower control arm here and the spindle. Make sure that's lined up.Now this is a 21-millimeter bolt. We are just going to tighten it up. We're not gonna torque it down just yet. All right, now we can work on our top upper control arm. That one uses the 15 and 18 bolt and nut combo. You may have to bring the spindle up towards you and this down. Start that nut. And then using a deep 18 and a 15-millimeter wrench, tighten this one up.All right, now we're gonna put this link back in. What I'm gonna do is start with the bottom. Start my bolt a couple threads and then rotate that up into place. Use my factory hardware. I'm gonna tighten that up. It's an 18 on the bottom and a 15 on the top.All right, now we're gonna reinstall our brake dust shield. And this is on by three 8-millimeter bolts.All right, now we're gonna bring up our rotor and brake caliper bracket. Hang our rotor right there. All right, now we're gonna bring our caliper bracket into place. Make sure it's not upside down. And then I'm gonna put the two 18-millimeter bolts back in.All right, now we're gonna put our brake pads on. This is a great time to swap pads if you wanted to change up your brake pads or rotors. And we're gonna slide our caliper back into its place. All right. Now I have the two 14-millimeter bolts in my hand. Now it's important for the brakes to make sure that this little collar or sleeve is seated in its place right there. All right, and we're gonna tighten down these 14 millimeters.All right, what we're gonna do now is just go through our bolts that we've loosened and just go around and make sure that they're tight. Then onto this upper link here. Again, 18 on this side and a 15 over here. All right, now we're gonna remove the pole jack. If you're using a regular floor jack, because we have to lower the vehicle back down in order to get our brackets all reattached and the wheel back on. All right, now we're gonna take our 8-millimeter hardware and our wheel speed sensor, put that back in its home. And then tighten it down with the 8-millimeter socket.Next, we're going to attach our parking brake cable back to our upper control arm. That is with a 10-millimeter bolt.All right, now we're ready to put our brake line back onto our sway bar bracket here.All right, now we're gonna put our nut back on the end of our axle. Before I did this, I did set the parking brake because we are gonna have to tighten this down and we don't want that moving on us.All right, once you've finished up tightening up this axle nut, you wanna put your wheel back on, repeat all those steps on the other side, get the vehicle on the ground, and test it out.All right, that's gonna wrap up my install of the Ford Performance GT350 Half Shaft kit. For all things Mustang, keep it here at americanmuscle.com.
Subscribe to our YouTube Channel
Features, Description, Reviews, Q&A, Specs & Installation
Brand | Ford Performance |
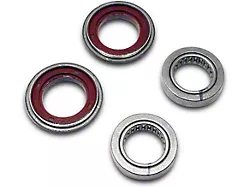
Spline Count | 34-Spline Inner; 32-Spline Outer |
Axle Placment | Rear |
A Valued Priced Upgrade. If you have installed performance upgrades on your 2015-2024 Mustang GT350, you might be worried about what effect its increased power will have on your Pony’s half shafts. The Ford Performance Mustang GT350 Half Shaft Kit is a valued priced upgrade that is recommended after doing mild drivetrain modifications or naturally aspirating engines. These shafts are designed and manufactured in the USA.
Both Sides Included. This half shaft kit includes both left and right half shafts. The left shaft has an increased diameter, which is larger than regular Mustang GT half shafts. These half shafts are original equipment of Mustang GT350s built from 2015 and up.
Tech Note. When installing this half shaft kit, it is recommended to also replace your IRS bearings and seals for the best results.
Expert Installation Required. This kit requires expert or professional installation.
Application. The Ford Performance GT350 Half Shaft Kit is engineered for installation on 2015-2024 Ford Mustang models.
Fitment:
Ford Performance M-4130-M8S
CA Residents: WARNING: Cancer and Reproductive Harm - www.P65Warnings.ca.gov
Installation Info
Installation Time
(approx) 4 Hours
Difficulty Level:
Mechanical expertise or professional installation required.
What's in the Box
Tech Guides:
10 More Questions