Installation Time
(approx) 4 Hours
Difficulty Level:
Light to Moderate mechanical skill required.
FREE 2 or 3-Day Delivery on Orders $119+ Details
Justin: If you're looking for a quality set of coil-overs to help improve the stance and more importantly the handling of your 2011 and your Challenger, but without spending thousands of dollars, well then you should definitely consider the Ksport Kontrol Pro Coil-Overs shown here today. Now, the Pros will feature 36-way dampening adjustment with the monotube shocks and struts along with the adjustable pillow ball mounts off of right around the low to mid $900 price point. Install will get a solid two out of three wrenches on the difficulty meter and take roughly four hours or so to complete from start to finish, as we'll show you guys later in the video. So, if you didn't know Ksport is a U.S.-based company that has been around for nearly 20 years and specialize in all things suspension. Now, they've since expanded their lineup over the years to include things like braking components and control arms. And they do really have a big presence in the drifting and Formula D world.Now, the Kontrol Pros that we have here on the table today certainly gonna be geared more towards street use things to the slightly softer spring rates and valving while the company's Kontrol Sport will be a little bit more geared towards track use. But with all that said, let's take a closer look at the Kontrol Pro dampers here, and at the core guys, you're gonna find a monotube design with a single floating piston and a nitrogen charge. Now, traditionally, the monotube design will dissipate heat a little bit faster, suffer less cavitation than a twin-tube design, which will ultimately result in a more consistent ride and more consistent performance. Now, dampers themselves are 36-way adjustable, guys, which will really allow you to customize the ride quality and handling based on your driving type and preference. But sticking with adjustability, guys, obviously these are adjustable in the ride height sense as well, kind of the main reason of going with the coil-over, of course, thanks to the adjustable collar and threaded body here.Now, Ksport doesn't disclose the exact amount of drop possible with these installed, but it's been my experience that with most cars, most coil-overs basically they allow you to slam the car to the grounds of the point of being almost undrivable if that's what you prefer, right? Or if you'd like to just keep things a little bit more modest, maybe go with the small drop compared to stock. Well, that's entirely possible here as well and really anything in between. Now, the springs on the Kontrol Pros do feature a powder-coated design with a rate of 12k for the front spring and a 25k spring here for the rear. Now, the springs will ride on the 6061-grade aluminum collar which is also gonna be your height adjustment for the rear and will deliver excellent strength along with a very lightweight. Another thing I do wanna point out here with the Ksport is that they do include pre-installed pillow-ball mounts for the front. Now, these plates or pillow-ball mounts had been loaded with upper spherical bearings that are just gonna allow for smoother articulation without any binding or excess noise and will contribute to improved steering feel compared to your stock strat mounts.Now, one of the nice things about going with a coil-over setup like this as opposed to maybe just a spring and shock setup is that you're not gonna have to mess with any spring compressors when it comes time for the install. Instead, you're just simply gonna yank out the stock strut assemblies, bolt the case boards in their place and that's pretty much it, guys. There's no modifications or crazy tools needed. Now, you should definitely get an alignment after everything's been installed and you had your time to dial in your ride height, just you're not chewing through your tires at an accelerated rate and ultimately you're gonna get your best handling performance out of a proper alignment. Finally, guys, Ksport does back their coil-overs with a 12-month limited warranty just in case you should run into any issues. But now we wanna show you just what it takes to get the Ksport installed on your Challenger at home, and to do so, feel free to check out our detailed walkthrough and tool breakdown now.Man: Tools used for this installation, half-inch impact gun, 3/8 electric impact gun, 6-inch 3/8 extension, half-inch swivel, 3/8 swivel, 18-millimeter reflect socket, 13-millimeter, 16-millimeter 3/8 sockets, 15-millimeter, 18-millimeter, and 21-millimeter sockets, half-inch drive extension, 20-millimeter to 22-millimeter combination wrench, 18-millimeter wrench, and a hammer. Hey, guys, I'm gonna show you how to install a coil-over kit on our 2013 Challenger. It's not a bad install, I'm gonna take you through all the steps, let's get started. First thing we're gonna do is remove our ball joint or loosen it up. I'm gonna take my 18-millimeter on my 3/8 electric impact gun, put it on here, I'm gonna hold down and I'm gonna get the nut and just leave it on there. I'm gonna take my hammer, I'm gonna have to give a good whack, just like that. Next, we're gonna loosen our strut up. So now we're going to remove our sway bar nut and then we'll remove our 18-millimeter here that holds our strut end. So I'm taking my half-inch gun with a 21-millimeter to remove this nut, I'll switch it over to our 18-millimeter, remove that bolt. And now that we have those out, we'll go up to the top and we'll remove our 13-millimeters up top.So now that we have our bolts underneath loose, we're gonna loosen up our three 13-millimeters up here. We have our strut brace here, we're not gonna have to remove that, what I'm gonna do is loosen these up. I'm gonna take two of them off, and the one I'm gonna loosen but not take all the way off. I'm gonna let it hold on, then we're gonna go back down underneath, I'm gonna lift up on the strut, reach my hand up here, loosen that up, and then we'll be able to push down on our control arm and remove our original strut. So, now what we're gonna do is I'm going to just remove our nut, our ball joint. I left it on there so that this won't flop around. I'm gonna release that, let this hang. It's not gonna hurt if it hangs a little bit, you don't wanna push down on it, but it'll be all right with the brake hose. Then what I'm gonna do, I'm gonna use my stool because I'm short. I'm gonna get up here, take this 13-millimeter off that we just left on there. That'll let the strut drop down. And then what I'm gonna do with the push down, and move it around a little bit to get it out.Now, once I get it out, it takes a little bit to work it out just with the nut, I'm gonna put my nut back on this, just a thread or two, just so this doesn't hang on the brake hose, it's always a good thing to do that. Now that we got our strut out, you're gonna wanna repeat the same procedure on the other side. So now we're gonna remove our rear shock and coil spring for our new coil-overs. Pretty much what I'm gonna do is get up in here, take these two bolts out here, take the bottom, that'll get the shock loose. Then once I get that done, then I'll go over, put a pole jack under, the lower control arm would fold out, lower down. Now, if you're at home, you can use a jack underneath here, make sure you got the car supported. But we're gonna do that, I'm going to take my 16-millimeter on my half-inch impact gun. I'm gonna get up here and remove these two upper bolts. So now I'm gonna take my 16-millimeter on my half-inch impact gun. We're gonna get up in here, remove the two upper shock bolts. And now we'll remove our lower one.So now we have our upper shock bolts out, now I'm gonna take my lower one off, I'm gonna use my half-inch impact with an 18-millimeter and a 15-millimeter on the other side. I'm gonna remove that bolt. Now we'll get a pole jack, put it underneath, and support the lower control arm. So now I'm underneath the vehicle, we're going to put a pole jack in this pocket right here. Now if you're at home, you can use floor jack, put it in this pocket to support it and we're gonna put tension on the coil spring and lift up on it a little bit. That way when we get ready to take this bolt out, we already know we have it compressed a little bit. So I'm gonna take it, compress it, you can do the same with a floor jack and get some tension on it. Now that we have tension on it, there's a couple of 13-millimeters here I'm gonna remove to lower the exhaust down so I can get to the control arm bolt. Now that we got our coil spring compressed with our pole jack, there's a 13-millimeter bolt here holding this hanger and a 13-millimeter bolt here holding that hanger. I'm gonna take my 3/8 electric impact gun with 13-millimeter and remove both these bolts to let this exhaust hang down. That's one, and that's two.Now, that'll get it out of the way so we can get to the control arm bolt. Then I'm gonna take my 15-millimeter and my 18-millimeter wrench and I'm going to remove this control arm bolt. Now I'm gonna take that bolt all the way out. Now, once I have that out, we'll drop the control arm down. So now that we have our bolt out, I'm gonna lower this down with our pole jack. And if you're at home and you're doing this with a floor jack, it's actually a little bit easier because the pole jack moves around a little bit. I can move this coil spring out from the pocket. Now that we have our coil spring out, I'm going to lower it down a little bit more and get the shock out. And it has to clear up top which is a little tough. Once you get it out of that, you can pull your shock right out. And that is our removal of the rear coil spring and shock. You're gonna wanna repeat the same procedure on the other side. And just be careful if you're using a jack so it doesn't slip out. It can be pretty dangerous with this stuff.So, I have our coil-over kit out on the bench here. And I'm gonna go over some of the stuff with this as far as setting right height, the dampening of the shocks. The rear has dampening in it too, how to adjust the right height on the rear. So we'll get started by doing our front strut assembly and I'll show you how to set the right height. And I'll show you what the dampener does. So, this is how the strut assembly comes in the kit. Now, if you're gonna wanna set your ride height, you're not gonna move your coil spring here or move these. We're gonna end up moving this part here, we're gonna loosen that, whacking that up, and we're gonna turn the strut assembly like this. And that's gonna set your ride height. Now determining where you want your ride height, that's another thing that you're going to have to figure out. You're gonna have to set this and try to get the car down on the ground, see how it looks. And then determine where you want your ride height to be.Once these two are locked together, you're able to spin the whole assembly in the car but it is not an easy task. I always loosen it back up. And then just give the strut assembly a couple more turns to make it so that I can get the right height to where I want it. We're gonna set it kind of near-stock but just a little bit lower. And I'm just gonna do that by measuring this compared to the other strut assembly and then go from there. Now, this does have a dampening on it for how hard or soft you want the shock itself to compress release. Now, I'm basically going to, for demonstration here, we're gonna put this and we're gonna count the turns from open to close. So, we'll go all the way one way till it stops, go all the way back count the turns, and then I'm gonna put it in the middle and start there. I think that's a safe place to start with this one. Now we'll go on to the back one and I'll show you how to set that up for ride heights.So, now we're on to our rear shock and coil spring assembly. We're going to reuse our lower rubber perch mount from our control arm. I'm gonna take my coil spring and just turn that in till it goes into the stop right there. Once we get that done, then we're gonna go on to our top mount. You're gonna see this is gonna be your adjustability of where your ride height comes from. Once you get it set, you're gonna wanna take your locking nut, lock it with a spanner wrench, same as the front strut, that has a spanner wrench, not on a two, so you can use them to lock it down. We're gonna kind of eyeball the old coil spring assembly, and maybe drop it like an inch to start. Hopefully, that'll be a good place when we get our ride height down. And then we're gonna go on to our shock. And you're gonna be able to adjust the ride height on your shock by just turning this knob right here or just turning the bottom of the shock. Once you screw it out, screw it in, it will end up making your ride height where you need it. It also has a dampener on it here, the dampener, I turn all the way to where it stops. Once I get it to where it stops, I'm going to count the clicks, and go back and put it in the middle to start there. That's a good process. Now that we went through all this, we're gonna take it and start installing it on our vehicle.So now that we're done on our bench over there, I'm gonna bring my strut over here, and we're gonna install it on the front of the car. I'll loosen our ball joint nut up and just let this hang down here. It's not gonna hurt if it just hangs for a little bit on the brake hose. I'm gonna take the strut assembly and we're gonna fish it up through here. And once I get it in place, I'm gonna reach up here, take one of our 13-millimeter nuts, and get it started. And that'll hold our strut in place for now. I'm gonna take my lower and my upper ball joint there and hook that back up, put the nut back on that. And you're gonna have to adjust this for ride height, you might have to loosen it up in the top, drop it down again to get to wherever you want your car to sit. We have a kind of set where the factory gave it to us. So we're gonna leave it here. Now what I'm gonna do is we're gonna lower the car down, I'm gonna put a jack under, jack it up to get my bolt started and to get my sway bar link sorted in the back of the strut.So now what I'm gonna do is I'm gonna pick up the hole spindle, and I'm gonna pick it up so I can start my strut bolt in there that holds the strut into the lower control arm. Then once we get that done, then we'll go over and we'll get the jack and we'll jack up our sway bar, we'll get that into the back of our strut. So, what I'm gonna do is lift up, line it up, put that bolt through, put our nut on the back of it, and then I'll get my gun and we'll tighten it up. I'm gonna take my half-inch driver with my 18-millimeter and I'm gonna take my 22-millimeter on the other side, hold the nut, tighten it. Now we'll lower it down and get our sway bar link put back in. So now we're gonna install our sway bar link. I thought I was gonna have to lower it down and jack up. If you do have to lower it down to get this to lineup, you're gonna wanna put the jack on the sway bar right here out towards the end. That'll give you the ability to raise it up. Ours is actually lined up pretty good. So I'm just gonna end up installing our nut, and I'm gonna take my half-inch impact gun with a 21-millimeter and tighten that up. Now that we have that tight, we'll go up and we'll tighten our ball joint. So now we're gonna tighten up our ball joint back up. I'm gonna take my 18-millimeter on my 3/8 electric impact gun.Now that we have that tight, I'm gonna go up and tighten our three 13-millimeters up top that hold the top of the strut to the frame. So now we're gonna install our three 13-millimeter nuts up top. I already installed one, that's what held the strut in place. I'm gonna take my 3/8 electric impact gun and tighten these up. It's got a 13-millimeter on it. And now that I have those three done, our strut's installed. Now you're gonna wanna make sure that anytime you do suspension work, you're gonna wanna torque things to manufacturer's specs on all the suspension parts. Now you're gonna just wanna repeat the same procedure on the other side. Now, I'm gonna start by installing our rear shock, I'm gonna sit it down in place, I'm gonna take my two bolts, stick these back up in. Now, once I get them started, now we'll install our coil spring then we can start lifting back up and seeing where everything ends up being.Now we're gonna take and install our coil spring, I have my coupler on, I have a rubber seal up top that comes into kit, I have our lower seal that was from the factory. So I'm gonna take my coil spring, slide it into place, make sure it sits down in. Now, once I get it down in place, I'm gonna take my pole jack, start raising it up. Once I get it up pretty close, I'll be able to tell where the shock's gonna be if I have to lengthen the shock. And if you're doing this with a floor jack, just be careful. So I have it up in place. Now I can adjust my shock, get my shock so that the bolts go in. I'll put my other bolt in there and then we'll be able to start putting our exhaust back up. So now we'll tighten up our two 16-millimeters for our shocks. Now we'll go finish our exhaust. So now we're gonna put our lower control arm bolt back in. And once you get it so far, you might have to adjust it a little bit or use a pry bar. Once you get it lined up, I'm gonna take my 18-millimeter and my nut, tighten that up. Now we'll put our shock bolt in, line our...I'm gonna take my impact with my 15-millimeter and my 18-millimeter wrench, tighten that up. Now we'll go back up and tighten our upper shock bolts up.So now that we got our upper shock bolts tight, I'm gonna reinstall our exhaust by putting our 13-millimeters in. Put that one back up in. Now that's tight, our exhaust is on, and that wraps up this installation. Okay, guys, and with that, that wraps up this review and install of our Ksport Kontrol Pro Coil-Over Kit for '11 to '21 Challengers excluding all-wheel drive and Demon and Hellcats. Thanks for watching. And for all things Challenger, keep it right here at americanmuscle.com.
Subscribe to our YouTube Channel
Features, Description, Reviews, Q&A, Specs & Installation
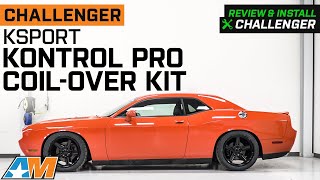
Enhances Suspension System. Boost your Dodge Challenger’s suspension performance by adding this Ksport Kontrol Pro Coil-Over Kit. This coil-over kit transforms your car into a road racer with its 36 levels of damping adjustment. So even if you encounter some bumps and potholes as you cruise the road, you can still experience a superior ride quality.
Crafted Using Aluminum Material. This Ksport Kontrol Pro Coil-Over Kit contains mounts and pieces that are made of 6061 aluminum. Furthermore, the components are electroplated with zinc to resist rust and corrosion.
Direct Installation. For ease of installation, Ksport built this coil-over kit to directly mount to your car’s factory location points. Geared with the right tools and mechanical expertise, you can easily install this coil-over kit using the supplied mounting hardware.
Backed by a 12-Month Limited Warranty. Ksport is backing this coil-over kit with a 12-month limited warranty to cover defects in material and workmanship. However, this warranty will be considered void if the product has been modified, customized, painted, dented, rusted, or improperly installed. For more warranty information, please visit the official Ksport website.
Application. The Ksport Kontrol Pro Coil-Over Kit is designed to fit all 2011-2023 Dodge Challengers, excluding AWD, Demon and Hellcat models.
CA Residents: WARNING: Cancer and Reproductive Harm - www.P65Warnings.ca.gov
Installation Info
Installation Time
(approx) 4 Hours
Difficulty Level:
Light to Moderate mechanical skill required.
What's in the Box
10 More Questions