

Installation Time
(approx) 6 Hours
Difficulty Level:
Mechanical expertise or professional installation required.
Installation Guides
No guide available for this part yet.
 FREE 1 to 3-Day Delivery on Orders $149+ Details

$568.00 set
CONFIRM THIS FITS YOUR VEHICLE!
Saved - View your saved items
We're sorry. We couldn't save this product at this time.
or use

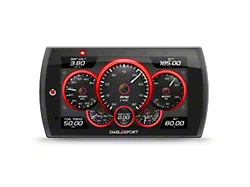
Diablosport Trinity 2 Platinum Tuner (09-14 5.7L HEMI Challenger)
 43
43

Eibach Sportline Lowering Springs (08-14 Challenger SRT8; 09-23 Challenger R/T; 09-23 V6 Challenger)
500+
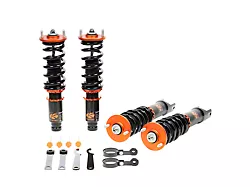
Ksport Kontrol Pro Coil-Over Kit (11-23 RWD Challenger, Excluding SRT Demon, SRT Hellcat & SRT Jailbreak)
 23
23
Features, Description, Reviews, Q&A, Specs & Installation
| Brand | Eibach |
| Sway Bar Location | Front and Rear |
| Sway Bar Includes End Links | End Links Not Included |
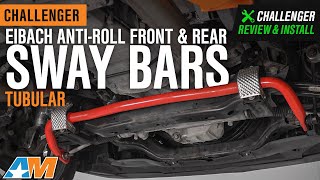
Decreased Body Roll. For a more comfortable and smoother ride, upgrade to these Tubular Eibach Anti-Roll Front and Rear Sway Bars. These sway bars help improve your vehicle’s suspension stiffness, resulting in a decreased body roll. By upgrading to this kit, you can also make faster and sharper turns, thanks to its higher level of tensile strength.
Two-Way Adjustable Sway Bars. These Tubular Eibach Anti-Roll Front and Rear Sway Bars give you the ability to fine-tune your handling since they are adjustable. These sways bars can be adjusted in two mounting positions to suit your driving style.
High-Quality Construction. Manufactured from cold-formed, aircraft grade steel, these Tubular Eibach Anti-Roll Front and Rear Sway Bars are guaranteed to be of the highest quality. Built for long-term use, these won’t easily rust and break, thanks to its red powder coat finish.
Urethane Bushings. This kit is also packaged with greaseable, urethane bushings. These are guaranteed to provide your vehicle a satisfying handling performance since these are designed to decrease your vehicle’s NVH.
Bolt-On Installation. Anyone with mechanical expertise can easily install this product since it comes with a bolt-on design, however the rear subframe needs to be dropped for installation. If you don’t have any mechanical expertise, please ask a professional mechanic for help.
Limited Million-Mile Warranty. This anti-roll kit is covered by a limited million-mile warranty. If your purchased product has any manufacturer defects, please contact customer service to learn about the warranty claim process.
Application. These Tubular Front and Rear Eibach Anti-Roll Sway Bars are created to fit 2008-2014 SRT8, 2009-2023 R/T and V6 Dodge Challenger models.
Eibach 2895.320
CA Residents:  WARNING: Cancer and Reproductive Harm - www.P65Warnings.ca.gov
Installation Info
Installation Time
(approx) 6 Hours
Difficulty Level:
Mechanical expertise or professional installation required.
Installation Guides
No guide available for this part yet.
What's in the Box

