Talk to a Mustang Sales Tech
1-877-887-1105
M-F 8:30A-11P, Sat-Sun 8:30A-9P
$20K Sweeps! 10 Chances to Win! Enter Daily >

Ksport Kontrol Pro Coil-Over Kit (05-14 Mustang)

Item 407831
Verify parts fit and get product recommendations.
Mustang Sales Techs: Connect Now M-F 8:30A-11P, Sat-Sun 8:30A-9P
$0.00
Our Price

$1,147.50 (pair)

FREE Shipping Market Price $1,319.99 You Save 13% ($172.49) Up to 10% off for Military & First Responders! See Details

Will this fit your Vehicle?

Select a different vehicle Help?
Update or Change Vehicle
Ship to: Ashburn - 20149
Sorry, please enter a valid US or CA postal code
We're sorry, zip can't be updated at this time.
    Create a list
    Add to New List

    Saved - View your saved items

    We're sorry. We couldn't save this product at this time.

    or use

      Product Videos

      Justin: If you're looking for a quality set of coil-overs to improve the stance, but more importantly, the handling of your 2005 to 2014 Mustang, and you don't wanna drop thousands of bucks, well, then you should definitely consider the Ksport Kontrol Pro Coil-Overs shown here today. Now, the Pros are gonna feature that 36-way damping adjustment, along with the monotube shock and strut design and the adjustable pillow ball mounts all for right around that mid $900 price point. Install's gonna get a solid two out of three wrenches on the difficulty meter here, gang. Take you about four hours or a half a day to complete from start to finish. But if you hang with me for a bit, we'll walk you through that job later in the video.So Ksport is a U.S.-based company that has been around for about 20 years now, give or take, and they do specialize in the suspension world. Now they've really expanded their lineup over the years to include things like braking components, hydraulic e-Brakes, control arms, and do have a pretty big presence in the drifting world and formula D as you might be able to tell from those list of parts. Now, the Kontrol Pros that we have here today is certainly gonna be a little bit more geared towards street use, thanks to the slightly softer spring rates and the slightly softer valving, while the company's Kontrol Sport coil-overs will be a little bit more geared towards track use and will feature a stiffer spring rate and stiffer valving.But let's start with the Kontrol Pro dampers that we have here today. And at the core, you're gonna find a monotube design with a single floating piston and a nitrogen charge. Now, traditionally, a monotube will, I would say dissipate heat a little bit better, suffer less capitation than a twin-tube, which will ultimately result in a more consistent ride and more consistent performance. Let's be honest. Now those dampers, again, are gonna be 36-way adjustable here, which will allow you to customize your ride and the quality of your ride in handling based on your driving type and, of course, ultimately your preference. But sticking with adjustability a little more, obviously, we talked about that 36-way damping adjustment. Well, obviously, these guys are gonna offer some adjustment in regards to your ride height as well.Take a look at your threaded body here, guys. This is essentially the amount of control or adjustment you have when it comes to ride height. Now, Ksport doesn't disclose the exact amount of drop here with the Kontrol Pros, but it's my experience that most coil-overs, including this one, will essentially allow you to slam the car to the ground to the point of being undrivable if that's what you're into, or obviously, keep things modest, go with a close to stock ride height maybe a little bit less. But you do have a wide range of height adjustability here with the Ksports.But let's shift our focus over to the springs. And you're looking at a powder-coated design here, a 12k spring on the front here to be exact, whereas the rears, guys, you're looking at 4.5k spring. And these springs are gonna ride on the 6061-grade aluminum collars, which are known for being very strong, of course, but also at the same time, they're gonna reduce some weight to be very lightweight. Now I mentioned at the top of the video, guys, that the Ksports do include the pillow ball mounts here, which if you didn't know are essentially a pre-installed castor camber plate that will allow for anywhere up to two degrees of both positive and negative camber adjustment, along with some caster stuff as well. Now, those plates are gonna be loaded with an upper spherical bearing that will allow for smooth articulation without binding or excess noise. And overall, Ksport says they're gonna help contribute to a more improved, more responsive steering feel.But going back to this assembly, as you guys can see, it is pretty much ready to rock and roll right out of the box. And this is one of the things I really like about going with a coil-over such as this because you don't have to mess with spring compressors or anything like that. You're simply just gonna yank out your factory assembly or your stock coil-over setup, and then bolt the Ksports into place without modification. And again, it's just a lot easier at the end of the day. Now, of course, you will need to get an alignment after the install has been completed and after you dial in your ideal ride height. That's one thing you will need to do a little bit here with these coil-overs.Play with the included spanner or wrenches, get your ride height set perfectly, maybe sleep onto the night, come back out to the car, see if you're still digging it because after you go get your alignment, you're really not gonna wanna mess with that ride height too much more after that. After that, though, guys, you should know that the Ksports do get backed by a 12-month warranty on parts here just in case you happen to encounter any issues. But enough about the Ksports themselves, why don't we show you how to get them installed on your S197 at home? So without further ado, check out our detailed walkthrough and tool breakdown right now.Man: Tools for this install, an impact, as well as a pneumatic impact, a ratchet or electric ratchet, a 21, 18, 17, 15, 13, 12, and 10-millimeter socket, as well as a 15-millimeter swivel socket, a hammer, a 17-millimeter wrench, and a caliper hanger. Hey guys, today we have our 2014 Mustang, and I'm gonna show you how to get your new coil-over kit installed right now. Now the first step after you get your tire off would be to remove your caliper. Now I'm gonna grab my 15-millimeter swivel socket, and get the two bolts on the top and bottom removed, and then we can hang it on the frame. Now, after you get your caliper removed, grab a bungee cord or a caliper hanger, and go ahead and hang that up in a safe location, that way, you are not stressing out the brake line.Now with your caliper removed and secured, you could also pull off your rotor. Now on the front side of your strut, grab a 10-millimeter socket and remove the brake line from your stock strut. Next, grabbing your 17-millimeter wrench and an 18-millimeter socket, remove the nut at the top of your sway bar end link. Now using the same 18-millimeter socket, remove the two bolts at the bottom of the strut. Now, because there is some pressure on the bottom bolt, don't be afraid to use a hammer, give it a few taps to get the bottom bolt out. Now the final step to getting your strut assembly removed, remove the four bolts at the top inside the engine bay using a 13-millimeter socket. After you do that, your strut should come right out.Now with your stock strut assembly removed, you can now get your new strut assembly in place. And using the new nuts provided with your new struts, secure them down into the strut mount. Now these new nuts are a different size, so grab a 12-millimeter socket and tighten them down. Now take your spindle and line that up with your new strut and place your strut bolts through your new strut. Now take the nuts and put them on the backside of your strut bolts. And this time, we're gonna take our 21-millimeter socket and tighten down these nuts. Now taking your brake line, place that onto your new strut. Now our kit didn't come with the nut to secure this, so I would suggest picking up an M6 by 1 nut so you can secure it onto your strut.Now adjust the collar to match the height of your sway bar link. And then we can get that secured using the stock hardware. Again, that's gonna be a 17-millimeter wrench and an 18-millimeter socket. Now take your rotor and put that back in place. And take your caliper and put that back in place as well. Again, this is gonna call for your 15-millimeter socket. Now repeat those steps on the other side.Now moving on to the rear end of the Mustang, we can actually take out both springs at once and the way that we're gonna achieve this is removing the sway bar links, as well as the shocks, and lowering it down using the pole jacks. Now you do not need to remove the sway bar completely just the links from the frame using a 15-millimeter socket. Now do the same with the other side. Once your bolts are removed, swing your sway bar out of the way. Grabbing your 15-millimeter once again, remove the bottom bolt from your shock. And do the same with the other side.Now with the bottom of the shock disconnected, we can now lower our axle and uncompress our springs. And now we can remove our shock using our 15-millimeter socket as well on the inside of your trunk. Now with our stock shock removed, we can place our new one in. I would recommend grabbing a buddy to hold it in while you place it into the back of the trunk. And with a 17-millimeter socket, tighten your new shock down.Now place your spring adjuster and new spring onto your axle. Now raise your axle using your pole jacks to get your spring seated correctly. And using your stock hardware, bolt in the bottom of your new shocks. And bolt your sway bar link back in using your stock hardware as well. Now place your tires back on and that's gonna wrap it up.Now that everything's bolted up, that's gonna wrap it up for our review and install of the Ksport Kontrol Coil-Over kit, fitting your '05 to '14 Mustang. For more videos just like this, keep it right here at americanmuscle.com.

      Product Information

      Features, Description, Reviews, Q&A, Specs & Installation

      Features & Specs

      • Kontrol Pro Coil-Over Kit
      • Improves Ride Quality and Driving Performance
      • Designed for Professional Road Racing
      • Monotube Internal Design
      • Single Adjustment Type
      • Durable Aluminum Construction
      • Completed With a Zinc Finish
      • Features 36 Levels of Damping Adjustment
      • Gas-Charged Shock Absorber
      • Without External Reservoir
      • Bolt-On Installation
      • Sold as a Kit
      • Supported by a 12-Month Limited Warranty
      • Tailored to Fit All 2005-2014 Ford Mustang Models

      Description

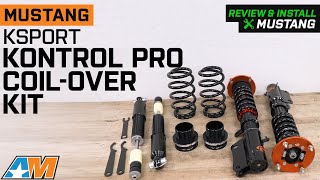
      Consistent Ride Quality. Installing this Ksport Kontrol Pro Coil-Over Kit allows you to experience a consistent ride quality in your Mustang. Thanks to its monotube design, your coil-over system is able to dissipate heat faster, allowing it to function even in tough driving conditions. Furthermore, this coil-over kit features 36 levels of damping adjustment in order to provide you with a smooth street-driving action.

      Durable Aluminum Construction. Engineered to handle your car’s tough driving demands, this Ksport Kontrol Pro Coil-Over Kit is built using the durable aluminum material. Furthermore, the mounts and pieces of this kit are completed with a zinc finish to provide superior protection against rust and corrosion.

      Bolt-On Installation. If you have a moderate-to-high level of mechanical skills, you may find this coil-over kit easy to install. Built with a bolt-on design, this coil-over kit can be directly mounted to your car’s factory location points.

      Supported by a 12-Month Limited Warranty. For your peace of mind, this coil-over kit is supported by Ksport’s 12-month limited warranty. To learn about the warranty claim process, please contact customer service.

      Application. The Ksport Kontrol Pro Coil-Over Kit is created to fit all 2005-2014 Ford Mustang models.

      Fitment:

      Ksport CFD240-KP

      CA Residents: WARNING: Cancer and Reproductive Harm - www.P65Warnings.ca.gov

      Installation & What's in the Box

      Installation Info

      What's in the Box

      • (2) Front Coil-Overs
      • (2) Rear Coil-Overs
      • Mounting Hardware
      4.6

      Customer Reviews (20)

        Questions & Answers

        10 More Questions