FREE 1 to 3-Day Delivery on Orders $149+ Details
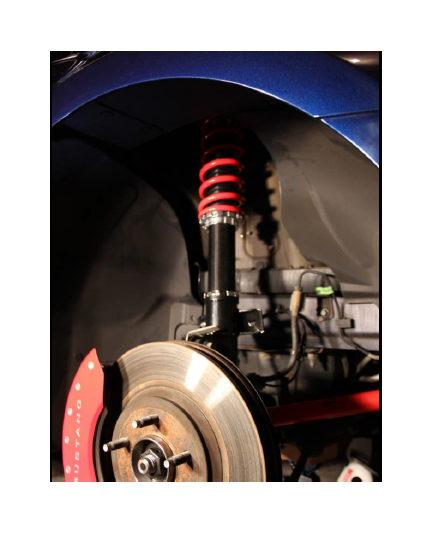
How to Install Pedders Extreme Xa Coilover Kit on your Mustang
Installation Time
5 hours
Tools Required
- Floor jack
- Jack stands (2)
- Wheel chocks, or equivalent (2-4)
- Impact driver or cordless impact driver (optional)
- 19mm socket
- 18mm socket
- 13mm deep socket
- 12mm deep socket
- 10mm socket
- 1/2” ratchet
- 1/2” breaker bar
- 1/2” torque wrench
- 3/8” ratchet
- 3/8” Breaker bar
- 3/8” torque wrench
- 19mm wrench
- 18mm wrench
- 8mm wrench
- 6mm allen wrench
- 5mm allen wrench
- Plastic body tool

Shop Parts in this Guide
Front - Stock Strut/Spring Assembly Removal
Note: Before starting the installation of the Pedders Extreme Xa Coilovers, measure the front and back ‘before’ height of your vehicle.
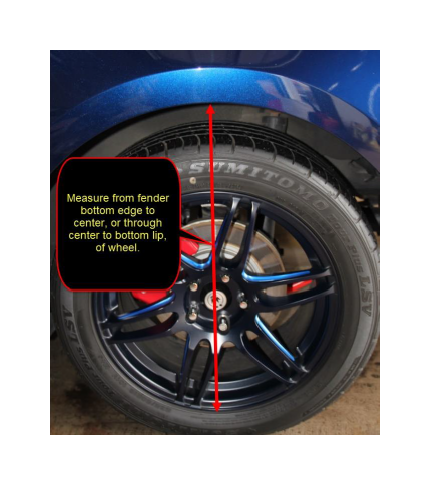
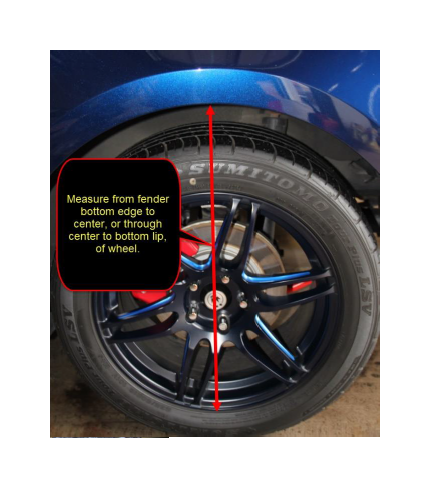
1. Measure fender to wheel (not to the ground) from the lower lip of the wheel through the center of the wheel to the bottom of the fender.
Notes:
Rear wheel shown as an example.
Measurement could also be taken to the center of the wheel depending on the offset of the wheel.
2. Engage emergency brake and put transmission in gear (automatics in Park).
3. Place wheel chocks or equivalent in front and behind wheels.
4. Loosen front lug nuts on wheel.
5. Jack (lift) vehicle and support with jack stands.
6. Remove lug nuts and tires.
7. Open hood to gain access to strut tower nuts.
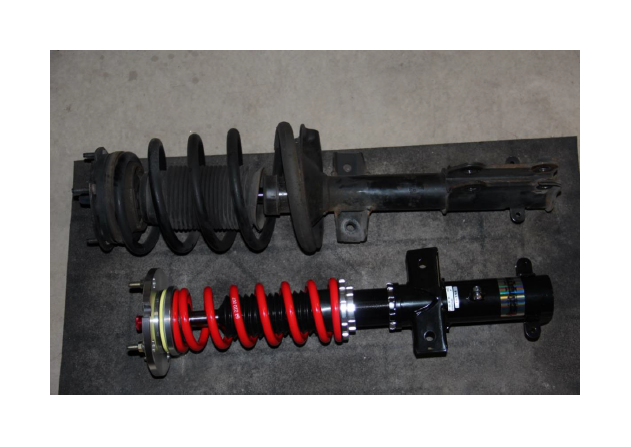
Pedders Extreme Xa Coilover Kits (05-14 All)
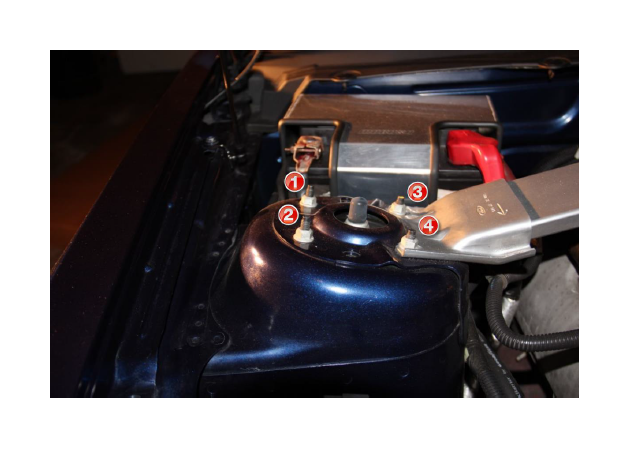
8. Remove engine side (3 & 4) stock 2-13mm nuts, and if applicable remove strut brace.

9. Loosen fender side (1 & 2) stock 2-13mm nuts leaving a few threads engaged to hold strut in-place after removing stabilizer link hardware, brake cable, ABS,R and upper/lower struct bolts.
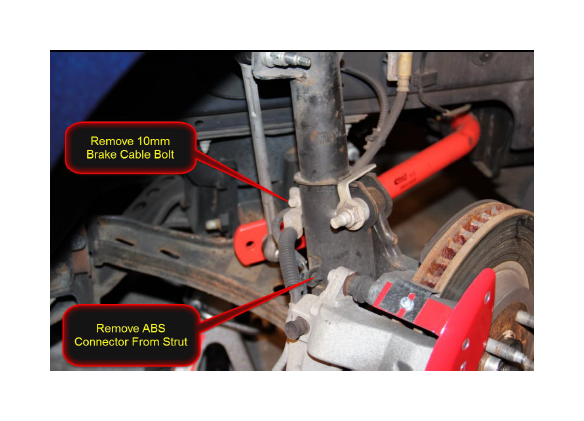
10. Remove stock 10mm brake cable bolt.
a. This bolt is not re-used.
11. Using a plastic body panel removal tool, remove ABS cable plastic connector.
b. Unless a new connector is available, this connector will be re-used.
Pedders Extreme Xa Coilover Kits (05-14 All)
12. Remove upper 18mm stabilizer nut using an 8mm wrench to hold.
c. This nut is not re-used.
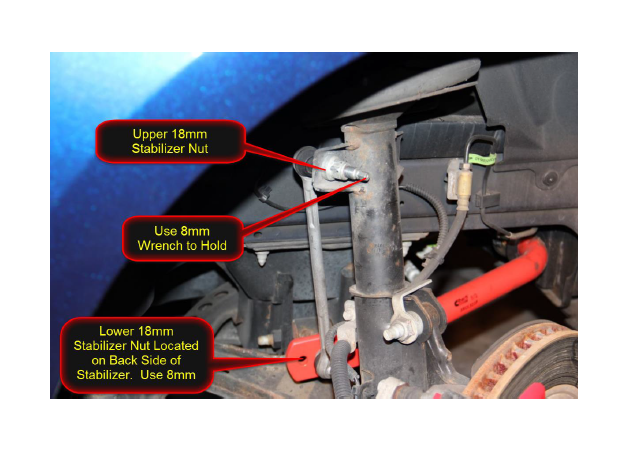
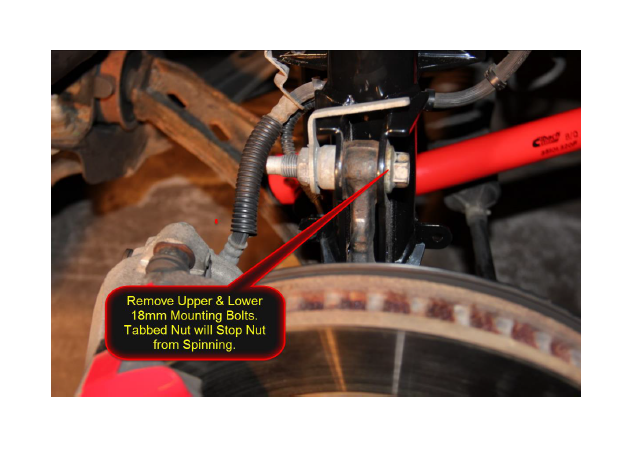
13. Place jack under rotor to support, then remove upper and lower 18mm knuckle/strut bolts.
Pedders Extreme Xa Coilover Kits (05-14 All)
14. Remove (1 & 2) 2-13mm strut tower nuts loosed in a previous step.
15. The strut can now be removed.
Pedders Extreme Xa Coilover Kits (05-14 All)
16. Remove stock lower 18mm stabilizer link not using an 8mm wrench to hold.
d. This nut is not re-used.

17. Remove stock stabilizer link from front sway bar.
e. The stock stabilizer link is not re-used.
18. Continue to Installation…
Pedders Extreme Xa Coilover Kits (05-14 All)
Front - Stock Strut/Spring Assembly Installation
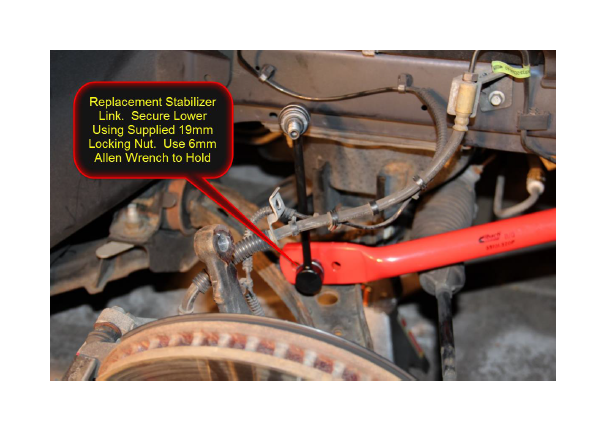
1. Place supplied stabilizer link in front sway bar and place supplied 19mm locking nut on lower stud and tighten using 6mm allen wrench to hold.
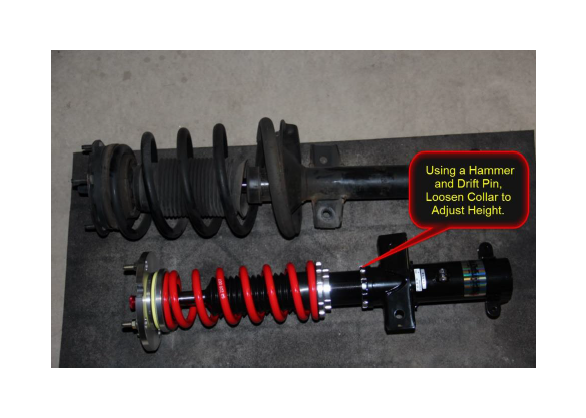
2. Remove 4-12mm nuts from top plate of XA Coilover strut and set aside.
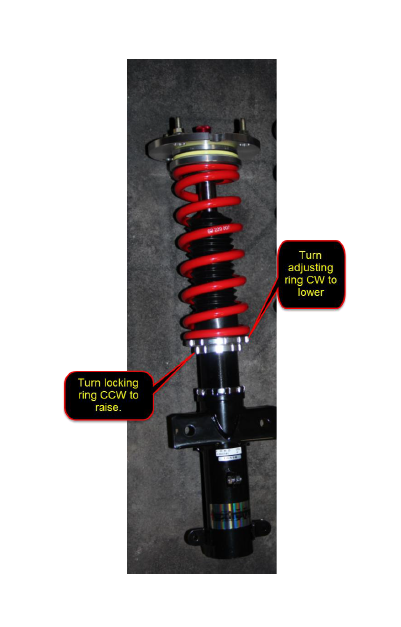
3. Using a hammer and drift pin, loosen collar between the monotube and mount. Using the Pedders supplied wrenches, set a preliminary height by turning the ‘locking’ ring CCW to raise and the ‘adjusting’ ring CW to lower.
Pedders Extreme Xa Coilover Kits (05-14 All)
4. Re-tighten the collar using a hammer and drift pin.
Note: the collar between the threaded monotube and steel mount is steel. Therefore, it can handle a fair amount of tightening.
Note: A minimum of 80mm (3.15“ (approx. 3-3/16”)) of the threaded monotube must remain in the strut mount.
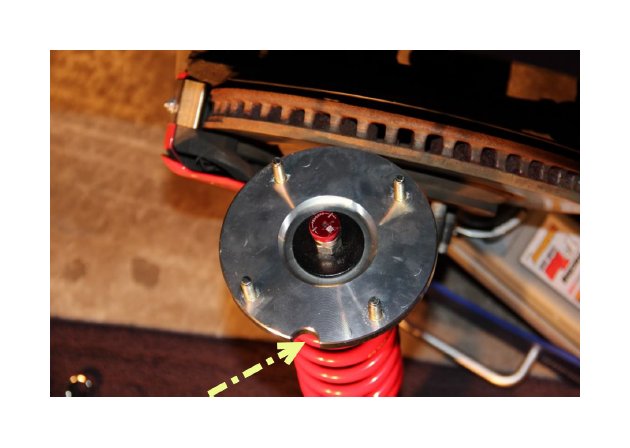
5. Place coilover in strut tower.
Note: The notch in the plate points to the outside or fender side.
Pedders Extreme Xa Coilover Kits (05-14 All)
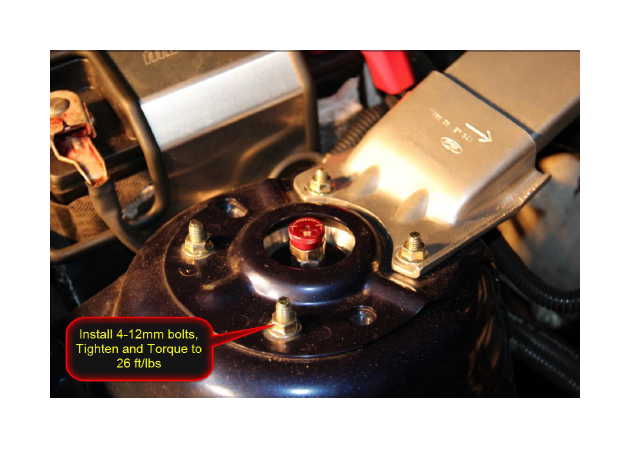
6. Secure with 4-12mm nuts previously set aside. Tighten and torque to 26 ft/lbs.
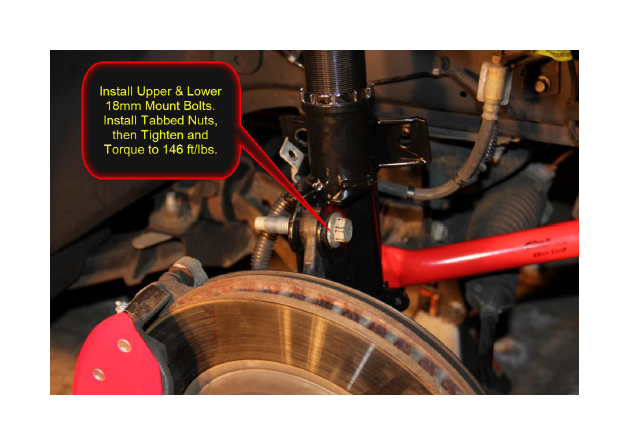
7. Place upper and lower knuckle/strut 18mm strut bolts through mount. Place tabbed nuts on end then tight and torque to 146ft/lbs.
Pedders Extreme Xa Coilover Kits (05-14 All)
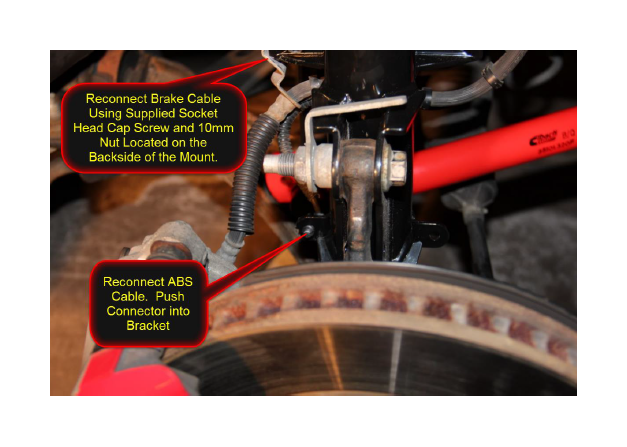
8. Connect ABS cable using original or new connector (shown below).
9. Connect brake cable using supplied 5mm socket head cap screw and 10mm nut as shown. Tighten and torque to 11ft/lbs.
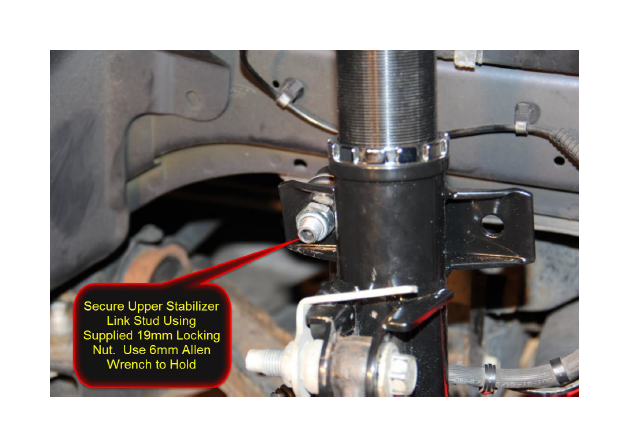
10. Place stabilizer link upper stud in strut as shown. Place 19mm locking nut on upper stud and tighten using 6mm allen wrench to hold.
Pedders Extreme Xa Coilover Kits (05-14 All)
11. If not already, install adjuster and nut on top of strut and tighten.
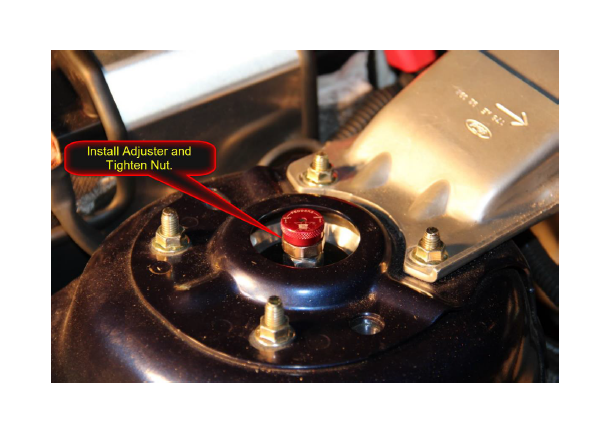
12. Turn adjusting nut CCW to the lowest ‘Soft’ setting and turn 15 clicks CW as a starting point.
13. The installation of the front coilover is complete.
14. Re-install wheel and lug nuts. Lower vehicle and tighten and torque to 100ft-lbs.
15. Repeat on other side.
Pedders Extreme Xa Coilover Kits (05-14 All)
Rear - Stock Strut/Spring Assembly Removal
Note: leaving wheels/tires on vehicle and using their weight may aid in removing stock springs. In this example, the wheels were removed for clarity. Since the installation was completed solo and was done on jack stands vs. a lift, the author felt it was easier with the wheels off.
1. Measure fender to wheel (not to the ground) from the lower lip of the wheel through the center of the wheel to the bottom of the fender as shown below.
2. Place wheel chocks or equivalent in front and behind wheels.
3. Loosen front lug nuts on wheel.
4. Jack (lift) vehicle and support with jack stands.
5. Remove lug nuts and tires.
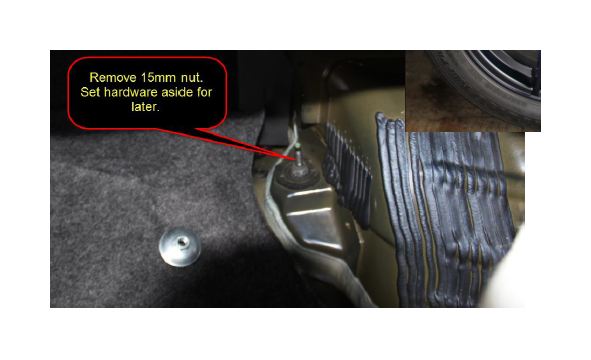
6. Open trunk, pull back liner to expose and then remove top shock 15mm nuts. Set hardware aside for later.
Pedders Extreme Xa Coilover Kits (05-14 All)
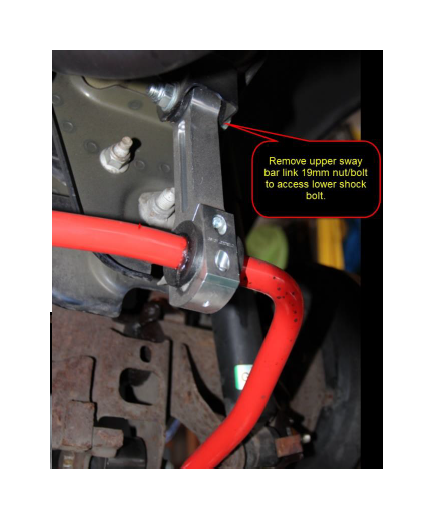
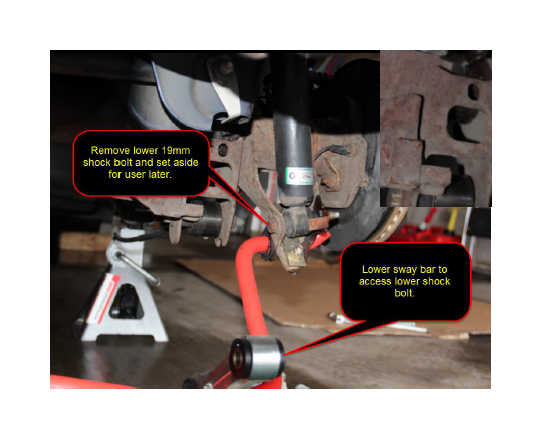
7. Remove upper sway bar 19mm link nuts/bolts and lower sway bar to gain access to lower shock bolts.
Note: The author previously replaced the stock sway bars with the Eibach Anti-roll Sway Bar Kit, American Muscle MPN# 35101.320. Therefore, your hardware may differ.
8. Remove lower 18mm shock bolts and set aside.
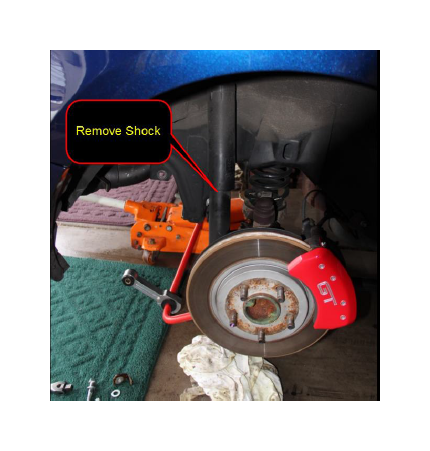
9. Remove shock.
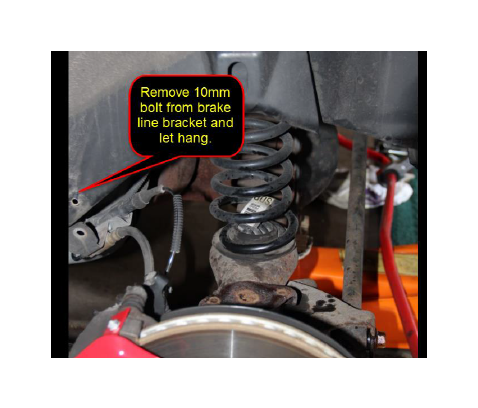
10. Remove 10mm bolt from break line bracket and let hang.
11. Support differential with jack and push axel down on one side and remove spring assembly.
Note: Jounce Bumper removed for clarity. This would be an opportune time to replace the stock jounce bumpers with the Ford Performance Jounce Bumper Kit American Muscle MPN# M-5570-A.

Rear - Stock Strut/Spring Assembly Installation
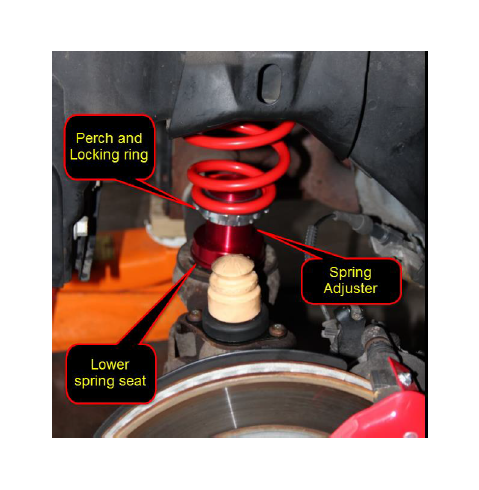
1. Preset spring adjuster so that the spring perch is set at a higher ride height setting, then tighten locking ring to spring perch using the supplied Pedders wrenches or a drift pin and hammer. Place adjuster and spring assembly between upper and lower spring seats as shown.
Note: Your desired ride height can be adjusted later by using the Pedders supplied wrenches turning the ‘locking’ ring CCW to raise and the ‘adjusting’ ring CW to lower.
2. To adjust the shock, loosen locking ring and adjust shock so that the monotube threads extend completely through hole. Use a drift pin and hammer to set locking ring.
Notes:
The hole in the shock body provides a visual for the minimum go / no-go height. The monotube threads must travel completely through whole.
The shock will be adjusted later to set desired ride height.
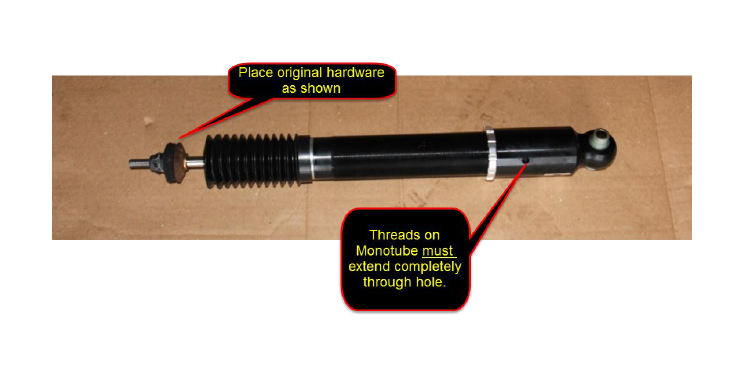
3. Remove adjusting screw and nut, and place original hardware on top of shock and above supplied washer as shown above.
4. Place shock/strut assembly through stock hole and secure with 15mm stock hardware in trunk and tighten to 30 ft-lbs.
5. Place adjusting screw and nut in top of strut and tighten. Turn adjusting nut CCW to the lowest ‘Soft’ setting and turn 15 clicks CW as a starting point.
6. Place lower 18mm bolt through mount and shock. Tighten and torque to 85 ft/lbs.
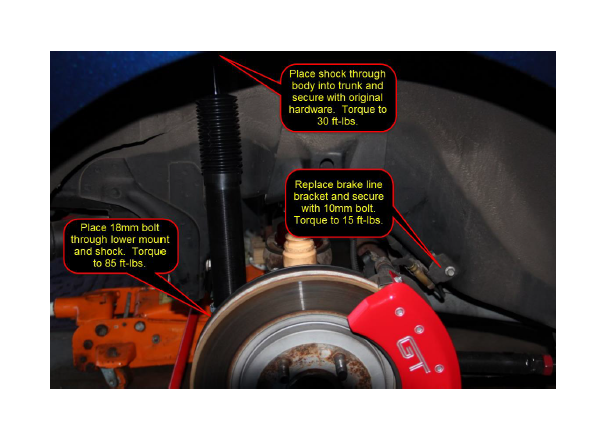
7. Replace brake line bracket and secure with 10mm bolt. Tighten and torque to 15 ft-lbs.
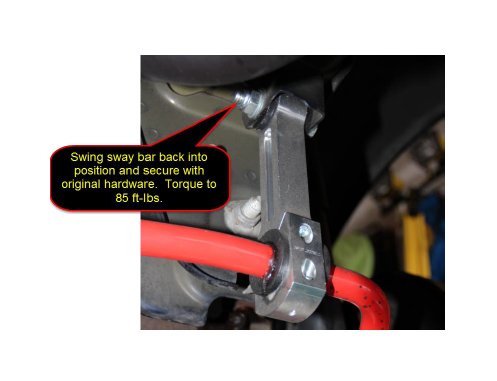
8. Raise sway bar into place and secure with original 19mm hardware. Tighten and torque to 85 ft-lbs.
Note: The author previously replaced the stick sway bars with the Eibach Anti-roll Sway Bar Kit, American Muscle MPN# 35101.320. Therefore, your hardware may differ.
9. Replace wheels. Tighten and torque lug nuts to 100 ft-lbs.
10. Repeat on other side.