FREE 1 to 3-Day Delivery on Orders $149+ Details
How to Install ST Suspension SportTech Lowering Springs - Coupe & Convertible on your Mustang
Installation Time
4 hours
Tools Required
- Properly rated floor jack, support stands, and wheel chocks
- Combination wrench set
- Ratcheting socket wrench and socket set
- Safety Glasses

Shop Parts in this Guide
DROPPED COIL SPRINGS
UNIVERSAL SPRING INSTRUCTIONS
Thank you for being selective enough to choose our high quality SUSPENSION TECHNIQUES PRODUCT. We have spent many hours developing out line of products so that you will receive maximum performance with minimum difficulty during installation.
Note: Confirm that all of the hardware listed in the parts list is in the kit. Do not begin installation if any part is missing. Read the instructions thoroughly before beginning this installation.
Warning: DO NOT work under a vehicle supported by only a jack. Place support stands securely under the vehicle in the manufacturer’s specified locations unless otherwise instructed.
Warning: DO NOT drive vehicle until all work has been completed and checked. Torque all hardware to values specified.
Reminder: Proper use of safety equipment and eye/face/hand protection is absolutely necessary when using these tools to perform procedures!
Note: It is very helpful to have an assistant available during installation.
Note: It is very helpful to have an assistant available during installation.
SAFETY REMINDER: PROPER USE OF SAFETY EQUIPMENT AND EYE/FACE/HAND PROTECTION IS ABSOLUTELY NECESSARY WHEN USING THESE TOOLS TO PERFORM PROCEDURES!
Suspension Techniques Sport Springs have been precision engineered with great care to enhance your vehicle’s handling potential. It is important to remember, however, that they were designed for the use with shock absorbers and struts of the proper caliber on vehicles in good mechanical condition. Suspension Techniques and our distributors are pleased to make proper shock recommendations upon request.
CAUTION: SPRING REMOVAL AND INSTALLATION, BY OTHER THAN COMPETENT PROPERLY EQUIPPED PERSONNEL, IS HAZARDOUS.
ATTENTION INSTALLERS:
KIT INSTALLATION
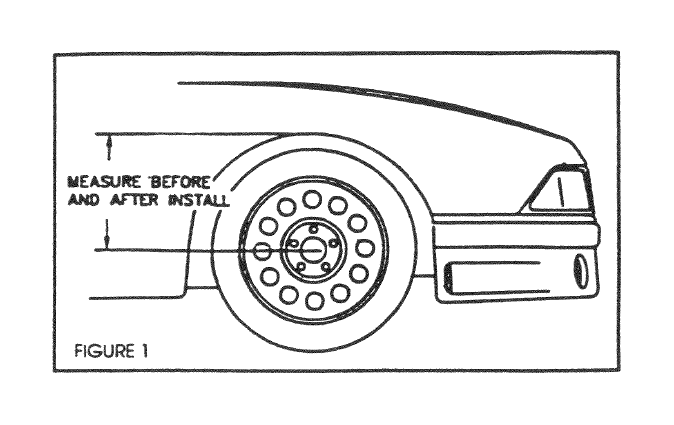
1. We strongly recommend that vehicle height measurements be taken BEFORE and AFTER all spring installations. Measure the distance from the inside of the fender arch, down to the hub center, at all four wheels. RECORD THIS INFORMATION!! All measurements should be taken with the vehicle on a smooth, level surface after the vehicle has been driven. This comparison is useful in both verifying the amount the vehicle is lowered and identifying ride heights particular to the specific vehicle. (See Figure 1)
2. The amount of lowering will vary depending on the condition, age, mileage and optional equipment installed on vehicle.
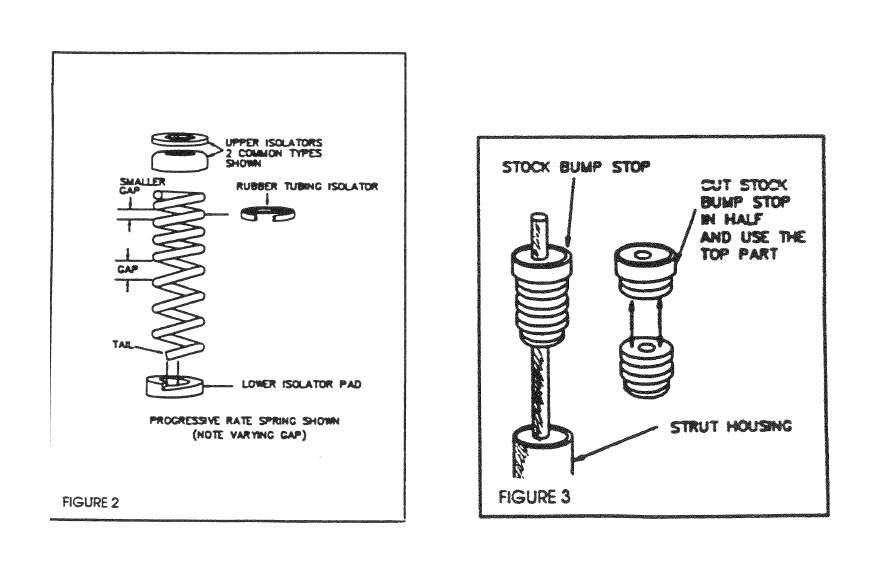
3. Always install all Original Equipment spring isolators (rubber pads, tube-type insulators, etc.) if so equipped. Please note that all vehicles do not always have spring in isolators. Vehicles equipped with progressive rate springs (coils closer together at one or both ends) must install any O.E. tubing-type isolators on the end of the spring with the closest coils (smaller gap). The rule is “If it came off the vehicle, put it back on.” (See figure 2)
4. Make sure the spring is properly seated in both the top and bottom spring perches. When installing springs into “helical” perches, the “tail” of the springs should be seated in the deepest part of the perch (or the ride height will be incorrect-too high). Always verify this after installing any spring. (See figure 2)
5. A direct side by side comparison between Suspension Techniques Sport Lowering springs and your Original Equipment (stock) springs can be very misleading. There are many factors which influence spring design and the Suspension Techniques Sport Lowering springs may look very different from the stock spring. The material thickness may be larger or smaller, the spacing between coils may be larger or smaller, the uninstalled length may be very different and the width (diameter) of the spring can be different. Please be aware of this difference, and be assured that Suspension Techniques Sport Lowering springs are engineered for improved handling and lower ride height than your Original Equipment components.
6. All Suspension Techniques Sport Lowering springs are height-tested in a loaded condition to simulate the weight of the vehicle. Because of this load testing method, comparing the spring un-installed length can be misleading. As a general rule, if there is a slight difference in length, install the tallest of the pair on the driver’s side of the vehicle.
7. On strut equipped vehicles; the bump stop (if so equipped) should be trimmed at least in half for added suspension travel. On A-arm (A-frame) type vehicle trimming the bump stops (if so equipped) will increase wheel travel. Some Suspension Techniques Sport spring sets include replacement bump stops. The bump stop (modified or replacement) MUST be installed in All vehicles or severe damage to the suspension components will result. (See figure 3)
8. A proper alignment (by mechanic experienced in aligning lowered vehicles) is always necessary for predictable handling and maximum tire life. Be advised that a rear wheel alignment may be necessary for vehicle equipped with independent rear suspension.
9. The warranty conditions for Suspension Techniques Speed Tech Competition Spring Program differ from the standard Limited Lifetime Warranty. Please read the disclaimer enclosed in all Speed Tech competition-only products. This information will assist you to correctly install your new springs and enjoy their full performance potential. Thank you for choosing Suspension Techniques products.
IMPORTANT! PLEASE READ
Marty factors affect "Nominal Reduction in Vehicle Height" Included are variances in vehicle manufacturing tolerances, installed Options, vehicle mileage, damage do to accidents, and many other factors. Suspension Techniques strongly re com mends taking time to fill In this form completely. Measurements should be taken from center of wheel (hub) to fender welt opening on all four wheels with vehicle parked on a smooth, level surface.
PERFORM ALL MEASUREMENTS PRIOR TO INSTALLATION (stock ride height)
KEEP THIS FORM WITH PROOF OF PURCHASE IN YOUR RECORDS FOR FUTURE REFRENCE.