Installation Time
(approx) 30 Minutes
Difficulty Level:
Simple installation for anyone.
FREE 2 or 3-Day Delivery on Orders $119+ Details
$594.99 (each)
FREE Shipping Market Price $672.99 You Save 12% ($78.00)Open Box from $416.49
Saved - View your saved items
We're sorry. We couldn't save this product at this time.
or use
Hey guys, Adam here with americanmuscle.com. And today, we're taking a quick look at, and of course, installing the Rear Aluminum Louvers available for the '08 and newer Challenger. You should be checking this out if you're looking for a retro classic muscle car styling to add to your Challenger. Now, this uses a complete aluminum construction, as opposed to some of the ABS plastic ones out there, which in my opinion, does look like it's a little bit higher quality. This uses high strength aluminum that also has foam padding on the back to make sure it's eliminating any rattling that you'd get, especially at highway speeds. There are some aluminum louvers out there that don't offer that foam padding feature on the backside, which can cause a rattle against the back windshield, especially at highway speeds. So, having that already integrated into the back here just adds another level of quality to the product.Now, it's also going to use a quick-release system with these thumbscrews. You can just easily unscrew these by hand, four of them in total, two on each side, and lift the entire louver off the back windshield to make sure you have easy access to clean the back windshield. So, if you're going through a car wash, I'd like to pop this guy off, throw it in the backseat, go through the car wash. You can easily put it back on afterwards. Now, those brackets there underneath of the screws, again, four of them in total, use 3M automotive bonding tape to attach to the back windshield. Now, when applied properly, 3M bonding tape can last a lifetime. It is going to offer a very secure attachment to your back windshield so you don't have to worry about it flying off. Now, it also includes adhesion promoter included in the kit to help even take that a step further. Now, you want to make sure you're cleaning your windshield properly, getting rid of all dirt and dust that would prohibit a good bond from the 3M when it gets to the install. And we'll talk about that, and I'll show you that a little bit later on.This guy comes in right around 450 bucks, putting it a little bit toward the top end of the spectrum when it comes to rear window louvers. It gives you plenty of clearance to open the trunk. So, you don't have to worry about it touching or removing it when it comes time to open this guy. So, it is a perfect fit to your OEM windshield. There's a little bit of a gap at the bottom, giving it a nice, unique finish compared to some of the other guys, again, still giving it clearance for the trunk.Now, the install for this, I'm going to give one out of three wrenches on our difficulty meter. Anybody can tackle it in the driveway at home, no tools required. I am going to suggest using soap and water along with a microfiber to clean off the windshield properly. But we'll touch on that in a second. It'll take you about 15 minutes from start to finish. What do you say we get started?Tools used in this install include a knife, soap and water mixture in a squirt bottle, and a microfiber are recommended. Now, because there's nothing to uninstall from our Challenger here, we can jump right into assembling our louvers on our table here and then getting them on our vehicle. Now, in order to assemble it, what you're going to need to do is grab the bracket's included in the kit, there are four of them, two for each side, on the backside of those aluminum brackets, you'll see four strips of 3M automotive bonding tape. This is primarily what it's going to hold the louvers to the vehicle. Now, 3M automotive bonding tape is meant to be used in all weather conditions. So, if applied properly, and that's the key there, this definitely will last and will hold your louvers on securely and tightly. Now, the big key there, again, being properly, you want to make sure you're properly prepping the window, getting rid of all dirt and dust, which we'll touch on in just a little bit. First, we want to get these on the louvers. Now, included in the kit will be washers, which you're going to pop right over the studs, and these plastic caps. Now, the caps are going to be holding the louvers to the brackets and then the brackets to the windows. The caps allow you to remove the louvers if you ever want to clean your windshield. So, first things first, put your washer over that stud. I'm going to lift up the louver, and I'm going to place the stud through the bottom making sure that the 3M is on the inside, not on the outside, which, of course, you don't want. Because you don't want to be able to see it. With that through there, just going to hold that in place and screw the cap onto the top. The caps are matte black to match the louvers themselves. And you can repeat this for all four. All right. So, you want to grab your bracket, throw that over there, just to put a washer between the aluminum bottom and the aluminum bracket, and then screw your cap onto the top. Same thing for the other side.All right. So, that's pretty much what the assembly looks like for this. Now, at this point, you're going to head over to your back windshield, grab some soap and water and clean off the windshield, completely using a microfiber. Now, it's not recommended to use something like Windex because while it does clean your windshield, visually, it's going to leave some chemical residue which can prohibit the bond between the 3M and the glass. Soap and water is going to be your best-case scenario. Secondly, you can use adhesion promoter included in the kit, which you don't see on the table here. It's just a little packet with a wet sponge, and you can apply that to the windshield before putting your louvers on to help promote the adhesion between the 3M and the windshield. Now, because we're just going to be taking this back off after the video shoot's complete, we're not going to be using that because it does make it a little bit more permanent and hard to get off. So, if you want to leave this on for the long haul and you want to make sure the brackets are on there securely, I suggest using that when you're at home.Now, for the next portion here, we're going to clean off the windshield, and then we'll peel off 3M backing. Now, there's a couple of different ways you can do it. You can put your louvers on the windshield while using the 3M backing so it doesn't stick. Mark your locations using a wax crayon or windshield paint or something like that, then peel the backing off and stick it. What I'm going to do is grab a helping hand to make sure we're doing it first time. It's going to make life a little bit easier. Now, next, let's clean off the windshield, and then we'll apply it.All right. So, I've got a squirt bottle here with soap and water. Again, no chemicals from Windex or something like that, and a clean microfiber, just going to spray this down one side at a time and make sure I'm getting all that dirt and dust off. You really want to focus on the sides here, which is going to be where the 3M will actually apply. But getting the dirt off the middle will definitely look a lot better through the louver slats.That's going to wrap up my review and install for the Rear Aluminum Louvers available for the '08 and newer Challenger. And again, if you're looking for a classic retro muscle car styling with an aluminum construction, can get yours right here at americanmuscle.com.
Subscribe to our YouTube Channel
Features, Description, Reviews, Q&A, Specs & Installation
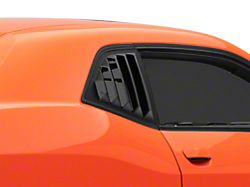
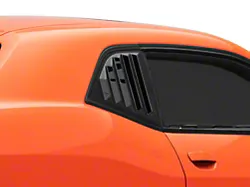
Louver Location | Rear Window |
Aluminum Rear Window Louvers. Go all out retro style with the Rear Window Louvers - Aluminum. These aluminum rear window louvers are constructed using high strength aluminum in a black paintable finish, with an easy lift-off design for quick window access.
Heat Resistant. This unit also helps to reduce interior temperatures.
Installation. It should take no more than 30 minutes to install these rear window louvers if you have moderate to expert level mechanical skills.
Application. These Aluminum Rear Window Louvers will fit all 2008-2023 Dodge Challengers.
Fitment:
CA Residents: WARNING: Cancer and Reproductive Harm - www.P65Warnings.ca.gov
Installation Info
Installation Time
(approx) 30 Minutes
Difficulty Level:
Simple installation for anyone.
What's in the Box
10 More Questions