Installation Time
(approx) 2 Hours
Difficulty Level:
Light to Moderate mechanical skill required.
FREE 2 or 3-Day Delivery on Orders $119+ Details
$2,345.99 (each)
FREE Shipping Market Price $2,744.99 You Save 15% ($399.00)Add Local Shop Installation
Saved - View your saved items
We're sorry. We couldn't save this product at this time.
or use
What's up, guys? Adam here with americanmuscle.com. And today, we're taking a closer look at, and installing, and listening to the Borla ATAK Cat-Back Exhaust, available for the 2018 and newer Mustang GT, with the active exhaust. Now, if you're the owner of that newer S550 with the active exhaust, you might be looking to beef things up in a major way. The ATAK system, as you just heard from our sound clip, is an absolute riot in almost every single driving mode with the active exhaust. So of course, I'm giving it the full five out of five on our loudness meter. That's absolutely expected with the Borla ATAK system, known to be one of the loudest in the category.Now, I will say the quiet mode here is probably the only mode that the ATAK has in the active exhaust that won't wake the neighbors. The second you switch that thing over to normal, you're definitely getting something extremely aggressive, very deep toned, and of course full of volume. Now, sport and track modes to me sound pretty similar but there is a very minuscule difference between the two. They're just all out rowdy. Wide open throttle is gonna not only wake the neighbors but the whole block. So, I'd take some caution when starting it up in the morning, cold start on a city street.Throwing through big gears, this thing rumbles. It backfires and sounds absolutely amazing inside and out the car. But I will say again, wide open throttle closer to red line, this thing is gonna be pretty overwhelming. I would say if you have passengers in the car, let them know that it's gonna be a little difficult to have a conversation if you're in one of those two modes because it does get pretty loud. With all of that mind, the quality of the sound does not get lost at wide open throttle, thanks to the ATAK technology, and I'll talk about that a little bit later on, but just know it stands for acoustically tuned applied kinetics.With that said, the entire system does have an X-pipe for a mid-pipe, getting a nice raspy sound with also an increase in power and torque, definitely what you'd expect with a three-inch mandrel bent 304 stainless steel system like this one here. It literally doesn't get much better than this in the category. It's one of the most premium kits in the category as far as technology and as far as build quality. In addition to that, and again I'll touch on this in just a little bit, there's a polyphonic harmonizer built into each side of the piping, which sounds pretty overwhelming but it's just to make sure that it has a really good crisp, clear quality while also keeping up that volume.This kit being one of the more premiums does have a pretty hefty price tag of just north of 1,800 bucks. Now, if you're serious about volume, if you're serious about quality and you really, really want this tone, 1,850 is about the price to pay. And the install is gonna get a two out of three wrenches on our difficulty meter. With all that in mind, I would say two, maybe three hours from start to finish on the install. I'm gonna take you through every step of the process, so let's get to it.The tools used in this install include an impact gun, an extension, a ratchet 10, 13, and 15-millimeter deep sockets, 10-millimeter wrench, a mallet, and PB Blaster or WD-40. So, the first step of our uninstall here is actually pretty simple. We're gonna start at the complete back end of our 2018. We're actually gonna disconnect the active exhaust valve actuators right on the top side of our exhaust tips. So, really from here, we're gonna stick our hand straight up. The plug is right up there. You just pull back on the locking tab, pinch, and release. Now, we can do the same thing on the other side. This is our plug. Gonna push back on the locking tab, pinch, and pull straight back. The next step here is to grab a 15-millimeter socket and head back by your factory resonators connecting to essentially what are your stock manifolds. Now, what we're gonna do is loosen up these two clamps, there's two bolts each. And from there, we'll be able to remove the hangers from the back end. But for now, let's loosen these up.Next step, we're gonna go under our subframe right behind the diff, and we're gonna remove the brackets that connect our factory hangers to the frame itself. Now, I find this easier to just unbolt it from the 13-millimeter bolts rather than trying to slip the hangers out of the isolators, then we can just transfer them over to our new pipes later on. So, I'm gonna grab an extension and a 13-millimeter socket. I'm gonna go right on over our rear sway bar and I'm gonna pop these bolts off. Now, what I like to do once the bolts are removed is to lift up and pop the bracket off of the subframe and just rotate them down.At this point, we have everything disconnected. What we're gonna do is bring in a helping hand. My buddy Joe is gonna help me get this exhaust off the car all in one piece. I'm gonna start by disconnecting the couplers back here by the headers or the factory manifolds. Then we're gonna slide them out of the hangers, and we're gonna set it all aside.So, we finally got our factory exhaust off of our '18 GT on the ground here next to the Borla ATAK. And I just wanted to quickly go through some of the similarities and differences between the two kits before we move forward. And I got to let you know, full disclaimer, there is not a whole lot the same. Now the factory exhaust starting at the front end uses a resonator after your stock manifolds. And on the Borla kit, completely different, going with an aftermarket three-inch X-pipe. The X-pipe is known to be a little louder, a little raspier, and it's also going to completely streamline that airflow with no restrictions like you get from an H-pipe or something like your factory resonators. While that does keep some sound down it's also keeping down the velocity of the airflow, which ultimately can rob you some power and some sound.The X-pipe connects right in the middle allowing the airflow to cross streams, ultimately giving that a more free-flowing airflow. Even back behind that, the Borla kit in particular comes with three-inch adapters. These will adapt to your factory manifolds. But if you were to upgrade in the future to something larger like a three-inch outlet on a long tube header, you can remove those adapters and still use your Borla X-pipe. So, I think that's a really cool feature for guys looking to upgrade later on down the road when it comes to the headers. The rest of the kit, 304 stainless steel exhaust, one of the highest quality materials on the market, also mandrel bent three-inch diameter giving you, again, free-flowing air, not as many kinks as your factory exhaust, so big upgrade there.The polyphonic harmonizer is something I wanna touch on before we get into the Borla ATAK system because it is exclusive to the Borla technology. The polyphonic harmonizer in simplest terms is basically four different chambers in this case of the same equal length and size, which can alter the tone and harmony of your exhaust sound. Now, in other particular cases down the road, we might see different sizes and length, which could also alter and give you many different tones in the exhaust. In this particular instance, they are all the same size, which gives you a very unique sound to the Borla exhaust system, something I personally have not seen in any other system that we've installed. And we've gone through quite a bit of them, so this is a very unique technology to Borla system, and working in conjunction with the Borla ATAK you can expect something very, very unique for your Mustang, especially when you factor in the active exhaust system.Now, Borla ATAK essentially stands for Acoustically Tuned Applied Kinetics. The ATAK system and the muffler specifically from Borla is meant to give you the highest possible decibel reading allowed for street legal use while also not distorting the tone. Sometimes when you get these systems that are five out of five on our loudness meter like the ATAK, you'll start to get distorted tones, a lot of kind of miserable drone inside the cabin, something that ultimately doesn't sound too good at wide open throttle. The Acoustically Tuned Applied Kinetics makes sure that while you're getting that volume, you're not losing the quality of the sound. So, that's something I really admire about Borla's technology. And working in conjunction with the polyphonic harmonizer, I think it's gonna make for something very unique.Coming out the rear end, we're moving on, we have about four-inch dual stainless steel tips on each side keeping that quad tip styling out the rear, polished 304 stainless steel with the Borla name on top, something I think that's going to look very aggressive on our '18 GT. And again, I'm excited to see what that looks like installed.Now, at this point what we need to do is transfer over our factory active valve actuators from the top here. We're gonna unbolt that, 3 10-millimeter nuts, transfer that over to our active exhaust system from Borla, then we're gonna also transfer over the brackets for our hangers that we removed under our subframe and transfer them over to our new hangers. So, first thing's first, let's move over the actuators and then we'll work on the brackets. Now, what I'm gonna do is take my ratchet and a 10-millimeter socket and I'm gonna remove these 3 nuts holding on our factory actuator. And we're just gonna hold on to the actuator and just let it loosen up itself. From here, take that third one off. And be careful just to lift straight back. You don't wanna disconnect that spring. And if you do, if this falls off, make sure it goes back on the exact same way it was stock, otherwise your valves won't be working properly. So, from here, we're just gonna set this down. And you wanna make sure you're reinstalling this on the exact same side. We started here on the driver side, so this is gonna go on the driver side muffler from Borla. Let's remove the other one, and then we'll transfer them over.At this point, you're gonna transfer over the factory actuator. Now, the seat inside of this bracket here does rotate. That's what open and closes the valve. So, just take a look at your spring. This little hump right here is gonna sit in the middle of the seat down in the bracket. So, it's gonna pinch right on each side. So, just make sure that lines up with the open holes. We're gonna go ahead and insert this, lining everything up. All right, with this back in place and the spring seated properly, we're just gonna screw on all 3 of those factory nuts, and then we'll tighten them down with our 10-mil. Repeat for the other side. All right, now we can insert this over the studs, making sure the spring is lined up. Grab those factory nuts and tighten them down.All right. Now, the last thing you have to transfer over are these two hanger brackets. We're just gonna pop those off on the factory hangers. Just rotate them back and forth until they slip off. Of course, PB Blaster or WD-40 would also help. All right. And just transfer them over to the new Borla system in the same location.Step number one, we're gonna take our factory band clamps off of our factory cat-back and put them over the ends of our stock manifolds. Now, you wanna make sure you're keeping this retainer pin in line with that bolt welded to the side. So, we're gonna just slide this into place until they match up. You should be able to bend that retainer pin to the back of it. Do the same thing for the other one.Next up, take your X-pipe making sure you have the adapters put into the three-inch inlets and you have a clamp on each end. Insert this over the band clamps you just put back on your factory manifolds. Should make sure you're seating them as far back as they can possibly go. Grab your 15-millimeter socket and tighten down the clamps. At this point, you can rotate these clamps upward and do the same thing to them.Next up, take your passenger side pipe and insert that into the X-pipe we just installed, making sure you have a clamp on the end. Seat that as far back as you can. Grab your 15 socket and tighten down this clamp. Now, what I'd recommend doing is making sure you're not overtightening them. You wanna get it nice and snug so it holds itself in place. But you wanna leave a little bit of room for adjustment in case you need to move it around later on. All right. We're gonna do the same thing for our driver side.Next up here, rotate these brackets upward and hang them back on our subframe. Now, we can grab the factory 13-millimeter bolts and put them back in place. Grab your 13-millimeter socket and extension and tighten down the bolts.Next up is our passenger side muffler and tip. Now, I like to lube up the isolator, hang it on the frame with some PB Blaster beforehand. It's personal preference, makes life a little easier. We're gonna slide that hanger into the isolator first, match up the pipes on the back end, and then we'll tighten down this clamp that we already have on our pipe. All right. Now, we can gun on this clamp. All right. Now, do the same thing for the other side.All right. At this point, we can reconnect the harness to our factory actuators now on our Borla exhaust. Put that into place. Push back in the locking pin, and repeat to the other side.At this point, guys, once you reconnect your actuators, all you have to do now is make sure your tips are aligned properly coming out of the rear valance. And if you need to readjust anything, do so at this point, and then tighten down all of your clamps.All right, guys, that's gonna wrap up my review and install for the Borla ATAK Cat-Back Exhaust available for the '18 and newer Mustang GT with the active exhaust. If you wanna pick this up and get that quad tip look with the polished finish, you can do so right here at americanmuscle.com.
Subscribe to our YouTube Channel
Features, Description, Reviews, Q&A, Specs & Installation
Brand | Borla |
Exhaust System Type | Cat-Back System |
Exhaust System Material | Stainless Steel |
Exhaust System Tip Finish | Chrome, Polished |
Exhaust System Tubing Diameter | 3.00 Inch |
Exhaust Loudness | Loud |
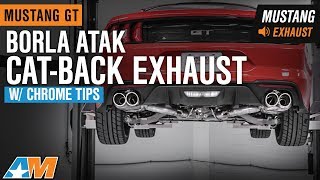
ATAK The Off-Road. For one of the finest racing-inspired cat-back exhaust systems on the market, look no further than the Borla ATAK Cat-Back Exhaust with Chrome Tips. This cat-back exhaust system delivers an aggressive sound using its polished 4 inch exhaust tips and straight-through design for maximum exhaust flow and little cab drone.
Built to Last. This exhaust is built to last, using T-304 stainless steel for long lasting performance on the street or off-road.
Warranty. Borla provides a million-mile warranty, which protects purchasers from any defects in materials and workmanship. Abnormal wear and tear, which may be the case with misuse, modifications, or accidents will not be covered.
Installation. It takes no more than 2 hours to install this cat-back exhaust with a medium level of difficulty.
Application. The Borla ATAK Cat-Back Exhaust with Chrome Tips is compatible with all 2018-2023 Ford Mustang GT Fastback models equipped with Active Valve Exhaust.
Fitment:
Borla 140743
CA Residents: WARNING: Cancer and Reproductive Harm - www.P65Warnings.ca.gov
Installation Info
Installation Time
(approx) 2 Hours
Difficulty Level:
Light to Moderate mechanical skill required.
What's in the Box
10 More Questions