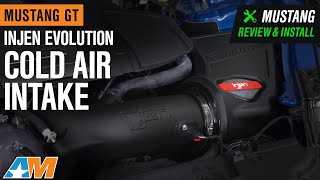
Installation Time
(approx) 1 Hour
Difficulty Level:
Simple installation for anyone.
FREE 1 to 3-Day Delivery on Orders $119+ Details
$385.95 (kit)
FREE Shipping Market Price $443.99 You Save 13% ($58.04) Up to 10% off for Military & First Responders! See DetailsAdd Local Shop Installation
Saved - View your saved items
We're sorry. We couldn't save this product at this time.
Hey, guys. It's Sara with americanmuscle.com, and today we have a review and install of the Injen Evolution Cold Air Intake fitting your '18 and newer Mustang GT. This is perfect for the Mustang owner who's looking to improve their intake system with this smoother flowing option. This air induction system includes a free-flowing rotor molded airbox with a larger and smoother intake tube and a super nanoweb dry flow air filter. This intake improves airflow for more performance. Injen reports increases of up to 26 horsepower and 23 pound-feet of torque. This intake is made in the USA and does not require a tune to install on your Mustang. However, a tune is recommended to get the most performance out of this intake. So, as far as price goes, this intake comes in at around $350, which is middle of the road price-wise when compared to other options. And for your money, you're getting a full intake system, including an airbox and reusable filter that does not require a tune. I'm giving this install a one out of three wrenches on the difficulty meter. It does feature a direct bolt up install with no modification required and can be done within two hours. So, with that said, let's jump into our install.For this install, you will need a trim panel removal tool, a pop clip removal tool, a set of pliers, a flathead screwdriver, ratcheting 10-millimeter wrench, a 10-millimeter socket, T15 Torx socket, an extension, a two-and-a-half millimeter Allen key, and a ratchet. Okay. So, the first step in our install once the hood is popped is to grab a trim panel removal tool and remove two covers on each side of the engine cover to expose some nuts that we have to remove. Okay. So, you will see two little cutouts on either side of this cover. Just take the end of your tool and pry up in one of the cutouts, and this should come out. Repeat that process on the other side. There are two 10-millimeter nuts, one on each side of the cover. You're gonna want a 10-millimeter socket if you can find one, and a nice long extension to make sure you can get on the nut. Go ahead and loosen it up and remove it. Repeat that on the other side. Okay. Now that these nuts are removed, you can grab your cover on the edges and pull it off. There should be several clips that you just need to release in order to move the cover.Okay. Now, we can disconnect the MAF harness, pull back on the red tab. It might be hard to see, but it's on the bottom here, press down and release. Now, you can release this vacuum line on your intake tube, press down, and release it. Next up, we're gonna remove this crankcase vent line. There's a blue tab. Press back on the blue tab and it should come free. Just press backwards on this blue tab here to release those. Okay. Now, you can grab a set of pliers and release the sound tube. Go ahead and squeeze the clamp and you should be able to wiggle the tube off. Now, if you can't get it off by hand, you can gently pry back on the tube with a flathead. Just be careful not to damage the rubber.Next up, grab your flathead screwdriver and loosen up the clamp holding on your tube to your throttle body. Go ahead and wiggle it to remove it. All right. Grab your 10-millimeter socket again and go ahead and remove the bolt holding on the airbox. All right. Now, we do have to remove this one pop clip that holds the MAF sensor connector line onto the airbox. So, go ahead and grab a pop clip removal tool. Go ahead and pull that off. That part of the sound tube is also connected to the airbox, just grab and pull it up and out of the way. Now that everything is disconnected from the airbox, we can grab it and lift it out and off of the car. All right. So, now with the factory intake removed, we can transfer over a few components to our new intake system. We're gonna start with the MAF sensor. So, go ahead and grab a T15 Torx socket, we're gonna remove the two bolts that hold on our MAF sensor. Go ahead and remove it. Then install the sensor directly into your new intake tube. Now, they have included new hardware here, so you will not be reusing the factory hardware. The thread pitch on the bolts are not the same. And these are Allen heads, so grab a two and a half-millimeter Allen key to tighten these down.Next up, we're moving to the airbox portion of our intake. We're gonna remove both of these grommets to reuse them. Press up on the metal part of this grommet and wiggle it out. Then we're just gonna go ahead and wiggle the grommet out of the plastic bracket. Moving on to this grommet, we just sort of wiggle it off of its posts. Okay. So, now we can install this smaller grommet. We're actually gonna go into the airbox. This might be a little bit hard for you guys to see, but there's a hole towards the back of it. Go ahead and find that hole and slide, then press the grommet through. You should feel it come through the outside of the airbox. All right. Now, we can replace this metal sleeve into the grommet we just installed and just press it into place.All right. So, now that we have our factory intake uninstalled from our Mustang, we can check it out side by side with our Injen intake. Now, they do feature a bit of a similar design, they both feature an airbox. However, there are some important differences I'd like to point out. Injen has this nice intake tube here which is quite a bit smoother than your factory. It's also larger in diameter. Now, inside the box goes this really nice conical aftermarket air filter, which is gonna breathe a much better than the paper filter of your factory airbox. In addition, you can also remove it, clean it, oil it, and reinstall it for reuse to save you some money down the road. So, with that said, let's finish up our install.So, now we can install the second grommet. We're actually gonna put this one on the car itself. So, go ahead and slide it in that open hole, and then we're just gonna slide the intake box on top of it. Now, you can grab the box and slide it back onto your car. Try to line it up with the grommets that are there and press it into place. Then we're gonna grab our bolt. This might be a little hard to see. We need to thread it through the grommet that's inside the airbox. Line it up with the hole, then go ahead and grab a 10-millimeter ratcheting wrench and tighten them down. Go ahead and grab the plug that's supplied to plug up this hole in your airbox, press it into place. Now, we can install the air filter itself, give a slide into the box and then turn it so it seats properly. Then once it's seated flush against that, you can twist it to lock it into place. Now, we can install our rubber coupler around the throttle body. Go ahead and slide the hose clamp over top, then we're gonna slide our rubber coupler into place. It's a nice and tight fit, but that is a good thing. Go ahead and carefully slide your hose clamp over top. Line it up. Let's clamp it own.Okay. Now, we can grab our other two clamps. Install the larger one over the end of the filter and the smaller one over the coupler on the throttle body. Grab your intake tube, line it up with your filter, slide it in, and wiggle it until it lines up with the coupler on your throttle body. And go ahead and try to slide it into place. If you need to use a flathead to guide you, just do it very carefully. Grab your flathead and tighten down the clamp on your throttle body and tighten down the clamp on your filter. Plug in your MAF sensor. Make sure you depress the red tab. Now, we can reinstall the sound tube. Now, we can reinstall the crankcase vent. It should clip on factory style. Then you can reinstall the vacuum line. Now, you can reinstall the cover, lay it on top. Line up the bolts and the studs and press into place. All right. So, now we can install the 10-millimeter nuts that hold on the engine cover. I have a piece of tape in the end of the socket to hold it in place so we can line it up on top of the stud. Then once it's tight, grab your plastic cover and clip it in place. Repeat that on the other side.All right. So, that is gonna do it for the review and install this intake. And remember, for all things Mustang, keep it at americanmuscle.com.
Subscribe to our YouTube Channel
Features, Description, Reviews, Q&A, Specs & Installation
Brand | Injen |
Cold Air Intake Type | Cold Air Intake |
Air Intake Tuning Requirements | No Tune Required, But Recommended |
Cold Air Intake Filter Type | Dry |
Cold Air Intake Tube Material | Plastic |
Fitment:
Injen EVO9202
CA Residents: WARNING: Cancer and Reproductive Harm - www.P65Warnings.ca.gov
Installation Info
Installation Time
(approx) 1 Hour
Difficulty Level:
Simple installation for anyone.
What's in the Box
10 More Questions