- Buy this Tuner & Submit your Mustang's Info
- A Bama Performance Calibrator writes custom tunes just for your Mustang & Mods
- Load 'em on your Mustang and GO!
- As you add new mods, Bama will update your tune files for FREE! That's right, Free Tunes for Life!
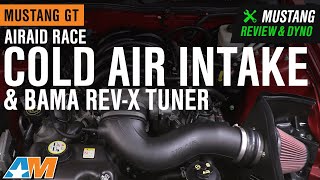
Power and Style. This Airaid Race Cold Air Intake and Bama Rev-X Tuner Kit will instantly give you added horsepower and TQ, plus better throttle response for your 2005-2009 GT Mustang. You'll also get a sensational-looking air box design that makes your engine bay look even cooler. Plus, you get a Performance Tune and a Race Tune.
Airaid Cold Air Intake w/ SynthaFlow Oiled Filter. This cold air intake not only improves horsepower, but it also provides superior air filtration, since it includes an Airaid Premium Filter with SynthaFlow® technology. SynthaFlow® is a synthetic nano-fiber material that traps the smallest dirt particles down to 2 microns in size that ordinary cotton-gauze "performance" filters just can't capture. And best of all Airaid Premium Filters are washable and re-usable saving you money. See more info about this cold air intake -
HereBAMA Rev-X Tuner w/ 2 Custom V2 Tunes. The SCT Rev-X Handheld Tuner allows you to re-tune your Mustang's computer for increased power and better drivability so you can take full advantage of your new Cold Air Intake. When you order this combo, you aren't just getting a tuner - you are getting the tuner and 2 Custom V2 Tunes that are written specifically for your Mustang and your particular modifications by BAMA Performance. See more info about this Rev-X Tuner -
HereGet More from Your Mods. From the factory, Ford programs their vehicles to cater to the needs of the daily driver, not the performance enthusiast who adds aftermarket bolt-on modifications in search of more power. That is why a custom tune file is so important. By optimizing the air/fuel ratio, adjusting ignition timing and tweaking variable cam timing, a BAMA Tuning Custom Tune will squeeze out the extra power your aftermarket performance mods have to offer.
Free Tunes for Life! Every customer that purchases a Bama Rev X Tuner is enrolled in the Free Tunes for Life program. Any time that you make additional mods to your vehicle, our team of certified Bama Calibrators will create new tunes for you. Just send us a list of the part or parts you've added and we'll upload your new tune files to the cloud.
Not CARB Certified. Neither the Cold Air Intake nor Tuner included in this kit are CARB certified, therefore they are not legal for use in California or any other state adopting California emission standards. Not legal for use on pollution controlled motor vehicles; intended for off road use only.
Application. This Airaid Race Cold Air Intake and BAMA Rev-X Tuner Combination is specifically designed for use with 2005-2009 GT Mustangs.
- Replacement Hardware – SKU U3021H
- Replacement Hardware – SKU U3022H
**Please Note: The Rev-X Performance Programmer ships blank from AmericanMuscle. Your custom tune files may take 2-3 business days to be written, meaning they should be available for download via the cloud when your tuner arrives.
It's highly recommended to download Free LiveLink and Updater Software. The LiveLink Application is used to view, data log, record and playback your Mustang's PCM data on a laptop computer. The Updater Application lets you update your device's Firmware, Tune Revision or to load Custom Tunes onto your device. Requires Windows Vista/7/8/10 and an internet connection.

CA Residents:  WARNING: Cancer and Reproductive Harm - www.P65Warnings.ca.gov


 FREE 1 to 3-Day Delivery on Orders $149+ Details