FREE 2 or 3-Day Delivery on Orders $119+ Details

Talk to a Camaro Enthusiast
1-877-887-1105
M-F 8:30A-11P, Sat-Sun 8:30A-9P
Win $3,000 in Store Credit! Enter Daily >

AWE Track Edition Cat-Back Exhaust with Quad Diamond Black Tips; Non-Resonated (16-23 6.2L Camaro Coupe w/ NPP Dual Mode Exhaust)

Item CC5097
Call a Camaro Enthusiast at 1-877-887-1105
M-F 8:30A-11P, Sat-Sun 8:30A-9P
$0.00
Our Price

$1,495.00 (kit)

FREE Shipping Market Price $1,573.68 You Save 5% ($78.68)

Will this fit your Vehicle?

Select a different vehicle Help?
Update or Change Vehicle
Ship to: Ashburn - 20149
Sorry, please enter a valid US or CA postal code
We're sorry, zip can't be updated at this time.
Recommended Install Shops
How It Works

Add Local Shop Installation

Install Shops are available near Ashburn - 20149
Total cost of service $299.00
    Create a list
    Add to New List

    Saved - View your saved items

    We're sorry. We couldn't save this product at this time.

    or use

      Video Review & Installation

      Jake: Jake here for American Muscle. And today, I'm taking a look at this AWE Track Edition Non-Resonated Cat-Back Exhaust with Quad Diamond Black Tips for 2016 and newer Camaro 6.2 liters with the factory NPP Dual Mode Exhaust. Now, if outright volume and raucous fun is what you're after, then this track edition cat-back from AWE is gonna be just what the mechanic ordered. This is a super high-quality system that is absolutely gonna bring the noise to your Camaro. AWE has been making high-quality exhausts for decades, and this system certainly does that reputation justice. They've also been known to bring the volume, which again, this system certainly does. This is perfect for the Camaro owner who is planning to track their car or just wants to have a high-quality exhaust that also absolutely sounds the business.Now, no getting around it, this one is loud. We're gonna give this a 5 out of 5 on the loudness meter, and let's just say, your neighbors are gonna know that something is up. Now, surprisingly, it is not actually as intrusive inside the cabinet as you might expect, but it is still gonna have a lot of volume. I can't really stress it enough, this one is not quiet, but, man, does it sound good. It's deep, verbally and aggressive like you heard in those clips earlier. It sounds like a true muscle car both inside and out, and it really brings a lot more character to the Camaro. Now, like I mentioned already, and as you can probably tell, this whole thing is super high quality. Everything is made from T304 stainless steel, which means it's gonna provide excellent corrosion and rust resistance. And everything is made of 3-inch mandrel bent tubing to provide excellent flow, and it's CNC laser cut for precise fitment.AWE also includes an X-pipe in this kit, which is what this part is, and that's a boon for exhaust flow and helping cancel out some of the potential drone by evening out those exhaust pulses that you often find in traditional pushrod V8s like the LT1. And since this system is non-resonated and not muffled, as you can tell, that is a very important inclusion, this X-pipe, since it's gonna keep that awesome sound but it's gonna make the drive overall a lot more pleasant. And of course, you get some cool exhaust tips to finish the whole thing off. As you can see here, I put two of them on and they do sort of mimic the stock dual-exit exhaust on the Camaro. Now, these are black diamond exhaust tips. So, they're 4 inches in diameter, they've got this really cool, dark, almost smoky-type high gloss finish. It adds a layer of stealth and subtlety to what is otherwise not a very subtle exhaust. I think these really set the rear of the car off, and they're a pretty perfect finish to this killer setup.Now pricing for this one is gonna come in around $1,700, and for a high-quality cat-back system, that's really not too bad. It actually ends up being on the lower end of the spectrum price-wise as compared to some of the other cat-backs out there on the market. However, it is worth noting that you are not getting those active exhaust valves with this system, and the price of course, does reflect that. However, the construction, the inclusion of that X-pipe and the sound, I think really make it worth the price of entry if this is the sort of thing you're going for.Now as far as installation goes, this one like most exhausts for the Camaro, will get a 2 out of 3 on our difficulty meter, and it should take you about 3 hours to get it all done. Everything you need, including new clamps and hardware, is included in the box. Now, since the stock system on the Camaro SS is not a bolt-together setup, you are gonna need to make a cut to the stock system. However, these are really easy to do and you do get instructions on how to measure it out in the box. You will also have to unbolt your active exhaust valves, but once those two things are done, this new system just clamps and bolts right in. It uses all of your stock exhaust hangers as well, and like I said earlier, you do get all-new hardware and all the clamps that you need included in the kit.Now, if you've done an exhaust in your driveway before, you know that it can be a little bit fiddly because of the lack of space, but even with the cutting that this one entails, it's absolutely something you can do at home. And to show you how to get this installed, let's head over to the install bay right now.Man: Tools required for this install include an impact gun, an electric ratchet, a hand ratchet, an exhaust hanger remover tool, a 3/8 to 1/4-inch adapter, 7, 11, 13, 15, and 16-millimeter sockets, an extension, a 5/16 ratcheting wrench, couple of zip ties, a tape measure, a pair of safety glasses, a marker, a Sawzall, and a grinder.What's up, guys? Today we're gonna be installing an exhaust on our Camaro, so let's get started. So, our first step to removing our exhaust is gonna be to disconnect our valves. Now, these are gonna be found on the outside of each side tip, so we'll get the harness, press the tab and disconnect them. So now our first step's gonna be to disconnect the wiring harness to our valve controller. So, to do that, we're gonna remove these two 7-millimeter bolts to clear up some access. You're gonna have to take these out later on eventually because we're gonna have to slide our exhaust back this way and the valves are gonna slide under this. So I'll get a 7-millimeter socket to get these off, then we can push that back out of the way and then reach in there and disconnect our wire harness. And then we'll do that same thing on the other side.So, the factory exhaust system has six hangers. We have two here, two here, and then two by our tips. So we're gonna remove the inner four here, that way we can still have our two hangers in the back holding our exhaust up while we disconnect our flanges up front. So, we can get the two on our passenger side first. So I'll grab an exhaust hanger remover tool and pop off these isolators. And then on this one, the hanger on our pipe's a little longer than the one from our chassis, so we'll pop off our top isolator, and then we can pop it off at the bottom and slide it back on the top. Now we can do the same thing on our driver's side.Now our next step is to remove our brace here. We have five 13-millimeter bolts holding that in. So I've got 13-millimeter socket on impact gun to get these off. Now our next step's gonna be to disconnect our O2 sensors on both sides. Now you can do this either by unscrewing the O2 sensor or simply just unplugging the harness. We're gonna unplug the harness. So there's a white tab that you're gonna push up and then push in and then it'll separate our connect. We'll take our white tab, push up on it, and then we can press down and slide our connector up. Now this side's gonna be the same thing, just a little deeper in there. Pull back on that tab and then disconnect our connectors.So now, we can work on our two flanges. We'll get those disconnected with a 15-millimeter socket. We've got a pole jack here to hold the exhaust in place so it doesn't drop down once we disconnect it, and then once we have our two flanges disconnected, we'll grab a buddy to help us pull the whole exhaust out of the car. So now on this side, we don't have much clearance, so I'm gonna get a 15-millimeter socket with a ratchet on this side, and then we can use our impact gun on this side. So, I've got some penetrating lubricant I sprayed on here just to make it a little bit easier to get these off. Now on this side, we can use a 15-millimeter socket on an impact gun to loosen this clamp.So now I have a pole jack set up underneath our muffler to keep it in place, and then we're gonna be removing the two bolts on our hanger on both sides to release the muffler. So now we can take a 15-millimeter socket on a ratchet to get our 2 nuts off, and then we'll do that same thing on the other side. So now would be a good time to grab yourself a buddy, and you can take one end while your buddy takes the other, and then we'll just simply slide it out and remove it from the car.So now with the exhaust removed from our car, we can take our valves off, and we'll be using a 5/16-inch ratcheting wrench to remove this. And then we can repeat that same process on the other side. And now we can remove our final two hangers on our stock exhaust using an exhaust hanger remover tool. Now before we get down with the install of this exhaust, it's important to note that we won't be able to retain our valve actuators with this kit. We do have a valve actuator simulator on the website that you can use from AWE to solve this problem. If you were to just get rid of the actuators, you would have a check engine light. So we're gonna plug ours in and zip tie 'em up out of the way. So now we're gonna take our valve actuator, we're gonna plug it into our harness, and then we have a nice harness up here out of the way that we can zip tie our actuator to. I've got a couple of zip ties put together.Now it's important to note that the silver piece is still gonna rotate, so make sure you have some space between that and your zip tie. And then we can bend our heat shield back up into position and reinstall our two 7-millimeter screws. And we'll tighten those down with our 7-millimeter socket. And then we can repeat that same process on the other side.So now for this kit, you're gonna have to cut your factory exhaust. So we're gonna need on the driver's side, 1.7 inches of straight pipe, and on the passenger side, 2.1 inches of straight pipe. So it'll be a good time to grab your tape measure and your marker, and we can measure out where our cuts will be made. So now we're gonna start on our passenger side. So once again, we want 2.1 inches of straight pipe. So instead of measuring from the weld here, we're gonna come out to about right here where our pipe straightens out. We'll get a tape measure down there, and then we can mark right around 2.1 inches. Now on our driver's side, we need 1.7 inches of straight pipe so it comes out pretty straight right here behind the weld. So we'll start our tape measure there and mark down 1.7 inches. So now with our lines laid down for where we're gonna make our cuts, you can grab whatever cutting tool you'd like. We're gonna use a Sawzall, and we can make our cuts.So now once we have our cuts made, we can go ahead and come over to the grinder and clean up our edges. So now with our cuts made and our edges cleaned up, we can reinstall our secondary cats. So we'll get it on here, get our nuts back in place, tighten those down, and then we can reconnect our O2 sensors. And then we can take our 15-millimeter socket to tighten our nuts down. And I'll get a normal hand ratchet on the other side. I don't have a lot of clearance. And then with our nuts tightened down, we can reconnect our O2 sensor, and then we'll push that white clip back in to lock it into place. So now on our driver's side, we can reconnect our O2 sensor. So we didn't end up having to take that out. And we'll click that white pin back into place on this side as well. So now on the other side, we take our driver's-side secondary cat, slide that over the edge, and then we can get a 15-millimeter socket on our clamp to tighten that down. So now obviously, we have two front pipes that are gonna be installed. The shorter of the two is gonna be for the driver's side, and the longer one is gonna go on the passenger side.So we can take one of our 2.75-inch clamps, slide it over our front pipe, and then we can raise that up and slide it over our cat. And then we'll get our clamp slid into position and tighten that down with a 16-millimeter socket. So now we can do that same thing on the other side, slide our 2 3/4-inch clamp over our front pipe, and then we can raise that up into position. And then we'll just slide our clamp into position and tighten that down with a 16-millimeter socket.Next, we can install our X-pipe. So we're gonna take 2 of our 3-inch clamps and slide those over the edge. And then to make it easier to install, we're gonna slide it into our two hangers first and then meet it up to our front pipes. Now we can slide our X-pipe over our two front pipes. And then we can slide our clamps into position, and we'll be tightening those down with the same 16-millimeter socket. Now we can install our tailpipes. So we'll take another 3-inch clamp, slide that right over the edge of our pipe, and then we slide that into our X-pipe, and then we can get it up into our hanger. Now we can reinstall our hanger bracket. Slide that over our hanger, and then we can get it lined up with our studs. And then we'll reinstall our two 15-millimeter nuts, and then we can take our 15-millimeter socket to tighten those down.And now we can slide our clamp into position, and we'll tighten that down with a 16-millimeter socket. Now we can install our tips. So we're gonna take our bolt and put it through, and then we have a nut on the other side that we'll thread on. And then we can slide on our tip. We'll tighten that down with an 11-millimeter socket. And then we'll do that same thing for this one. Put our bolt through, get our nuts started on the other side, and we'll tighten that down with that same 11-millimeter socket. And then we can repeat that same process on the other side. Now we can reinstall our brace. So we'll thread our five 13-millimeter bolts back up into place. And then we'll take our 13-millimeter socket and raise the brace up to make sure all of our bolt holes are centered, and then we can tighten these down.So, that'll wrap up this review and install of the AWE Track Edition Cat-Back Exhaust with Quad Diamond Black Tips Non-Resonated for your 2016 and newer Camaro Coupe with NPP Dual Mode Exhaust. Thank you for watching. And remember, for all things Camaro, keep it right here at americanmuscle.com.

      Product Information

      Features, Description, Reviews, Q&A, Specs & Installation

      Features & Specs

      • Loud, Aggressive Track Sound
      • Increases Exhaust Flow for More Power
      • Non-Resonated X-Pipe
      • Mandrel-Bent .065 Wall T304L Stainless Steel - 3-inch
      • Quad, Slash-cut, Double-walled Tips - Diamond Black
      • Direct Bolt-On Installation
      • Proudly Manufactured in the USA
      • Compatible with NPP Dual Mode Exhaust
      • Fits 2016-2023 6.2L Chevrolet Camaro Coupes with NPP Dual Mode Exhaust

      Description

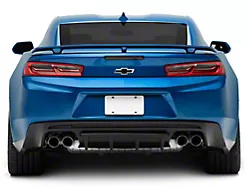
      Loud, Aggressive Track Sound. Unleash the sound of the beast hiding under the hood of your 6.2L powered Camaro by upgrading to an AWE Track Edition Cat-Back Exhaust. With no mufflers or resonators to get in the way, this straight-pipe AWE Track Edition Cat-Back Exhaust will convert your Camaro's tame factory exhaust note into a loud, aggressive one that will wake up the entire neighborhood.

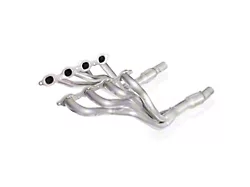
      Power And Performance. AWE's Track Edition Cat-Back Exhaust not only improves the sound of your Camaro, but it will also improve its performance as well. With the help of its free flowing design and high-flow x-pipe, this Cat-Back will significantly improve exhaust flow for an increase in rear wheel horsepower and torque.

      Superior Construction. This AWE Track Edition Cat-Back Exhaust is handcrafted from U.S. sourced, CNC 3-inch, mandrel-bent 0.065-inch wall T304L stainless steel tubing for its rugged durability and excellent corrosion resistance. Featuring an "X" style mid-pipe, the tubing in this Kit is CNC mandrel-bent to reduce kinks and improve exhaust flow. The included quad, diamond black, double-walled slash cut tips will add an impressive muscle car appearance to your Camaro.

      Direct Bolt-On Installation. AWE engineered their Cat-Back to be a direct bolt-on upgrade replacement. This Cat-Back System will easily bolt straight up to the factory piping without any cutting, modifications or special tools required for an easy straight forward installation.

      Application. This AWE Track Edition Cat-Back Exhaust with Quad Diamond Black Tips; Non-Resonated is designed to fit 2016-2023 6.2L Chevrolet Camaro Coupes with NPP Dual Mode Exhaust.

      Fitment:

      • 2016 Chevrolet Camaro
      • 2017 Chevrolet Camaro
      • 2018 Chevrolet Camaro
      • 2019 Chevrolet Camaro
      • 2020 Chevrolet Camaro
      • 2021 Chevrolet Camaro
      • 2022 Chevrolet Camaro
      • 2023 Chevrolet Camaro
      Details

      AWE 3020-43074

      CA Residents: WARNING: Cancer and Reproductive Harm - www.P65Warnings.ca.gov

      Installation & What's in the Box

      Installation Info

      What's in the Box

      • Front Driver Side Inlet
      • Front Passenger Side Inlet
      • X-Pipe
      • Driver Side Tail Pipe
      • Passenger Side Tail Pipe
      • (4) Tips
      • Clamps
      4.8

      Customer Reviews (122)

        Questions & Answers

        10 More Questions

        Will It Fit My Camaro

        • LS - 23
        • LT - 23
        • LT1 - 20, 21, 22, 23
        • SS - 16, 17, 18, 19, 20, 21, 22, 23
        • ZL1 - 17, 18, 19, 20, 21, 22, 23