Installation Time
(approx) 1 Hour
Difficulty Level:
Light to Moderate mechanical skill required.
FREE 2 or 3-Day Delivery on 10,000+ Items. Details
$899.99 (each)
FREE Shipping + $199.00 Oversized Item Fee Market Price $1,034.99 You Save 13% ($135.00)Saved - View your saved items
We're sorry. We couldn't save this product at this time.
Hey, guys, it's Sara with americanmuscle.com, and today we have a review and install of the Cervini's Stalker Hood with an unpainted finish, fitting your '18 and newer Mustang GT or EcoBoost. This is perfect for the Mustang owner looking to add some style as well as some functionality to their car. This hood features a top fiberglass construction and it does show up unpainted. I know you guys are looking at this nicely painted hood and wondering why I would say that. It shows up unpainted and you can paint match it to your Mustang, we want to give you an idea of how nice it looks once it's complete. So, the function comes in with the scoop in the front of the hood that you see here. It does sit up a bit higher to give you some more room to move around in the engine bay. In addition, it does have this large opening to get a ton of more airflow into your engine bay. They do sell a scoop separate to really direct it towards your intake. And of course, if you are running an open-element filter intake, you're really gonna get the most out of this feature.They also feature these black louvers for some added style. Now, there is a vent underneath there but it doesn't give you quite as much airflow as the front here, but still, it's a great feature to have. All right, so one thing to note with this hood is that, out of the box, it will not bolt right up to hood struts. However, it does work with your factory windshield sprayers. Although you will see in a second you may want to secure those a bit higher to make sure they don't snag on anything in your engine bay. So, as far as price goes, this hood comes in at around $800, which is on the lower end price-wise when compared to other options. And for your money, you're getting both form and functionality with this hood without breaking the bank. I'm giving this install a two out of three wrenches on the difficulty meter. It does feature direct bolt-up installation that can be done within one hour. So, with that said, let's get into our install. For this install you will need a trim panel removal tool or a pop clip removal tool, a 10-millimeter socket, and a ratchet.All right, so the first step in our install is to grab a pop clip removal tool and remove all of the pushpins that hold on the liner underneath our hood. Get behind each of these and just pry away. Now, you don't have to remove all of these, we are doing that to give you guys have better look at what we're doing behind this. If you want to just remove the ones that are blocking your sprayer, that's why we're taking this out, and that's what we wanna get to. All right, go ahead and remove it off the Mustang. All right, at this point, we can disconnect the sprayer nozzle by pulling back on this black piece and pulling down. Now, I'm gonna use a small flathead here just make sure you're being careful if you're gonna use a tool, you can use this by hand. And then repeat that process on the other side. Now, finally, remove the clips that hold on the sprayer line. All right, at this point, we will have to transfer over the latch as well. So, we're gonna grab a 10-millimeter socket and remove the 2 nuts on either side. So, go ahead and get these removed.All right, so at this point the hood is ready to come off, you're gonna grab your 10-millimeter socket and a ratchet, we're gonna remove the 2 nuts that are holding on each side. Make sure you're supporting the hood as you do this. All right, so you're definitely gonna want a friend for this step. Have them grab the side of the hood there where you just removed the bolts. Make sure you guys have a good handle on it because we're gonna remove the hood prop. Make sure you're supporting the hood. Grab a 10-millimeter socket and remove the 2 nuts. All right, now you can remove the hood off the Mustang. All right, so now that we have our factory hood uninstalled from our Mustang, we can check it out side by side with our new hood here. Now, there are a few differences. The first being this is fiberglass, to the factory aluminum, so they're both pretty lightweight. They both have vents on them, although they are a different style. And the biggest difference here is the scoop in the front is gonna get a ton more air directly into your engine bay.And in addition, this cowl section in the center sits up higher, getting you some more room as well. But with that said, let's finish up our install. All right, so at this point, we do have to transfer a couple of things over from our factory hood to our new hood. The sprayers here, we're just gonna pop these out. We're also gonna transfer the weatherstripping as well. Let's start with the sprayers. All right, go ahead and insert your trim tool behind the sprayer, and it should pop right out. All right, now do the same thing on the other side. All right, now you can install them into your new hood. Now, they come out through this opening, which is kind of tight. They do clip in really nicely with the angle, but this is not super ideal. So, I would either secure this nicely to your hood or maybe even put a hole right here for it to come out a little better. But that's just me, just keep that in mind, this is going to hang a little bit lower than factory. Go ahead and repeat that on the other side. Line up the clip up top here and then clip it in the bottom. They clip in there pretty nicely.All right, so the last thing I wanna point out is that while there are some holes in the bottom here that seem like they should be for weatherstripping, the factory weatherstripping does not work as it stands. If you do want some on your hood, you can grab some aftermarket weatherstripping, which will work great, or you can modify your factory weatherstripping to work. But with that said, let's get our hood installed. All right, so you may want a friend for this step, it definitely makes it easier. Go ahead and line up your hood and start to get the hardware installed. Now, because these are not studs, maybe a little bit more finagling that has to be done in order to get these to line up. All right, once you have one side in, go ahead and toss the hood prop back up to help you out. All right, go ahead and line the other side up using the hardware included with the hood. All right, so at this point, you wanna make sure that your hood fitment is exactly where you want it, you're gonna get all of the adjustment via these bolts.So, try to almost close it, open it again, get it right to where you want it, and then we're gonna tighten these down. Now, if you do tighten them down and it still doesn't line up, go ahead and loosen them just a bit on each side to get it perfect. Let's go ahead and grab our 10-millimeter socket and tighten these down. Be careful not to overtighten these as we are going into fiberglass. And then repeat that on the other side. All right, at this point, you can plug in your windshield washer sprayers, listen for the click, and it may be wise to secure this up a bit, as I said before, it does hang down a little bit low. All right at this point, we're gonna remove the two 10-mil bolts that are where our head latch should be. Line up your latch, make sure it's facing the correct orientation because it may contact this bump if it's not. And then go ahead and tighten it down. Keep in mind we are still going into fiberglass and we don't wanna overtighten. All right, so with the sprayers installed and the hood tightened down, let's go ahead and shut it. All right, so that is gonna do it for the review and install this hood. And remember for all things Mustang, keep it at americanmuscle.com
Subscribe to our YouTube Channel
Features, Description, Reviews, Q&A, Specs & Installation
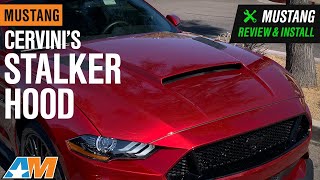
Muscular Styling, Added Performance. Provide your GT or EcoBoost with a muscular styling touch that also improves performance with the Cervini's Unpainted Stalker Hood. Your vehicle’s hood is designed to emphasize its muscular lines. This hood with its ram-air scoop and louvers, offers an unmistakable high-performance look, making your vehicle stand out from the pack.
Functional Ram Air Scoop. The aforementioned ram air scoop is not there just for show. This air scoop air duct can be made fully functional with a ram air duct (part# 1240) - sold separately. When installed this setup will provide your engine with fresh, cold air that it can certainly use to boost performance. This means your pony car won’t only look good, it will perform better as well. Additionally, the 2 louvers work to dissipate heat more efficiently, ensuring cooler engine temperatures.
Tough Build Quality. A hood is only as good as it is tough, and this one is no exception. This hood is crafted from quality aircraft-grade fiberglass, making it not just strong but significantly more lightweight than steel. This reduced weight also helps with your car’s performance. This stalker hood also features specialized channels in its underside designed to conceal the windshield washer nozzle hoses and turn signal wiring harness for a clean look. Likewise, the hood louvers are constructed from high-grade polyurethane. Lastly, this hood is kept unfinished, allowing you to paint it to match your Mustang’s body color, or even in a different hue for contrast.
Professional Installation Recommended. This Stalker hood is designed to bolt-on directly onto your vehicle’s factory hinges without any modifications. However, painting this hood will require some prep work since this is a fiberglass component. If you’re not familiar with this type of procedure, or if you don’t have the proper painting equipment, professional installation is always an option.
Application. Cervinis Unpainted Stalker Hood fits 2018-2023 Ford Mustang GT and EcoBoost models. Does not fit GT350 models.
Fitment:
Cervini's 1240
CA Residents: WARNING: Cancer and Reproductive Harm - www.P65Warnings.ca.gov
Installation Info
Installation Time
(approx) 1 Hour
Difficulty Level:
Light to Moderate mechanical skill required.
What's in the Box
10 More Questions