FREE 2 or 3-Day Delivery on 10,000+ Items. Details

Talk to a Mustang Enthusiast
1-877-887-1105
M-F 8:30A-11P, Sat-Sun 8:30A-9P
$12k Summer Sweepstakes! Enter Daily >

C&L Super Sport Brake Rotor and Pad Kit; Front and Rear (05-10 Mustang GT)

Item 410664
Call a Mustang Enthusiast at 1-877-887-1105
M-F 8:30A-11P, Sat-Sun 8:30A-9P
$0.00
Our Price

$270.96 (kit)

FREE Shipping Market Price $316.99 You Save 15% ($46.03)

Will this fit your Vehicle?

Select a different vehicle Help?
Update or Change Vehicle
Out of Stock

Ship to: Ashburn - 20149
Sorry, please enter a valid US or CA postal code
We're sorry, zip can't be updated at this time.
    Create a list
    Add to New List

    Saved - View your saved items

    We're sorry. We couldn't save this product at this time.

    or use

      Video Review & Installation

      Hey guys, it's Sara with americanmuscle.com. And today, we have a review and install of the C&L Super Sport Brake Rotor and Pad Kit for the front as well as the rear fitting your '05 to '10 Mustang GT. These are perfect for the Mustang owner who's looking to replace their pads and rotors all around and wants an upgrade over an OE replacement. This brake kit was designed for street as well as track use and delivers improved braking performance over stock, thanks to the drilled and slotted rotors, as well as the ceramic compound pads. These zinc-plated cross-drilled and slotted rotors will keep your brakes cool and clean, and the ceramic metallic compound pads will give you that added braking performance with minimal dust and noise. Now one thing to keep in mind, because this is a performance braking kit, you may get some additional noise because of these harder compound brake pads when compared to just a stock or OE replacement kit, which is the trade-off for some more stopping power. So as far as price goes, this kit comes in at around $300 for the complete front and rear kit. Now this will run you a bit more than an OE replacement. But for your money, you are getting these improved components that deliver some more stopping power. And as far as the install goes, I'm giving this one a two out of three wrenches on the difficulty meter. It does feature a direct bolt-up install that can be done within four hours. So with that said, let's check out the install.For this install, we used an impact gun but a regular hand ratchet will work just fine. You'll also need 15, 13 and 12-millimeter sockets, or we did use a 13 and 15-millimeter ratcheting wrench. You may also want a swivel 15 socket. We also used a small pry bar or you can use a large flathead. You may also want a caliper hanger or similar tool, a pair of cutters, a small flathead, and you will need the tool to push in the front caliper and to twist in the rear caliper. All right. So the first step in our uninstall, with your car in the air and the wheel removed, we're gonna use a 12-millimeter socket and remove the two bolts holding your caliper to the bracket. Grab that 12-millimeter socket and go ahead and remove the bolts at the back of your caliper. Should be one on the top and one at the bottom. With both of these bolts removed, you can now remove the caliper. Now, if you can't seem to wiggle it off, you can use a small pry bar or a flathead screwdriver will work just fine. Go ahead and get it started and then wiggle it the rest of the way. Once the caliper is off, you're gonna wanna grab a caliper hanger tool or a similar tool like a bungee cord will work, and just hang it out of the way so we can finish up our install. And now that you have the caliper removed, there's two bolts right here holding on the caliper bracket. Grab a 15-millimeter socket and get these removed. You may also want a swivel socket or a swivel extension.Now just be careful as the second one comes out because now you can remove the bracket as well. Now I did wanna point one thing out, if your car still has these retainers on from the factory, you've never done brakes before, you will need to remove these and these are single-use so you will not be able to reuse them. Really all this does is keep the rotor in place but we have a trick for that during assembly. So you do not actually need these for the function of your rotor. I'm using a flathead, just pry up on it enough to be able to get behind it with a pair of cutters, and using those cutters, cut it and remove it. And now what we can do is remove this rotor. Now if yours isn't loose like ours, what you can do is hammer around the backside of this rotor where the caliper was with a rubber mallet to loosen it up. Once it's loose, go ahead and wiggle it off.All right. Now that we have the factory pads and rotors uninstalled from our Mustang, we can take a look at them side by side. Now as you can see here, the biggest difference is the drilled and slotted rotors and the ceramic metallic compound pads that come with this kit. Those paired together will give you a ton of more stopping power, thanks to the compound of the pads and the drill and slotting in the rotor to keep your brakes cool and clean. Now this kit includes obviously the rotor and the pad, but also includes these metal clips to hold the pad in the caliper bracket which is a nice thing to have for those worn out or aging components. So with that said, let's finish up our install.Now we can install our new rotor. Before you put this on, make sure you spray both the front and the back with some brake clean to remove the oils that build up from the factory. Once you've done that, go ahead and line them up over the studs and press it into place. Then one trick I like to do is grab one of your lug nuts and thread it in place to keep the rotor from moving around while we finish up the install. Now that we have our caliper bracket off of our car, we can transfer over the new brake pads here. Now you can do this on car but while we have it off here, we do wanna take a look at it. So all I'm gonna do is grab the brake pad and slide it forward. And you may also have to twist to remove it.Repeat that with your back brake pad, same thing. And while we're here, we wanna take a look at the rest of the bracket. We wanna make sure these sliders move. If not, you may need to regrease them, and take a look at these rubber boots as well, make sure they're not torn or damaged. Next up, they also include these metal clamps that go inside each of these ears and hold the brake pads. Now you can remove these if you like, but if yours are in good shape, you can leave them as well. We're gonna pop these out and show you guys how to do it. So all you're gonna do, is start with a tab on the inside, the larger one, just go underneath with a small flathead and push forward to remove. Repeat that process with the rest of your metal clips.Now that you have all of those off, take a look at these ears here. Make sure everything is nice and clean. If you need to take a wire brush to these, definitely a good idea because you want these new metal clips to line up as nicely as possible. Go ahead and slide them in. You want the larger tab facing outwards and go ahead and click it in place. The larger flat piece here will be towards the inside as well. The exact same orientation as the factory. Go ahead and repeat that for the rest of these metal clips.It'd be easier to get the smaller one lined up first and then pop the larger one in place. Now we can line up these brake pads. What you're gonna do is again come at it from about an angle and then just go ahead, twist it in place. Same thing on the other side. And I do wanna point out that you will wanna grease these ears of the brake pad. Make sure they're moving nice and freely in these openings. Because this is demonstration we're gonna skip that step. But you do wanna have these nice and greased so the brake pad can move back and forth. Now you can line up your caliper bracket and brake pads on overtop of the rotor. Then go ahead and slide your bolt in the back, and get it threaded in. And once both bolts are threaded in, grab that 15-millimeter socket and tighten it down.Next up, we're gonna grab the caliper off the hanger and grab a caliper tool. What this does is press in both of these pucks into the caliper itself so that we can clear those fatter brake pads. Go ahead and keep squeezing until they're all the way in. You want them pretty much flush. And you can double-check that they'll clear the pads and keep going. But once you have them in far enough, go ahead and start to line them up. Make sure they're lined up with the sliders and overtop of both brake pads and wiggle it in place. And once the caliper is in place, go ahead and line up the bolts through the back of the caliper, one at the top and one all the way at the bottom. And then with your 12-millimeter socket, tighten them down.All right. And now that the install is complete in the front and the rear, make sure you repeat that process on the other side. Before you drive anywhere, make sure you press on that brake pedal and you get a nice firm brake pedal feel, and then that is gonna do it for the review and install of this brake kit. And remember for all things Mustang, keep it right here at americanmuscle.com.

      Product Information

      Features, Description, Reviews, Q&A, Specs & Installation

      Features

      • Improves Braking Performance
      • Ideal for Street and Strip Applications
      • One-Piece Cross-Drilled and Slotted Rotors
      • Vented Design Improves Heat Dissipation
      • Premium Cast Iron Construction
      • Zinc Plated Finish
      • Ceramic/Metallic Compound Brake Pads
      • Low Dust and Quiet Braking
      • Direct Fit Replacement Upgrade
      • Complete Front and Rear Brake Kit
      • Fits 2005-2010 GT Mustang Models

      Description

      Increased Braking Performance. A great way to upgrade the stopping power of your 2005-2010 GT Mustang is by installing a C&L Super Sport Cross-Drilled and Slotted Rotor Brake Rotor and Pad Kit. Including Cross-Drilled and Slotted Front and Rear Brake Rotors, as well as a set of matching Ceramic/Metallic Brake Pads, this Brake Kit will significantly improve the braking performance of your GT Mustang, when compared to your original factory brakes. This C&L Performance Combo Kit is ideal for those who want high-performance braking power without breaking open their piggy banks.

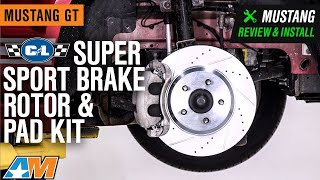
      Superior Construction. C&L Performance manufactures its one-piece Brake Rotors from premium-grade cast iron castings. CNC machined, these Rotors are perfectly mill-balanced to prevent vibration, noise, and uneven wear. C&L Performance then completes their rotors in a bright zinc electroplating treatment to provide good looks and protection against rust.

      Cross-Drilled and Slotted. C&L Performance Super Sport Rotors feature a cross-drilled and slotted design that helps to reduce brake fade by allowing hot gasses to easily escape through the vented holes. The slotted design will sweep away dust, water and debris to keep the surface of your brake pads cleaner for reliable bite every time you hit the pedal.

      Cooling Vane Design. Unlike solid aftermarket brake rotors, these C&L Performance Super Sport Rotors feature a vented vane design with an internal chamber structure. These vented vanes will allow hot gasses to escape easier to further improve the cooling performance of your brakes. Faster heat dissipation in turn will greatly increase your Mustang's braking performance.

      Ceramic Metallic Compound. C&L Super Sport Brake Pads are manufactured from a proprietary blend of ceramic and metallic fibers that will resist brake fade and will provide maximum braking bite. C&L Super Sport Ceramic pads are the logical choice for big brake stopping power without the price.

      Clean and Quiet Operation. Featuring a rotor-friendly ceramic/metallic compound and an OE style slotted design, these C&L Performance Brake Pads will produce significantly less dust when compared to your original stock pads. When C&L Performance Brake Pads are combined with their matching Rotors, you will experience smooth, noise-free braking.

      Direct Fit Replacement Upgrade. C&L Performance designed its Cross-Drilled / Slotted Rotor and Brake Pad Combo Kit to be a direct fit replacement upgrade for your Mustang's stock rotors and pads. Installation can normally be completed in under 4 hours with just basic hand tools using the existing calipers and hardware.

      Complete Front and Rear Kit. This C&L Performance Rotor and Brake Pad Kit comes complete and includes 2 Front Rotors, 2 Rear Rotors as well as a set of Ceramic Front and Rear Brake Pads. The Kit also includes all the required hardware needed for installation on your Mustangs original factory calipers.

      Application. This C&L Super Sport Cross-Drilled and Slotted Brake Rotor and Pad Kit; Front and Rear is specifically designed to fit 2005-2010 GT Mustang models.

      Fitment:

      Details

      C&L 410664

      CA Residents: WARNING: Cancer and Reproductive Harm - www.P65Warnings.ca.gov

      Installation & What's in the Box

      Installation Info

      What's in the Box

      • (1) Front Driver Side Rotor
      • (1) Front Passenger Side Rotor
      • (2) Pairs of Front Brake Pads
      • (1) Rear Driver Side Rotor
      • (1) Rear Passenger Side Rotor
      • (2) Pairs of Rear Brake Pads
      4.6

      Customer Reviews (45)

        Questions & Answers

        10 More Questions

        Will It Fit My Mustang

        • Bullitt - 08, 09
        • GT - 05, 06, 07, 08, 09, 10