Installation Time
(approx) 6 Hours
Difficulty Level:
Mechanical expertise or professional installation required.
FREE 2 or 3-Day Delivery on 10,000+ Items. Details
$910.00 (kit)
FREE ShippingSaved - View your saved items
We're sorry. We couldn't save this product at this time.
or use
Hey, guys, Adam here with americanmuscle.com. And today, we're taking a closer look at, and of course installing, the Eibach Pro-Plus Suspension Kit, available for the '11 and newer R/T Challenger. Now, you should be checking this out if you're looking to lower the center of gravity on your Challenger, getting rid of that factory, ugly wheel gap to drop your front end about 1.4 inches and your rear 1.7 inches. Now, with that drop, of course, you're gonna get an improved suspension and handling, you'll also get better cornering abilities, and the Pro-Plus kit you see here also includes front and rear sway bars. Now, there's a number of ways you can lower your Challenger and improve the suspension and ride quality as well as your handling performance, especially under hard launches and cornering.Now, this particular kit from Eibach takes it a step farther, so instead of just getting lowering springs, you're improving body roll as well. Anytime you do lower that center of gravity there, you're of course bringing your vehicle down toward the ground, which is gonna help stability. It's gonna help your Challenger roll less, especially at hard corners, to help make sure that you're keeping traction a little bit more at the rear end while also getting a little bit less of the excessive squatting upon launches and excessive nosedive upon braking.We'll talk about the details a little bit later on in the video as far as diameter of the sway bars and the differences there, but at first, I want you guys to know that the sway bars are adjustable for front and rear. You have two forms of adjustment, so you can stiffen it up or keep it a little bit more neutral depending on how you want your ride to be. Now, that's not necessarily changeable on the fly, but if you jack up the vehicle, pop the wheels off, you can easily switch the adjustment position by just disconnecting the end link and switching it over to the other hole. Your springs are progressive. Now, progressive versus linear is something that you wanna consider when picking up a spring. Your factory springs are linear, which means that they're predictable in every ride situation.Progressive springs, on the other hand, stay really comfortable under normal driving conditions, but the more you push them, like hard launches and cornering, the more stiff it will get. It progressively stiffens up to make sure it's handling that particular driving scenario. Now, that's kind of the best of both worlds in my opinion. You can definitely take them to the strip and have it perform. You can also have a weekend warrior and even a comfortable daily driver at the same time. Now, as far as lowering the Challenger with this particular kit here, the Pro-Plus System from Eibach, it's not the most aggressive drop in the category, but it is one that's a little bit staggered, so instead of getting the same drop in all four corners, you get a little bit less of a drop in the front and more in the rear.Now, if you're looking for something that's all-out aggressive, Eibach has their Sport-System, which drops at 2 inches in all four corners, definitely getting rid of a lot more of that wheel gap. It's all personal preference, but I particularly think this looks really good. If you're looking to upgrade your shocks and struts, Eibach does offer a kit like that as well, the Sport-System or the Pro-System, which is definitely a good idea for guys hitting a lowering kit. Anytime you add lowering springs to your factory shocks and struts, you can wear them down just a little bit faster than you would on the stock spring, so upgrading to an aftermarket one built for the lowered application is always a good idea.Now, as far as pricing is concerned, this particular kit, the Pro-Plus System with springs, front and rear sway bars comes in right around $750. Now, if you're not as interested in the sway bars as you are shocks and struts per se, you can check out the Pro-System or the Sport-System to pick that up for about $850. Now, those systems are a bit more expensive and they focus on compression and rebound more than body roll. This particular kit here focuses a little bit more on that body roll and cornering ability. Either way, huge upgrade to your factory suspension, and it's definitely gonna look aggressive and feel aggressive no matter the driving condition.Now, as far as the install, I'm gonna give this one three out of three wrenches on our difficulty meter, not because it requires drilling or any permanent modification, but it is pretty involved with the install and definitely requires some mechanical expertise. You can definitely tackle this in the driveway at home, it's just gonna take a little bit longer and require some more patience and proper hand tools. Now, as far as the front, you can knock that out pretty simply, but when it comes to the rear, in order to get that factory sway bar out, you do have to drop the subframe just a little bit. We're gonna loosen up those bolts, bring it down a bit in order to get the sway bar cleared from the body of the vehicle.It's also gonna require a spring compressor. Since it's not a full coilover assembly that comes assembled out of the box, you are gonna have to compress your factory springs at the front in order to swap them over. Keep that in mind going forward. If you don't feel comfortable tackling it yourself, no shame handing it over to a professional to get done properly. With all that said, it'll take you about four hours from start to finish depending on your experience. I'm gonna show you every step of the process here. Let's get started.Tools used in this install include an air impact gun, cordless impact, pry bar and a hammer, ratchet, extension, 8-millimeter swivel socket and deep socket, 10 and 13-millimeter deep sockets, 13-millimeter swivel socket, 15 deep, 16-millimeter swivel and deep sockets, 18, 21, and 22-millimeter deep sockets, universal swivel joints, both 0.5-inch and 0.375, 15 and 18-millimeter wrenches, 16 and 15-millimeter ratcheting wrenches are recommended, and not shown on the table is a hydraulic floor jack and a spring compressor. First step, we're gonna get our wheels out of the way. Our factory lug nuts here are 22-millimeter, so I got my impact gun. I'm using air tools for this, but if you don't have air tools, of course, a lug wrench works just as well. This is just gonna make life a little easier.All right. Next up, we're gonna disconnect some of the ABS lines here so we don't put too much stress on them as we remove some suspension components. Now, these are just rubber. I'm just gonna pull straight off on that guy. There's two more clips on your brake lines as well. I'm just gonna disconnect those to give it a little bit more slack. Next up, we're gonna disconnect our sway bar end link from the strut body. Now, this is a 21-millimeter nut. Now, using air tools, it can be a little easier, but if you're using an impact gun, it might start spinning the bearing. In which case, you wanna be able to hold onto the backside with something to keep it from spinning. Got it. All right. So, now you can pull the sway bar end link out of the strut body. And I like to just put that nut back on just to keep it safe, you know, so we don't lose it. What I just did was I put a pry bar right on the other side of the spacer to put a little tension on it as I took it off to keep it from spinning.All right. Next up, we're gonna tackle the nut holding on our upper control arm to the knuckle itself. Now, this is an 18-millimeter nut, and what we're gonna do is use a swivel socket on my impact gun. Or you can use a ratcheting wrench, that'll work as well. I'm gonna work this guy off. It might also be a good idea to put a pry bar on the spring and pry down on it so it doesn't shoot off. All right. We're gonna keep this on a couple of threads just to make sure we can disconnect these two without it shooting off. So, just put the nut on a couple of threads.All right. So, now I'm gonna pry up to disconnect the ball joint here. So, now we can pry back down, take that nut off, and work this off easily. All right. Just guide the knuckle back down. And I'm just gonna thread the nut back on so we don't lose it. All right. Use that same 18-millimeter socket, and we're gonna remove the bolt holding on at the factory strut to the bottom control arm here, the lower control arm. Now, the nut is already on the strut body so we don't need a wrench on the other side, but I am gonna keep my hand here to keep it from popping off too quickly. All right. Next up, we're under the hood because we have to remove the three nuts holding on the top of the strut tower. I'm gonna twist off this cap here, and I'm gonna set that right onto our cowl there.Now, that will expose the back two there. These are 13-millimeter, so grab your impact gun and your socket and get those three off. All right. Now, as you remove the third one, the strut's gonna fall straight through, so you wanna have a hand on it to get it off. All right. Now that you have a hand on it, you can push down on the suspension assembly there to pull the strut away from the lower control arm and then off of the vehicle. All right. So, next up here, we're set up at our spring compressor. Now, I've got the bottom coil set up into the spring compressor arms, but I wanna say, if you're working on this at home by yourself, just use extreme caution, this can be very dangerous if not done properly. So, I got the bottom set up. This factory strut does have this rubber spacer at the top, so you gotta take that guy off along with the flat washer to expose the nut there, and that's an 18-millimeter.So, now what we're gonna do is set up the top. So, the top, I'm actually gonna take these arms right to the strut hat for a little bit more security. All right. So, I'm gonna bring this down. Now, before you start compressing, you just wanna make sure everything is done properly, you wanna make sure the spring's at the bottom, the coils are set into the arms properly. All right. All right. So, now we can compress. Now, when you wanna compress, you wanna do this slowly. Basically, you're taking the tension off of the top hat by compressing the spring so it takes that tension off of this top here, and then we're gonna take the nut off, and then slowly decompress to take it apart. So, that should be enough compression there to take that stress off of that nut.So, now what we can do is take our 18 socket. I'm gonna use an extension and a swivel, put it right through the top here, and take that off. All right. Once you crack that nut loose, you'll see that the strut is loose at the bottom. So, you wanna have a hand on that because once the nut comes off, the strut's gonna fall right through the bottom. You wanna be able to catch it. Take that off, bring the strut back down, and set it aside. From here, we can slowly decompress that spring. All right. Once we have those guys loose, push them out of the way. Top hat comes off. Might take a little bit of force because it's been on there. This is what we're gonna reuse. This we can set aside.All right. To kick off the install here, we're gonna be reusing our factory strut because they're not included in the kit here. If you're upgrading your strut, now's a good time to do that. You can take your spring from Eibach. You're gonna insert that guy over the rod. Now, you're gonna seat that onto the factory isolator at the bottom. Now, if your bushing or isolator here is pretty worn out, it's a good time to replace it as well so you don't have to come back and redo everything later. Grab your factory hat with the dust boot, along with the bump stop on the inside, and insert that over the top. So, now because this is a lowering spring, we have threads coming through the top. We don't really need to compress it. So, I'm gonna put it on the ground here, we're gonna push down to expose more thread, and put the factory nut back on the top.All right. You wanna be able to get a couple of threads on here, so I'm just gonna thread it on by hand. Then, grab your appropriate socket and tighten this guy down. From there, it's a good idea to take that factory washer along with the rubber spacer there and put it back on here. That's to protect the studs and the nut there from the top cap on the strut tower and under the hood. All right. First step here, we're gonna grab the strut assembly, we're gonna feed it up onto the wheel well into the top hat there, and we'll tighten down at least one nut to hold it in place. Now, we can feed the bottom of the strut back around the lower control arm. All right. So, let's grab our factory bolt and put it back through. All right. Grab your 18 socket and tighten that down.All right. Next up, we're gonna do the sway bar end link at the back here. So, let's take that nut off, feed it back through, and put it back on here. Grab your 21 socket and tighten that down. All right. So, now we're gonna do the upper control arm. I'm gonna take that nut off there, push up, and attach the assembly. You wanna hold tension on the upper control arm while you put a couple of threads on. If you need to, you can use a pry bar. I'm gonna put a pry bar under the coil here, pull down, and tighten down that nut. I'm gonna use my 18 socket and my swivel to tighten that down. All right. So, now we can reattach those ABS lines, snap them onto the brackets on the brake lines. And now, we can head up under the hood to tighten down our last 13-millimeter bolts.Last but not least, tighten down the cap at the top. Repeat on the other side. And it's always a good idea to look up your torque specs for your specific vehicle and torque down all the bolts. All right. First step for the uninstall of our factory sway bar here is to take off the heat shields on both sides. They're held on by two 8-millimeter bolts, one in the corner here, and one in the top corner. So, I'm gonna start up here and get that off. And down here. Taking the heat shield off exposes the bracket here for the bushing. We're gonna take the heat shield off on the other side and then tackle those bolts. All right. I'm switching over to an 8-millimeter swivel socket to tackle this guy because it's awkwardly placed above the sway bar. Now, the other side.All right. Now, these two are 15-millimeter bolts. I'm gonna use a swivel socket on my 15 deep socket to get the top guy off. And then, the bottom. You wanna take this off carefully. And when the sway bar starts to swing down, once we have the other side unbolted, this backplate may fall, so just keep that in mind. All right. Same thing on the other side. All right. Once you have those bolts off, you just wanna help guide it down slowly. And, again, these backplates might come off, so you just wanna pull them off yourself.All right. So, now the sway bar's hanging on those end links. So, grab a 21-millimeter wrench. I'm using a ratcheting wrench because it makes life a little bit easier. We're gonna use a 10-millimeter socket to hold on that stud so the ball doesn't spin. So, we're basically gonna crack these guys loose and work that nut off. I'm just gonna put it on one thread just until we get the other side done too. All right. Now, you wanna support the sway bar by your hands, pull that nut off there, carefully get that end link off. Now, I'm gonna put this nut back on so we don't lose it. And now, we can disconnect it from the other side as well. All right. Pull the sway bar off the vehicle and put the nut on. There you go.So, we got our factory front sway bar off of our '13 R/T behind me, and it's on the table next to our Eibach one. And the first thing I wanna talk about here is the difference in diameter because that's gonna make the biggest difference to your anti-roll characteristics that it provides to the vehicle. Now, your factory front sway bar here is a 30-millimeter diameter, whereas your new Eibach one is a 35-millimeter diameter. Now, it might not sound like much, but the 5 millimeters in diameter makes a huge difference to how much anti-roll it provides to the front end. It's gonna give you that much more stiff ride feel, especially when cornering. The front isn't gonna sway or roll as much given that girth.The next difference I wanna talk about here is adjustability. Your factory front sway bar has no adjustability to it whatsoever, it's a fixed position, you can't mess with how it feels. Your new Eibach has two positions of adjustability. As you can see on the sides here, there are two open holes. You can move it to one hole to give it a slightly less stiff, slightly less anti-roll, or you can move it to the secondary hole and give it a lot stiffer of a front feel. Now, a lot of guys probably wanna give it the stiffest possible feel, the least roll possible when cornering. That's something that you have the ability to do. If you're looking for a little bit more stiff than stock, but not too crazy that it makes it a little more uncomfortable for you, you have the ability to adjust that as well.Included in the kit are also new poly bushings, along with some bushing lubricant, and you're gonna reuse your factory brackets there. Now, in some cases, you may see on sites like Eibach's that they have red bushings with gold brackets. That's a little bit of an older feature. The new kits here provide black poly bushings, which are a super big upgrade over the factory ones, especially if yours have never been changed before. They can start to get a little bit worn out over time. And we know that the '11 to '20 gen isn't necessarily the oldest vehicle, but we're pushing upwards of a decade-old for some of those vehicle years. So, having that replacement there is gonna go a long way.Now, in addition to that, you're gonna be reusing the factory heat shield that we used earlier, taking the factory one off, and you're gonna be able to determine your adjustment position when we attach it to the bottom portion of your sway bar end link, which, again, is also gonna be reused from the factory. If your sway bar end link is looking a little worse for wear, it might be a good time to pick up a new one. This is definitely not something that you wanna have to crawl up under the vehicle just to replace that one measly part, but it is easily interchangeable if you're looking to change it on the fly, you'll just unbolt the bottom nut, and switch it over to its adjustment size, and then tighten it back up again.Now, before we get to the installation for the front sway bar here, we do have to do one thing. We're gonna lubricate the bushing and install it. It does come with a split out of the box, so you get to easily pop that onto your new sway bar, but you wanna make sure you're lubricating the inside properly with the provided lube. All right. First step here, we're gonna take this bushing, and I'm gonna just put a little bit of lubricant inside the hole there. Doesn't take a whole lot. Take your finger, and I definitely recommend using gloves, and you're just gonna wipe that lubricant all around the inside of that bushing. This is gonna prevent any squeaking, or squealing, or any kind of noise coming from the sway bar bushing connecting to the actual sway bar. Just gonna put a little bit more in there, felt like that was a little light, and go around.Now, what I recommend doing is opening this guy up and snapping it onto the sway bar. Now, this is the stopper here. You wanna be on the outside of that stopper and connect it just like that. Now, what I'm gonna recommend next is taking just a little bit of this on your finger, and I'm gonna lubricate the outside because this is what's gonna connect to the metal bracket. And, again, we don't want any noise coming from that. Before we repeat on the other side, grab the factory bracket, just like that, and you're gonna pop this guy on.What you'll notice is the sway bar bushing here is flat on a couple of sections. That flatness is to help snap on this bracket. Now, it might not be a perfect fit at first, but once we have that bolted down, those flat portions there will start to contour again into that bracket just like it did from the factory. All right. So, let's repeat this on the other side. All right. Again, using that same lubricant, we're just gonna put some on inside and do the same thing on the other side. Now, once you have that lubricated, you can do the same thing with the bracket. But most likely, these are not going to seat fully. You may need to wait until it's on the vehicle, otherwise it'll fall off during install. So, let's take those back off and leave them aside. Now, we can head over to the front and start installing.All right. Kicking off the install, first off, you just wanna make sure that the sway bar is facing the right direction. There's an Eibach logo in the middle of it, you just wanna be making sure that it's not upside down. So, we're gonna start here on the driver's side. You also wanna determine which setting you wanna set it to. The setting here closest to the rear of the vehicle is gonna make it a little more stiff, so we're gonna go that route. I'm gonna take the factory nut off the sway bar end link and then tighten it back down. And now, we can do the same thing on the other side to help support it up. All right. Now, of course, whatever setting you do on one side, you have to make sure you do the exact same setting on the other. So, we're just gonna do the same thing.All right. Now, I'm not gonna tighten down these nuts just yet, I'm gonna put the front brackets on the bushings first and bolt it up to the subframe there before we tighten these down just to give it more stability. All right. Now, this can be a little bit tricky. Put your backplate on first. Just be careful, it does tend to wanna fall off. Swing the sway bar up into place. You wanna make sure that flat portions...there's a flat portion here and on the top. Make sure that is on the top and bottom, not on the inside and outside.Next, put the forward-facing bracket on next. Now, it's not gonna connect all the way by hand, but you're gonna take the bolts, thread them on, and when we tighten it down, it'll squeeze in together and compress into the bushing. That's why you wanna make sure you have a proper lubrication on there from the lubricant included in the kit. All right. Now, let's put the bracket on the other side before we tighten this down just to make sure they're aligned properly, and then we'll come back with the sockets. All right. Now, this one's gonna be a little bit trickier to get the backplate in, so you might need to just squeeze it in sideways, just like that. Again make sure the bushing is aligned. Grab your top bracket and put the bolts through. All right. Now, let's grab our 15 socket, tighten those bolts down on all four corners. All right. So, now we can put the heat shields back on using the factory 8-millimeter bolts.All right. So, next, we can tighten down the end links. All right. Now, it's a good idea to look up your torque specs, again, for your vehicle and gen and torque down all your bolts, and then we can move on. All right. First step here for the rear, of course, is gonna be to get the wheel out of the way. Switch back over to our 22-millimeter socket to get our factory lugs off. All right. Now, the top of the shock body is connected to the body of the vehicle here with these two 16-millimeter bolts. I'm gonna use a swivel socket on these and get them off.All right. The next step here is actually a little bit different. We have to remove the two hanger brackets from the frame here in order to drop our driver's side exhaust down a little bit. The reason we're doing this is because the bolt holding on the lower control arm there that we have to remove to decompress our spring doesn't have enough clearance to come out with the exhaust pipe. So, we're gonna lower it down. I'm gonna use my 13-millimeter swivel socket, which I recommend, along with an extension to get these two bolts off the frame. All right. Now, I'm gonna keep my fist right here on the muffler so it doesn't drop down on me, and we can slowly lower it. All right. So, I'm gonna bring this guy down. The muffler's gonna come out of the bumper there. All right. And now it's low enough, we have enough clearance for the bolt.All right. So, now that we have enough clearance for that bolt, the next step is to support the lower control arm so that when we remove the bolt, it's holding the tension on the spring so we can lower it down slowly and safely. I'm gonna use a pole jack here since we're on a lift, but if you're working on the ground, a hydraulic jack does the trick as well. I'm gonna put that right up here. I'm gonna put that jack tension on the lower control arm. So, now when we lower it down, it's gonna be nice and even and come down safely. I'm gonna use a 15-millimeter socket on the bolt head and an 18 wrench on the nut on the other side.All right. Next step, we have this taken care of, what we're gonna do is slowly start lowering our pole jack down to relieve the tension from the spring to take it out safely. You definitely wanna do this slow. If you're working on the ground with a hydraulic jack, make sure you're relieving that as slow as possible. Now, once you start being able to wiggle it, the tension's not as strong, so we're just gonna keep going down until the spring is loose, which you can see it is. Just bring it down enough that you can get it out. So, here we can lift our spring out, and set that aside, and then work on our shock. To kick things off at the rear, we're gonna remove the two factory 16-millimeter bolts here at the top of the shock connecting it to the body. I'm gonna use my 16 deep socket along with a swivel to help make this easier.Once you have the top of the shock disconnected on one side, repeat that for the other. And then, we're gonna move on to our sway bar end link. Pretty much everything you do on one side, you're gonna repeat on the other side, so you can do everything simultaneously for the rear. Now, what we're gonna do is take a 15-millimeter wrench and hold the bolt head here for the sway bar end link. And I'm gonna use a 16-millimeter ratcheting wrench for the nut on the other side. So, now I'm gonna remove that nut altogether. Now, it's gonna be pretty stiff. We probably can't pull the end link out just yet. We can try though. There you go. All right. So, let's take that factory nut. I'm just gonna thread it on a couple of threads so we don't lose it. Repeat that on the other side.All right. Next step, what we're gonna do is remove our brake line bracket that's connecting at the brake line and holding it up to the frame here. Now, it's just right behind our fender liner. Now, you can take this pushpin clip off and peel it back, but you should be able to just lift up enough to expose that bolt. I'm gonna use a 10-millimeter socket and an extension to get it off. All right. You just wanna unhook it from the frame, and we're just gonna bring it down so it's off. All right. With that one off, just repeat that on the other side. All right. Next up, we have to pop one of our hangers out of the isolator on each side of the differential. So, I'm gonna use a hanger removal tool here. I'm just gonna pinch this guy off. All right. So, now we're popping these guys off on the other side. There we go.All right. The next step here is something you wanna exercise extreme caution for. I have three pole jacks in position because I'm on a lift. If you're on the ground, it may be a little bit different. I have a pole jack here under the cradle connected to the subframe, I have a pole jack in the same position on the passenger side, and then I have a pole jack supporting the rear differential. What we're doing now is we have to loosen up all four of the rear subframe bolts. One's here, one's on the other side of the cradle, and then two on the opposite side. We're not gonna completely remove them, we're just gonna loosen these up so the subframe comes down far enough to clear the sway bar.As we loosen these up and lower the three pole jacks here one at a time, it'll decompress our spring. Now, that you wanna be cautious of because if you do it too quickly, this can be under a lot of tension, so you wanna exercise caution there. So, again, just loosen up these bolts one at a time, make sure you have proper support under the rear diff, and I'd recommend more under the cradles. I'm gonna use my 18 socket here to loosen up this first bolt. And, again, still on there, just loose. All right. Now, this next one's pretty tough to see. It's directly above one of our control arms here. There's a cutout in the splash shield underneath that we're gonna go straight through with an extension and our 18 socket. Again, just loosen it up, don't completely remove it. Repeat both of these bolts on the other side.All right. At this point, guys, we're gonna slowly and carefully start lowering our pole jacks here. We're gonna do a little bit on one side, then a little bit on the other side, and then a little bit for our diff, and just kind of go back and forth really slowly, decompressing the springs and lowering down the subframe here. You just wanna exercise extreme caution when you're doing this. A little bit of pressure off here. Now, we have access to the top of our sway bar here. Now, the sway bar has two 15-millimeter bolts. I'm gonna use a 15-millimeter ratcheting wrench to get these off. All right. Same thing for the other bolt. All right. Let's repeat that on the other side. All right. So, now that we have the other side disconnected, I'm back here on our driver's side. We're basically gonna lift up on the sway bar and feed it all the way through. You may need to go on the other side and clear it from the brake line.As you can see, we've got our Challenger taken apart at the rear here. On the table, I have the factory rear sway bar along with our new Eibach sway bar, we have our factory driver's side rear spring along with our new Eibach lowering spring for the rear. I wanna take you through some similarities and differences between the two, and I'm gonna start with our sway bar. Now, your factory sway bar here is a fixed position, which means it's non-adjustable, it comes with one setting, it's either installed or it's not.Now, as far as the diameter, this is a 16-millimeter diameter for the factory rear bar. Now, your new Eibach rear bar has two different adjustment positions on the sides, and it's a 19-millimeter diameter. The larger diameter is gonna give you a more sturdy rear end, it's gonna be a little bit stiffer and sportier, it's gonna handle cornering a lot better, and it's gonna help with anti-roll more so than your factory, skinnier sway bar. The two levels of adjustment allow you to make it stiff or a little bit stiffer. Either way, it's gonna be stiffer than the factory bar and it's really gonna solidify that rear end, but the level of adjustment is up to your personal preference. There are two holes on either side here, which will connect to the sway bar end link. And this kit does not include end links, so we're gonna be reusing the factory ones.Either way, you can change the level of adjustment pretty much on the fly. You just go into the wheel well, unbolt the sway bar end link from the sway bar, switch it over to a different hole, and bolt it back up. I would recommend starting off with any level of adjustment that you feel you're gonna like more. If you think you want it as stiff as it possibly can be, start there. And if it's too stiff, you can dial it back from there, or vice versa. Your factory spring is a linear spring that gives you that ugly ride height or wheel gap that you get from the factory. Closing that up is something you wanna do with this Eibach spring.Now, this guy is a progressive spring rate and it's gonna drop your rear end about 1.7 inches. Now, the progressive spring rate gives you a nice, comfortable ride quality under normal driving conditions, but as you progressively get on it, whether it be hard launches, hard cornering, faster speeds, that thing is gonna stiffen up and get a lot sportier to adjust to your different driving condition. So, not really the case for the linear spring, which stays pretty consistent no matter what driving condition it's under. Going to that progressive spring is something a lot of guys do and it's something you'll see in a lot of the lowering springs out there.Now, back to the sway bar here, we have two little new things that are gonna be an addition to the sway bar. These are poly bushings to upgrade from your factory ones. Now, after a couple of years, those poly bushings from the factory do get pretty worn out, so having new ones is definitely gonna make a difference. It's also gonna come with bushing lubricant. Now, the lubricant here, we're gonna apply on the table, we're basically gonna squirt this here into the middle, we're gonna rub it around. I definitely recommend having some latex gloves on just to make sure you're cleaning up that mess a little bit easier. We're gonna lubricate the inside, rub a little bit of lubricant on the outside, and transfer over the factory brackets. So, let's do that now.All right. For these, I'm just gonna take our lubricant, and I'm gonna insert that just a little bit onto the inside, and I'm gonna rub that all around the inside of that bushing there with my finger. All right. Now, these bushings actually split, so you can easily pop it onto the sway bar. Now, what I like to do is line up the factory sway bar so we know about where we need to put that guy. Looks like right about here. So, I'm just gonna open this guy up and squeeze it onto the sway bar, just like that. Now, you'll see there's a flat portion there. The flat portion's gonna be facing down. Pick up your bracket. And what I'm gonna do is just put a little bit of lubricant on the outside here so it reduces any squeaking that you might get from the bushing being against that metal bracket. All right. Pop this guy into position, just like that. Now, we can repeat on the other side.All right. So, now we can get to the install. We're gonna feed our sway bar into place first and then follow it up with our springs and jack up the rear. All right. First step of the install here, we're gonna focus on our sway bar. We're gonna feed this guy in place, making sure that it's facing the appropriate direction. Keep in mind, these brackets may pop off. You can try not to bump into anything, but it might pop off somewhere in the middle there, so just keep that in mind. All right. I'm gonna head over to the other side and try to pull it through.All right. Next up here, we're gonna tighten down that end link. Fifteen-millimeter wrench on the bolt head, and I'm gonna use a 16 ratcheting wrench on the nut, but a regular wrench would work just as well. All right. Finally, we can bolt up the top of our shock here to start buttoning things back up. All right. At this point, guys, the bushing is in position right on top of the bracket it needs to be on. I'm gonna take the top plate because it did fall off. I'm gonna snap that guy back into place. Take your factory 15-millimeter bolts. And you're gonna tighten those down by hand, and then grab your ratcheting wrench, or the wrench that you're using, and tighten them down. All we really have to do at this point is jack up the subframe so it meets up with the body, and then, of course, tighten down the subframe bolts here, and then finish up by bolting up our exhaust again. All right. So, let's grab our socket and extension, and we're gonna tighten those down. All right. Same thing for the other bolt, and then repeat on the other side.All right. To kick off the spring install, we've got our vehicle close to the ground. What we're basically gonna do is take our new spring, reuse our isolators as long as they're still in good condition. If they're not, it's a good time to replace them. So, let's feed this guy in place. You wanna make sure that the coil is sitting up against the stopper at the end of the isolator at the top and bottom. So, now that we have this in place, I'm gonna put a hydraulic floor jack under here to jack it up into place, slowly and safely compress the spring, and then we're gonna put the bolt through that lower control arm or the cradle here. All right. So, I'm basically gonna put that pad for our hydraulic jack down there. You wanna use your hand here to guide the top of the spring into place properly. You also simultaneously wanna guide the shock into place as well. You can sort of move it back and forth here to help guide it in place as well.All right. So, now we're gonna use a pry bar and our hammer to tap the bolt through. All right. So, now that we have the nut on the other side and we hammered the bolt through, I'm gonna grab my 15 socket and my 18 wrench and tighten these down. At this point, repeat this exact same process on the other side. All right. Now, I'm really just gonna focus on getting our muffler back into the bumper and then bolting up our 13-millimeter bolts for the hangers. All right. So, now we can reconnect our hangers.That's gonna wrap up my review and install for the Eibach Pro-Plus Suspension Kit, available for the '11 and newer R/T Challenger. You can get this kit right here at americanmuscle.com.
Subscribe to our YouTube Channel
Features, Description, Reviews, Q&A, Specs & Installation
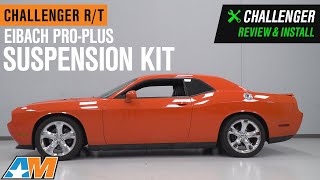
Aggressive Street Performance. Stay ahead of the pack with this Eibach Pro-Plus Suspension Kit. It effectively lowers your car’s height for maximum traction and street performance. With the included sway bars, you can enjoy better roll stiffness so you can perform tight turns with improved precision.
Intimidating Lowered Stance. This suspension kit drops your car’s height by approximately 1.40 inch on the front and 1.70 inch on the rear. This gives your Challenger an aggressive muscular look while also improving its traction on the track.
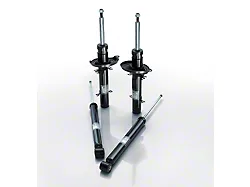
Heavy-Duty Construction. Designed for endurance, the springs included in this kit are built from heavy-duty, high tensile strength steel. They have also been shot peened for maximum strength and unmatched performance. In addition, these springs are powder-coated to resist damage caused by corrosion.
Progressive Coil Springs. Engineered to provide superb handling, the coil springs included in this kit feature a progressive design. This allows for superb handling on uneven road surfaces. No matter how hard you push your muscle car, its tires stay on the road so you can drive faster and stay ahead of the competition.
Powerful Anti-Roll Sway Bars. For maximum roll stiffness, this suspension kit features front and rear sway bars. These heavy-duty steel sway bars significantly reduce body roll so you can perform tight cornering with greater precision.
Accommodates OE and Aftermarket Wheels and Tires. This suspension kit has been designed to accommodate OE and aftermarket wheels and tires without rubbing issues.
Mechanical Expertise Required. AmericanMuscle highly recommends installing this kit with the help of a professional installer. Wheel alignment after installation is also recommended for best results.
Backed by a Million-Mile Warranty. This Pro-Plus Suspension Kit carries a Million-Mile warranty against structural workmanship defects subject to the manufacturer’s terms and conditions.
Application. This Eibach Pro-Plus Suspension Kit has been designed for all 2011-2023 Dodge Challenger R/T models.
Fitment:
Eibach 28111.880
CA Residents: WARNING: Cancer and Reproductive Harm - www.P65Warnings.ca.gov
Installation Info
Installation Time
(approx) 6 Hours
Difficulty Level:
Mechanical expertise or professional installation required.
What's in the Box
10 More Questions