Installation Time
(approx) 2 Hours
Difficulty Level:
Light to Moderate mechanical skill required.
Installation Guides
FREE 2 or 3-Day Delivery on Orders $119+ Details
$296.99
FREE Shipping Market Price $338.99 You Save 12% ($42.00)Saved - View your saved items
We're sorry. We couldn't save this product at this time.
or use
Justin: The Ford Performance Front Control Arm Kit that we have here will be a great replacement or even upgrade for all 2015 and newer GT or EcoBoost owners out there who might be looking to stick with those genuine Ford Performance parts for their S550. Now, these arms will be the same ones used on the performance pack Mustangs and will feature a stronger forged steel build along with spherical bearings and air deflectors used for brake cooling all for around that low $300 price point. Install, according to the site, guys is gonna get a middle-of-the-road two out of three wrenches on the old difficulty meter and take a couple of hours or so from start to finish. But hang with me for a bit and we'll show you how that job is done later in the video.So again, this kit from Ford Performance will be a great replacement or upgrade depending on your situation, right? Now, as far as replacements go, well if you have a factory performance pack car, maybe your factory arms have been a bit damaged due to an accident or maybe the ball joints are just on their way out, whatever the case, these are certainly going to be a solid option. Now, on the other hand, if you have a non-performance pack car and you're looking to make a subtle improvement to your handling, well then this kit would also be worth a look.So as I mentioned at the very top of this video, guys, these front four lower control arms are gonna be the same ones used on the performance pack S550s which were a little bit better equipped from the factor in regards to handling and braking performance. Now, focusing in on these lower arms here, in particular, the first big difference you're gonna find between these and maybe a non-performance pack option will be materials. Now, these arms will use forged steel for overall strength compared to the base Mustang arms. Now, let's first talk about these rear arms here. These guys are going to end up replacing the soft rubber factory bushings found in those base cars with the spherical bearings here on the end.Now, this guy is gonna be a huge improvement when we're talking about reducing movement or reducing overall deflection. Now, that along with the tubular weld mount will combine for an arm that's gonna be much better suited for track use than just overall handling improvement. Now, these forward most arms here, these guys are also gonna feature that same forged steel build as the rear arms, and one of my favorite parts about these guys will be these little flaps here. These are actually designed to deflect air up onto the breaks at speed and will help aid with break cooling which I just think is pretty neat. Now, aside from the forged build, the spherical bearings to held reduce deflection and, of course, these air deflectors we just talked about. The Ford Performance control arms are also gonna deliver four fresh ball joints which are protected by a nice thick rubber boot and they do even include brand new hardware to complete the swap.Now speaking of that swap, the site does have this one pegged at a middle of the road two out of three wrenches on the difficulty meter and they call it a couple of hours to complete from start to finish. But just to give you a better idea of how things might go down on your S550 at home, feel free to check out our detailed walkthrough and tool breakdown right now.Man: Tools for this install, a torque wrench, a breaker bar, a pneumatic impact or impact, a 21-millimeter socket, a 24-millimeter socket, a ratchet, trim removal tool, and our favorite tool, a hammer. Again, this is gonna be a very simple install. Start off by taking off your wheel to give you better access, and we are gonna start at the tension link. Grab your 21-millimeter socket and we're gonna go ahead and take off the bolt on the bottom side of the tension link located at the ball joint portion.Now, don't remove your nut all the way, we're gonna now grab our hammer, that way we can get our ball joint out of its seating. Go ahead and strike the side of the seating. Be careful not to hit the actual stud. That way, we don't mess up any threads. Go ahead and remove the nut from the stud and pull your tension arm up. To get better access to your 24-millimeter subframe bolt, we're gonna go ahead and take our trim removal tool and take out the pop clip on the inner part of the fender well. That way, we can open this up and get our 24-millimeter socket in there. Now, go ahead and take your 24-millimeter socket and a breaker bar and start to break loose the subframe bolt. Once your bolt is broken loose, you can switch out your breaker bar for your ratchet and start undoing your subframe bolt. And with your subframe bolt removed, you can remove your tension link by turning your axel.Now for the lateral link, go ahead and mimick the same thing as the tension link. Grabbing your 21-millimeter socket, we're gonna loosen up the nut on the ball joint portion of it. Again, do not fully remove. Grab your hammer so we can get the ball joint out. Now, before we take our hammer to our ball joint, go ahead and grab your breaker bar and 21-millimeter socket once again and break the bolt loose from the subframe. After your bolt is broken loose, you can go ahead and grab your ratchet and continue to get the bolt out. Now with your subframe bolt now removed, your lateral link should come out of the ball joint mount, however, if it does not, do not be afraid to strike it with a hammer just like we did on the tension link.Now go ahead and take your new lateral link, simply slide that in place and start hand threading your subframe bolt through and take your ball joint, and place that into the spindle. And go ahead and hand tighten your nut. Now the bolt on the ball joint should be torqued down to 85-foot pounds and the subframe bolt while on loaded weight should be torqued down to 185-foot pounds. Now grab your new tension link and place it into the knuckle at the ball joint end first and thread your new nut for now and your ball joint will be torqued down to 85-foot pounds. And take your new subframe bolt provided in the kit and get that hand threaded through the subframe.Now, this is going to be torqued down to 185-foot pounds on loaded. Again, your ball joint nut is a 21-millimeter socket. Now grab your 24-millimeter socket and get your subframe bolt tightened down and then we'll come back with our torque wrench. Don't forget to replace your pop clip back into your fender liner and repeat these steps on the other side. Now after getting everything torqued down to spec, go ahead and place your wheel back on, torque that down as well, and I highly recommend an alignment afterwards. But for us, that's gonna wrap it up for this review and install of the Ford Performance Pack Control Arm Kit, fitting your '15 to '21 GT and EcoBoost. For more cool videos just like this, make sure to hit that subscribe button at americanmuscle.com.
Subscribe to our YouTube Channel
Features, Description, Reviews, Q&A, Specs & Installation
Brand | Ford Performance |
Control Arm Type | Fixed |
Control Arm Placement | Front Lower |
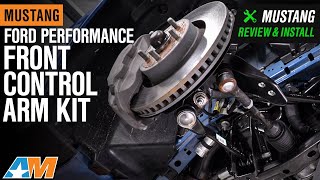
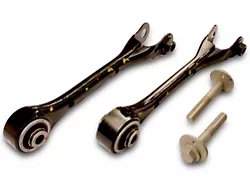
Fitment:
Ford Performance M-3075-F
CA Residents: WARNING: Cancer and Reproductive Harm - www.P65Warnings.ca.gov
Installation Info
Installation Time
(approx) 2 Hours
Difficulty Level:
Light to Moderate mechanical skill required.
Installation Guides
What's in the Box
10 More Questions