Installation Time
(approx) 2 Hours
Difficulty Level:
Simple installation for anyone.
FREE 1 to 3-Day Delivery on Orders $119+ Details
$439.00 (kit)
FREE Shipping Market Price $504.85 You Save 13% ($65.85) Up to 10% off for Military & First Responders! See DetailsAdd Local Shop Installation
Saved - View your saved items
We're sorry. We couldn't save this product at this time.
or use
American Brothers Design Black Oil Catch Can with SRT Hellcat Logo (15-23 Challenger SRT Hellcat, SRT Jailbreak)
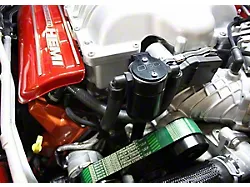
J&L 3.0 Oil Separator; Black Anodized; Passenger Side (15-23 Challenger SRT Demon, SRT Hellcat, SRT Jailbreak)
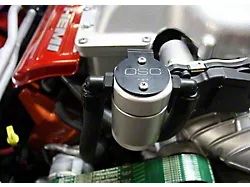
J&L 3.0 Oil Separator; Clear/Satin Anodized; Passenger Side (15-23 Challenger SRT Demon, SRT Hellcat, SRT Jailbreak)
Hey guys, it's Sara with americanmuscle.com. And today we have a review and install of this Col Air Intake with Red Oiled Filter fitting your '15 and newer Dodge Challenger Hellcats. This is perfect for the Hellcat owner looking to improve their underhood appearance, as well as the airflow to their intake. And for those of you with a '15 to '18 Hellcat, it will replace that restrictive paper factory filter with this reusable oiled option for smoother airflow. This cold air intake is crafted from heat-resistant ABS plastic, as well as the rotomolded intake tube that's a smooth seamless unit for improved flow and less areas for turbulence.It also includes the S&B Power Stack oiled air filter that can be cleaned and reused, which is especially useful for those of you with earlier Hellcats that have the paper filters factory. This intake provides increased throttle response and improved sound over the restrictive closed airbox of those '15 to '18 Hellcats. Another great feature of this particular intake is that it's CARB-certified, meaning it's street legal in all states requiring CARB certification for aftermarket parts. In addition, it does not require a tune for install making installation a breeze and making it even easier to uninstall if necessary. And this intake also includes MAF or IAC adapter plates for a seamless install regardless of what your Challenger's intake has.So, as far as the price goes, this intake comes in at around $450, which is middle of the road price-wise when compared to other options. And for your money, you are getting this direct-fit intake that features a reusable air filter to save you some cash and it does not require a tune. And as far as the install goes, I'm giving this one a one out of three wrenches on the difficulty meter. It does feature a direct bolt-up installation with no modification required and can be done within two hours. So, with that said, let's jump into the install.For this install, we used an impact gun, but a regular ratchet will work just fine. You will also need 10 and 8-millimeter sockets. You may want a long extension and a Pillips head and flat head screwdriver. All right, so, the first step in our uninstall, we're gonna unplug this IAT sensor. Now, if you do have one of the older generations, you'll have a MAF. It's the same concept, go ahead and unplug the sensor. Next up, we're gonna loosen both of the clamps. We have an 8-millimeter socket here, you can also use a flat head screwdriver. Moving on to the second clamp, this one is a little bit farther down, so we are using an extension as well and our 8-millimeter socket. Go ahead and loosen this up. We're also gonna remove this bolt holding on the front of the intake. With your 8-millimeter socket, go ahead and get it removed.Next up, this is specific to 2019 and newer, we need to remove this PCV solenoid temporarily. So, if you have an older model, you do not need to do this step, but for our 2019 and newer, go ahead and pull back on this plastic tab to remove this connector. You're gonna press down on the same tab and pull backwards. You also need to remove this line as well. There are two points to pinch, top and bottom, and just push backwards. We're just gonna move it out of the way slightly for now. Now we're gonna remove 3 nuts, these are 10-millimeters. So, grab a 10-millimeter socket and go ahead and get this removed. Now we can pull the solenoid up and set it to the side so that we can remove it off of our car with the rest of the intake.Next up, we're gonna pop this part of the radiator shroud cover off so that we can expose the cold air intake tube on the bottom. So, what we're gonna do, go ahead and move your hood release to the side. You're just gonna bend and pop this out of the way. Just do this carefully. And then you're gonna pull towards the center of the car because there are two pins on the backside here. Now, what we're doing here is we're gonna release the clips on the inside of the airbox that hold on this cold air intake tube. So, I'm gonna stick my hand down underneath the filter. If you can't fit your hand down there or you're having any trouble, you can use a flathead or a trim-panel removal tool. Just be careful of these clips because we will be reusing them.Now with everything disconnected, you can wiggle your airbox, remove the tube. Make sure your PCV comes off with it. And wiggle and remove the airbox itself. Now, if the intake tube starts to come with it, just go underneath and wiggle it out of the way. One thing I wanted to point out is this rubber grommet on the bottom here is going to stay with your car. To get it off of your factory intake, if it did not come off, just twist or remove and then pop it back in its spot.All right, so, at this point, now that we have our factory intake uninstalled from our challenger, we can check it out side by side with our new intake here. Now, one important point is that this particular intake is what comes on a '19 or newer Challenger. Now, if you have a '15 through '18, yours is gonna be a more traditional closed-box design. So, there's gonna be a much bigger difference between that closed-box intake and this new aftermarket intake. Now, the '19 and newer intake we have here is a little bit similar to your traditional cold air intake. Both have an open-box design, both have this oiled cotton filter that is reusable and cleanable. So, it's nice to keep those features with our new intake.Now, I would say, the biggest difference here is gonna be this intake tube. It's a lot smoother and straighter than the factory so you do get that benefit there. Now, for those of you who are running the '15 through '18, you'll notice a lot more benefits to the change to this intake, especially an improvement in sound. So, with that said, let's go ahead and finish up our install.All right. So, at this point, what we're gonna do is separate the PCV solenoid from the line so we can reinstall this on the car. Now, there's several ways to do this. We're going to be heating it up to slide it out so that we can reuse this if you ever need to go back to stock. If that's not working, you can also cut this right here. As long as you don't damage the solenoid itself, it should be good to reuse. First thing we're doing with the heat gun is we're just gonna heat around the entire perimeter here. Just get it nice and hot, just make sure not to melt anything. And then we're gonna slowly work it out of the line. Once it's hot enough, go ahead and twist it and pull.Next up, we have to remove this IAT sensor. What we're gonna do is twist and just work it out of the rubber boot. Now, I just wanna show you how the sensor goes into your new plate. This is for 2019 and newer, so, if you do have a '15 to '18, you will install a MAF sensor instead. Now, you can install this once this plate is bolted onto your intake tube but I wanna install it now just to show you how exactly it sits in. Now, you'll see that there are two tabs on the sensor there. What you're gonna do is line those tabs up with the openings in the plate. And now we're gonna look on the backside. There is a rubber O-ring, so, what we're gonna do is just press to compress that and then twist it in place.Now we can install that plate onto the intake tube. Now, again, keep in mind, if you are '15 to '18, you will be installing the other sensor plate. This one is for '19 and newer. Either way, we're placing the rubber grommet there over top of all of those holes. And then we're gonna place our plate on top of that. We already have our sensor in it. If you'd like to install the plate first and then the sensor, you can definitely do that. Again, I just wanna show you guys exactly how it sits in there to get you a better look for when you install it. Now, we're lining up the Phillips head screws. I'm just gonna get them started here with a Phillips head screwdriver. And once they're all in, you can go ahead and tighten them down.All right. So, now this step is only for 2019 and newer. What we're gonna do here is we have to swap out this grommet because this connector is a little bit too small for the one that comes in there. What we're gonna do is just pull it out. You can also just push it inwards as well. Either way works. And now you'll find a new one that is a bit smaller in a bag labeled "2019 and newer." What we're gonna do is just line it up and press it into place. And now the fitment of this line will be a lot more snug. And on the other side of this line, we're gonna press in the barb fitting on the PCV solenoid into this new line. Now, this is the one we heated up and disconnected. So, what we're gonna do is just slowly work it on there, twist it if you need to, and just make sure it's fully connected and on all the way.All right, so, before we can get the new airbox installed on our car, what we need to do, because it is a little bit wider than your factory, is just loosen up the two 10-millimeter bolts that hold on your coolant reservoir so we get a little more room to wiggle it past the coolant reservoir. Now, you don't have to remove these completely, we're just going to loosen them, but if you wanna take them all the way out, you definitely can. With your 10-millimeter socket, go ahead and loosen these up. There's one a little bit farther down, which might be hard to see. And now we have a little bit more wiggle room to slide the intake box past it.Now we can work this airbox down past the coolant reservoir. Now, this mounting point will tuck up right into this pocket here but, because it is recessed, it's why you need to move the reservoir just a little bit temporarily for it to slide down past it. Now, we're also lining up that rubber grommet on the far side, make sure the post for this intake box slides right in there. And you'll know it's in place when it doesn't wiggle around. Now we're going to line up the mounting point on the far side of your intake and reinstall the factory bolt here. And with your 8-millimeter socket, go ahead and tighten it down. Now that our airbox is bolted down, we can line back up our coolant reservoir and thread the factory bolts back in. I'm lining them both up and getting them threaded in. And then, with the 10-millimeter socket, I will tighten it down. Now we can reinstall the inlet tube through the opening in the airbox and line it up about where it's gonna sit.Now, next up, we're gonna install this grommet that seals it. But before we can do that, we're going to clean around the opening because the inside of this is pretty oily so we're gonna make sure that it can stick properly. They've included an alcohol pad, and we're just going to wipe around the edge of where this seal is going to adhere to, to make sure that we have a good seal and the piece of foam does not pull back up. Now you'll see how this foam sits around the inlet tube. So, we're gonna keep it in that configuration, peel off the backing, and stick it down. Now, I recommend lining it up with this tube before you start to stick it and to start with the bottom part. Make sure everything is sitting exactly where it should be. Go ahead and work it in place.All right, we have the rubber coupler on the bottom here. Now, it is a bit of a tight fit but you can definitely wiggle this into place. Make sure it's fully seated right up against this ledge here. And then what we're gonna do is grab this clamp and slide it over the top. This is the biggest one. Grab our filter. And again, this is a tight fit as well but we're just gonna slide it into place and get it to line up. Now, at this point, once both of these are installed, we can go ahead and start to install the intake on the car. Now, we have the middle-sized clamp here, make sure you're sliding that over top of your coupler. And I'm gonna slide the smaller clamp over top of the throttle body. Now, the easiest way to do this is to line it up on the bottom of the throttle body, just begin to. Go ahead and get your clamp over top there. And then we're gonna twist this in place.Now, we're gonna slide this, as we twist, to help line up the rest of the intake and get it seated properly in the box. Make sure it's fully over top of your throttle body here. And now we can line up these clamps and get them tightened down. I'm gonna start with the first clamp right on the throttle body. With an 8-millimeter socket, or you can use a flat-head screwdriver, go ahead and tighten it down. Moving on to the next one, same thing, flat head screwdriver, or you can use an 8-mil. Tighten it down, make sure the coupler is fully seated as you're doing this. And finally, the larger clamp around your filter. Again, make sure the filter is fully seated over the pipe and then tighten it down with either an 8-mil or your flat-head.Next up, what we're gonna do is pop this connector through the open hole and plug it into our IAT sensor. Now, they do provide a grommet for the safety of this wiring and it is slotted here, which makes it easy to go around this wire and install it in your airbox. Now, we're gonna install it the same way we did the grommet in the pipe, just sort of slide it in place. And I recommend twisting it to ensure it's fully seated. And at this point, we can reinstall our PCV solenoid. Go ahead and slide it over top of the three posts. Grab your three factory nuts and thread them in place. And with your 10-millimeter socket, tighten them down.Next up, we're gonna reconnect the PCV line at the back. Go ahead and line it up and click it into place. And repeat that with the connector up top. Click it into place and don't forget to push that white tab forward. And now we'll connect the other side of this PCV line, lining up with the grommet and pressing it into place. And finally, we're gonna reinstall this cover. The first thing we're gonna do is line up the two posts on the far side. Push the hood release to the side and pop it into place. All right. So, that is gonna do it for the review and install of this intake. And remember, for all things Challenger, keep it at americanmuscle.com.
Subscribe to our YouTube Channel
Features, Description, Reviews, Q&A, Specs & Installation
Brand | JLT |
Cold Air Intake Type | Cold Air Intake |
Air Intake Tuning Requirements | No Tune Required |
Cold Air Intake Filter Type | Oiled |
Cold Air Intake Tube Material | Plastic |
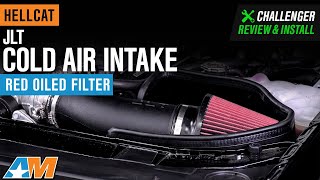
Max Power. If you feel that your Challenger Hellcat's 700 horses are not enough, and you're looking to squeeze just a little bit more power from it, then the JLT Performance Cold Air Intake is what you need. This cold air intake features a wide, 4.50-inch free-flowing air inlet, and a high-performance S&B oiled air filter to provide your engine with loads of cold air. This in turn ensures more efficient fuel combustion, resulting in extra power and torque on tap for a truly remarkable level of performance.
No ECU Tuning Necessary. All the power provided by the JLT Performance Cold Air Intake is the result of advanced design and construction, and does not need an ECU re-tuning. It should be noted that a future re-tuning of your ECU will always improve your Challenger's performance, and should be considered.
Powerstack Oiled Air Filter by S&B. The JLT Performance Cold Air Intake uses the S&B Powerstack air filter. This oiled air filter uses 8 layers of fine cotton-based filter media with 99% efficiency, while still providing maximum air flow. This air filter is completely serviceable, using the proper cleaning and oiling kit and lasts a long time.
Tough Plastic Build. The JLT Performance Cold Air Intake is crafted from tough, heat-resistant ABS plastic for superior durability. The inlet tube is roto-molded into a seamless unit that eliminates areas where turbulence can be created. A super-efficient heat shield protects the air filter from engine bay heat, and ensures only near ambient-temperature air enters your engine. Finally, this cold air filter assembly comes with 2 Lexan rain shields that install under the hood air vents, further protecting the air filter.
Includes MAF and IAT Adapter Plates. The JLT Performance Cold Air Intake conveniently includes MAF and IAT adapter plates that are precision-machined from billet aluminum. This ensures a proper fit of your stock MAF or IAT sensor.
No-Nonsense Drop-In Installation. This cold air intake is engineered as a direct, drop-in and bolt-on assembly using the factory air system location. No modifications are needed for a truly no-nonsense install procedure.
Comes with a 1-Year Limited Warranty. The JLT Performance Cold Air Intake comes with a 1-year limited warranty covering workmanship defects. Please visit the manufacturer's website for more details.
Application. The JLT Performance Cold Air Intake fits all 2015 to 2020 Dodge Challenger Hellcat models.
Fitment:
JLT CAI-HC-15
CA Residents: WARNING: Cancer and Reproductive Harm - www.P65Warnings.ca.gov
Installation Info
Installation Time
(approx) 2 Hours
Difficulty Level:
Simple installation for anyone.
What's in the Box
10 More Questions