Talk to a Mustang Sales Tech
1-877-887-1105
M-F 8:30A-11P, Sat-Sun 8:30A-9P
$20K Sweeps! 10 Chances to Win! Enter Daily >

MBRP Armor Lite Cat-Back Exhaust; Race Version (18-23 Mustang GT w/o Active Exhaust)

Item 405141
Verify parts fit and get product recommendations.
Mustang Sales Techs: Connect Now M-F 8:30A-11P, Sat-Sun 8:30A-9P
$0.00
On Sale

$669.99 (each)

FREE Shipping Market Price $827.63 You Save 19% ($157.64) Up to 10% off for Military & First Responders! See Details

Will this fit your Vehicle?

Select a different vehicle Help?
Update or Change Vehicle
Ship to: Ashburn - 20149
Sorry, please enter a valid US or CA postal code
We're sorry, zip can't be updated at this time.
Recommended Install Shops
How It Works
Install Shops are available near Ashburn - 20149

Add Local Shop Installation

Total cost of service $299.00
    Create a list
    Add to New List

    Saved - View your saved items

    We're sorry. We couldn't save this product at this time.

    or use

      Product Videos

      Okay, guys. Today we're gonna be taking a look at and installing the MBRP Installer Series Race Version Cat-Back for 2018 and newer GT Mustangs without active exhaust. So you're gonna wanna be checking this cat-back out if you're looking for something that's gonna give you a ton of volume and a ton of sound, but that's at a very budget-friendly price. This cat-back costs right about $600. It's made of 3-inch aluminized steel tubing, and it comes with an H-pipe. Now, if you guys didn't know already, or if you were wondering, MBRP makes a Pro Series and an Installer Series. The difference between the two is gonna be the materials. As far as loudness goes, on a scale of one to five, with one being a quiet upgrade and five being a very loud upgrade, I'm gonna call the race version of this cat-back a full five out of five on the loudness meter. When it comes to the install, I'm gonna call that one a two out of three wrenches in the difficulty meter, and we'll show you how to get this on your car now.For this install, we used a 3-inch drive impact gun, a deep 15-millimeter socket, a deep 13-millimeter socket, a shallow 13-millimeter, a small extension, a power ratchet, and a rubber mallet. Okay, guys. So we are gonna drop our cat-back as one big piece. We are gonna start up in the front and then work our way towards the back. The first thing that we're gonna do is we're gonna loosen these clamps here. Now, you'll need a 15-millimeter socket for that. We're gonna go ahead and loosen all four of these nuts here.I'm just double-checking to make sure that the clamps popped free. If they didn't, you guys can always take a flathead screwdriver right here and just pry them apart a little bit. The next thing that we're gonna do is unbolt our two sets of hangers. Now, you guys have two hangers back here behind the rear dip, and there are also two hangers over top of your rear mufflers. You'll need a 13-millimeter socket for that. What we're gonna do is we are going to remove the bolts, but we're gonna leave the hangers clipped into the frame here, and that's gonna hold our exhaust up until we're ready to remove it. All right. Now we'll remove the bolts back here by the muffler. Then we'll do the same thing for the other side.All right, guys. So at this point, you're ready to drop your cat-back as one big piece. Now, it's going to make things a lot easier for you if you have a second set of hands. I have Andrew here, he's gonna help me drop the cat-back down. And what we're gonna do is we're gonna unclip the hangers from the body of the car. And once that's done, we are going to push backwards on the resonator, and then it will drop free from the car.All right, guys, with our factory cat-back uninstalled, we can take a quick second to compare it to our MBRP cat-back. So the MBRP cat-back is made of aluminized steel, and it is a 3-inch cat-back. So it starts at 2.5 inch and then it's gonna jump up to 3-inch, which is a nice little upgrade in diameter for you. The other thing I wanted to mention is that this does come with an H-pipe. So an H-pipe is known to give more of a deeper sound. Most car enthusiasts associate an H-pipe with more of a true muscle car sound, as opposed to an X-pipe, which is gonna give you a little bit more of a higher level of volume, but it's also gonna bring in some raspy notes. All right. So then your H-pipe is going to flow down to your MBRP mufflers here, which obviously look a little bit different than your normal regular muffler setup.Lastly, you have a quad tip set up here with some polished MBRP tips. Now, before we get this installed in the car, we have to transfer over a couple things, mainly our hangers. So I'm gonna go ahead and grab the hangers off of the factory cat-back, get them installed in the MBRP, and then we'll go ahead and get it on the car. All right. So we're gonna grab our hangers off the factory exhaust. If you guys have a hard time doing this, you can always use some WD-40 or PB Blaster. We'll go ahead and get them onto the MBRP. We'll do the same thing with the rear hangers.All right. We'll start by getting our H-pipe in place first. A couple things I wanna mention. We have our factory clamps here, we are gonna reuse those. We're just gonna double-check and make sure they're in the proper place. Ours are. I also have a pole jack here, and that's gonna help me get the H-pipe up into place and hold it up for me while I get the rest of the system installed. The other thing that I wanted to point out is that there's a support brace on the bottom of the H-pipe. And you wanna make sure that's pointing towards the ground, not up towards the bottom of the car. So we'll make sure that's pointing towards the ground, and we'll go ahead and get our H-pipe in place. Basically what I'm gonna do is just line it up here and slide it into the clamps. And, like I said, I'll use the pole jack.Now we're gonna grab the next piece of the puzzle. And a couple things I wanna point out here. We have our hanger in place, and we also have a clamp over the end of our pipe too. So before we connect it to the H-pipe, just make sure you guys have clamps in place. We're going to slide this over the end of the H-pipe. And I'm actually going to clip my hanger into the body of the car. That's gonna help hold things up. And I do have the hardware here. I'm going to just thread this into place. And that's going to make sure that this stays up and in the proper place. I'm not gonna tighten it yet because I know I will need to make some adjustments with this pipe. All right. Now we'll grab our muffler once again, making sure that we have a clamp in place. We'll slide it over the pipe here. And then we'll take the hanger back by the muffler, clip it into the body of the car. Once again, we will hand-tighten our hardware in there just to make sure this doesn't fall out.All right. So now we're gonna switch over to the other side and we're gonna do the same thing. We'll loosely assemble our exhaust. Make sure that our hanger gets clipped into the body and we'll start the hardware. All right, we'll do the same thing with the muffler on this side. Once again, make sure we have a clamp in place. All right. So at this point, we can get our tips installed. We are going to slide our inside tip into place. And the tips are tightened by Allen-key bolts. So I have a 5/16 here. I wanna make sure the tip is straight and aligned properly. I want to make sure that it's also pushed in far enough onto our muffler here. And I'll go ahead and tighten it down. All right. So then we'll get our next tip in place. And once again, make sure that's straight before we tighten it. All right now, we'll get our other tip in place. Now, obviously, it's not sitting correctly in the rear valance yet because we don't have our system completely lined up the way it needs to be, but we're still gonna get our tip installed, and that's gonna help us line things up because we'll be able to see how the tips are sitting. We'll go ahead and tighten this down.All right. Now we're gonna go through and tighten down all of our clamps from the front to the back, so we'll switch back to a 15-millimeter socket. All right, guys, now we're ready to tighten our next set of clamps. And basically what I'm doing is I'm checking to make sure my H-pipe is straight. I'm double-checking to see my tip alignment. I do have another pole jack in place that's helping me straighten everything out. But from here, now that everything's good, we can go ahead and tighten our clamps. All right. So now we'll move to our next clamp, which is right here. All right, guys, so we'll do the exact same thing on the other side. I have everything lined up in straight. Now we can tighten our clamps. So all we have left to do is tighten down our hanger bolts and double-check our tip alignment.All right, guys, that's gonna wrap up this review and install. Keep in mind, you can always check this cat-back out more online right here at americanmuscle.com.

      Product Information

      Features, Description, Reviews, Q&A, Specs & Installation

      Features & Specs

      • Race Version Installer Series Cat-Back Exhaust
      • Deep, Aggressive Muscle Car Sound
      • Dramatically Increases HP and Torque
      • Powerful, Classic H Crossover Pipe
      • Three-Inch Aluminized Steel Tubing
      • Quad 4 inch Dual Wall Tips
      • Direct Bolt-On Installation
      • Three-Year Limited Warranty
      • Fits all 2018-2023 Ford Mustang GTs without Active Exhausts

      Description

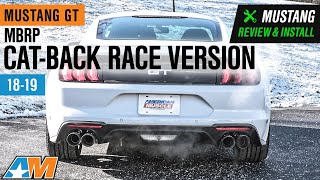
      Customized Sound. Your 2018-2023 Ford Mustang GT can achieve mind-blowing performances, so make sure it sounds just as aggressive as it performs by installing MBRP's Race Version Installer Series Cat-Back Exhaust. Featuring a design that allows the exhaust to achieve the deep, intimidating muscle car sound that your Pony deserves, this exhaust is guaranteed to help your Mustang turn heads on the track and in the streets.

      Dramatic Performance. This exhaust comes with an H-pipe that not only adds a deep rumble to your exhaust sound, but also increases your Pony's power to give you the extra boost you needed. Just as the name suggests, this exhaust is for the most challenging competitions, providing dramatic gains in horsepower and torque that will give your Mustang the power it needs to dominate at every turn.

      Aluminized Steel Tubing. In order to ensure this cat-back exhaust remains reliable for a long time to come, it is constructed from 3 inch aluminized steel tubing, making it high-strength and lightweight. With four 4 inch dual wall exhaust tips that also boast superior durability as well as top-notch style, this exhaust will give your Pony a high-end appearance and performance both now and down the road.

      Installation. The direct, bolt-on installation takes about 2 hours from start to finish. Moderate mechanical skills are recommended.

      Warranty. Featuring a 3-year limited warranty, this exhaust is guarded against defects in materials and craftsmanship. Some limitations apply.

      Application. MBRP's Race Version Installer Series Cat-Back Exhaust is built to fit all 2018-2023 Ford Mustang GTs without active exhausts.

      Fitment:

      Details

      MBRP S7207AL

      CA Residents: WARNING: Cancer and Reproductive Harm - www.P65Warnings.ca.gov

      Installation & What's in the Box

      Installation Info

      What's in the Box

      • (1) Cat-Back Exhaust
      • (1) H-Pipe
      • Exhaust Tips
      4.8

      Customer Reviews (500+)

        Questions & Answers

        10 More Questions

        Will It Fit My Mustang

        • GT - 18, 19, 20, 21, 22, 23

            Related Mustang Categories