FREE 2 or 3-Day Delivery on Orders $119+ Details

Talk to a Challenger Enthusiast
1-877-887-1105
M-F 8:30A-11P, Sat-Sun 8:30A-9P
Win $3,000 in Store Credit! Enter Daily >

ABS Rear Window Louvers; Textured Black (08-23 Challenger)

Item CH3652
Call a Challenger Enthusiast at 1-877-887-1105
M-F 8:30A-11P, Sat-Sun 8:30A-9P
$0.00
Our Price

$414.99 (each)

FREE Shipping Market Price $473.99 You Save 12% ($59.00)

Will this fit your Vehicle?

Select a different vehicle Help?
Update or Change Vehicle
Ship to: Ashburn - 20149
Sorry, please enter a valid US or CA postal code
We're sorry, zip can't be updated at this time.
    Create a list
    Add to New List

    Saved - View your saved items

    We're sorry. We couldn't save this product at this time.

    or use

      Video Review & Installation

      Hey, guys. Adam here with americanmuscle.com, and today we're taking a quick look at, and of course, installing the Rear Window Louvers in the Textured ABS Finish, available for all '08 and newer Challengers. You should be checking this out if you're looking for a retro nostalgic look to the rear end of your Challenger. Rear window louvers are something that we saw a lot in the '60s and '70s on these muscle cars, and now you can get it in a little bit more of a modern fashion for your newer Challenger.Now, this guy, in particular, is made from the textured ABS plastic construction, a very common material that you get in the category. A lot of exterior styling parts for Challengers, and cars in general, are made from an ABS plastic, and with the textured finish, it looks pretty aggressive and pretty stealthy. It goes really well with any color Challenger as well. Now, as far as painting it, textured ABS isn't necessarily the best to actually get painted. It's more so right out of the box a finish that you just want to install right away, but there are other pre-painted options out there if that's something you're more interested in.Now, this one does come with easy to attach brackets. It's basically going to use 3M automotive bonding tape that screw on with these thumb screws through holes pre-drilled into the louvers themselves. Now, it also includes adhesion promoter to make sure that it's going to get a really good bond with your windshield, as long as you're cleaning it properly before the application, which I'll show you guys in just a little bit.Those brackets themselves also make the louvers removable. Any time that you want to remove the window louvers to clean the underside or the windshield itself, all you have to do is easily remove these thumb screws, either with your hands or a flathead screwdriver. You can get the window louvers off and get full access.Now, these louvers are coming in right around 325 bucks, making them a pretty cost-effective way to pick up some louvers. Sometimes these things can be 400 to 500 bucks. About 300 bucks gets you the textured ABS version. If you're looking for something a little more unique, there are a little bit more of modern styles to the louvers available in the category, along with some that are made from an aluminum finish. So it's all personal preference. The ABS is a little bit more popular than the actual aluminum option out there, but there are so many variants, you can pick whichever fits your personal preference.The install for this guy is going to get one out of three wrenches on our difficulty meter. Anybody can tackle it in the driveway at home with about an hour from start to finish, but there are a couple of things I want to mention before we jump into things. Number one, it's recommended to pick up black silicone, which is not included in the kit, in order to get a nice weather strip seal around each one of the 3M tape brackets, to prevent any rainwater or weather elements from undercutting the brackets and loosening up the adhesive. Secondly, some guys have also mentioned that there is some rattling, in some cases, at highway speeds, from the center of louvers and at the bottom. In that case, I would recommend picking up some additional 3M tape to tape down the bottom underneath there, where no brackets would be applied due to the trunk line, or installing foam blocks, which you can get in some of the other kits out there, that will help prevent the windshield from contacting the ABS. Obviously, they're all optional, but if you tackle each one of the installation steps properly, you should be able to avoid any issues like that.Thirdly, you also want to make sure that you're giving the 3M tape 24 hours to cure before attaching the louvers again. I'll go through that process once we jump into the install there, but keep in mind that if you're not gonna let it cure properly, and you just install the louvers right away, you might prohibit a good bond with the 3M tape, so you want to make sure you're following that to a T. With all that said, I want to show you guys how to install this, so what do you say we get started?All right. Tools used in the install include a knife, soap and water mixture in a squirt bottle, and a clean microfiber. All right. So the first step here is to assemble our bracket system on the back of our louvers. Take one of these 3M strips that also has the offset stud, and we're basically going to install them into the holes. So you'll see we have holes all along the edges here. You're going to drop this guy on, take one of the washers included in the kit, set that on it underneath, and then take one of the twist knobs, and tighten it on by hand. Now, at this point, we're not really over tightening them just yet. You just want to get them a little hand-snug. Get them snug enough so it doesn't rotate too much. Keep in mind the direction this is facing as well. You don't want it to be on the outside like this, because you'll be able to see it. So you want to rotate it inward like that. So now that we have this hand-tight, let's move on and do all of them.All right. Press one here. Pop on the washer, follow it up the twist knob.All right. Next step, it's really important that we clean off our back windshield, especially where the 3M tape will apply, to make sure it gets a really good bond. Now, what you want to use here is a squirt bottle and a soap and water mixture, which is definitely recommended. I would not recommend using things like Windex, because it leaves a chemical residue behind. It might clean the window, but it still leaves a residue behind that can prevent the adhesive from getting a good bond. Soap and water works best. Alcohol wipes I'd recommend second. Also, clean microfiber here, so I'm just going to spray the windshield, and I'm going to clean it off here. Again, you really want to focus on the edges, where the actual 3M will adhere. All right. Same thing on the other side.All right. Next step, we're back on the table. I'm gonna use my knife here, and we're basically gonna peel off the red backing on the 3M tape. Now, of course, guys, you want to do all four of the strips on each one of the brackets, but for the sake of this video, I'm only going to remove one backing, but for you guys at home, make sure you're removing all four. After all, we will be putting this back to stock. Just like that. Again, remove all four, and then move on to the next.Now, this next step is optional, but highly recommended. Now, the kit also includes adhesion promoter. Now, at this point, what you would want to do is pick your louvers up, line them up to your back windshield to see exactly where each of these brackets will apply. Before you actually stick it to the windshield, you'd open your adhesion promoter, which is basically a wet adhesive promoter sponge, and you want to basically just apply it to the windshield where the 3M will apply. Again, it's optional, but it does add an entire layer of strength and security to the adhesion, which I would definitely recommend doing.For the purposes of this video, I'm not going to be applying the adhesion promoter, but I recommend it for the guys at home who want to make this a little bit more of a long-term solution, who don't want to have to worry about the louvers coming off. We're going to be returning our vehicle back to stock at the end of the video, so we want to make sure that's a little bit easier later on. I definitely recommend using this, though. At this point, let's get the louvers, and apply them to the windshield. All right. Now, it's definitely a lot easier to apply these with a helping hand. But if you're working by yourself, just be careful, starting on one side. You want to line it up using the top of the trunk liner and the top of the windshield itself, line it up to the edge of the glass. Once you like that position on one side, just put light pressure on the two strips over here. That way it'll hold itself in place, but you still have a little bit of room for adjustment.All right. Then you want to go to the other side and make sure it's applied there as well. All right, and put pressure on the top, to make sure that's applying. Perfect. Now, once you know that these guys are solid and you have those applied and they're gonna be stuck to the windshield, what you want to do is give it about 5 or 10 minutes to make sure that those pieces apply very nicely, and then we're gonna take this guy off. So you're gonna thumbscrew each one of these guys off, and lift the louvers out of place. What you really want to do is once you know that they're exactly where you want them to be, take the pressure of the louvers off of the windshield, but that'll leave behind your brackets. Your brackets you'll give about 24 hours to cure. The 3M tape underneath of it needs time to settle in on the windshield, and you want to make sure you're doing that and allowing it to do that without the windshield louvers on. The windshield louvers on can put a little bit more pressure on it and pull it down, which can prohibit a good bond, so let it cure for about 24 hours without the louvers applied to the windshield. So I'm going to take those guys off, just using that thumbscrew, and do that for each one of them.All right. Once you have all of those off, gently lift off the louvers and set them aside. All right. Once you have this guy off, again, you want to leave about 24 hours for these guys to cure. It's also recommended to pick up some silicone separately, in order to line the edges of each one of the brackets, so moisture and water during rainy days doesn't undercut the 3M and prevent a good bond there. So, that's optional, but definitely recommend picking it up. And from here, about 24 hours to cure, and then we can come back and throw our louvers back on.All right, so after 24 hours of it curing, and you applied your silicone, what you want to do is basically line this guy back up, and drop them back onto the studs. From there, you can take your plastic thumb screws and tighten those guys back down.All right. With all those guys back on, you're good to go. If there's any point in time that you want to actually clean the rear windshield and get better access to it, just take the thumbscrews off that we just took off before, lift your louvers off the windshield. You have full access to the windshield. You can clean it, and throw it right back on. It's as simple as that.That's gonna wrap up my review and install of the Rear Window Louvers in the Textured ABS Finish, available for the '08 and newer Challenger, and you can pick this set up right here atamericanmuscle.com.

      Product Information

      Features, Description, Reviews, Q&A, Specs & Installation
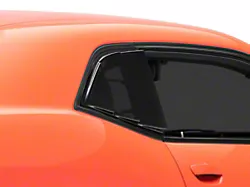
      Features & Specs

      • Rear Window Louvers
      • Retro Styling
      • Textured ABS Plastic Construction
      • Heat and Impact-resistant
      • Slanted Tab Formation
      • CAD-designed and Injection Molded for Exact Fitment
      • Easy Installation
      • Compatible with All 2008-2023 Dodge Challengers

      Description

      Retro Styling for your Dodge Challenger Rear Window. Inject retro styling and reinvigorate your ride with these Textured Black Rear Window Louvers. These rear window louvers offer a blacked-out appearance, with heat and impact-resistant ABS plastic in slanted tab formation.

      Quality Construction. ABS plastic is renowned for its heat resistant properties, CAD-designed, and injection-molded to exact specifications.

      Installation. There is an easy level of difficulty in installing this product, taking up to 30 minutes to complete, depending on your level of mechanical skills.

      Application. These Rear Window Louvers - Textured ABS is compatible with all 2008-2023 Dodge Challenger models.

      Fitment:

      CA Residents: WARNING: Cancer and Reproductive Harm - www.P65Warnings.ca.gov

      Installation & What's in the Box

      Installation Info

      What's in the Box

      • (1) Rear Window Louver
      4.4

      Customer Reviews (52)

        Questions & Answers

        10 More Questions