FREE 2 or 3-Day Delivery on Orders $119+ Details

Talk to a Challenger Enthusiast
1-877-887-1105
M-F 8:30A-11P, Sat-Sun 8:30A-9P
Win $3,000 in Store Credit! Enter Daily >

Borla S-Type Cat-Back Exhaust with Polished Tips (09-14 5.7L HEMI Challenger)

Item CH1525
Call a Challenger Enthusiast at 1-877-887-1105
M-F 8:30A-11P, Sat-Sun 8:30A-9P
$0.00
Our Price

$1,810.99

FREE Shipping Market Price $2,118.99 You Save 15% ($308.00)

Will this fit your Vehicle?

Select a different vehicle Help?
Update or Change Vehicle
Ship to: Ashburn - 20149
Sorry, please enter a valid US or CA postal code
We're sorry, zip can't be updated at this time.
Recommended Install Shops
How It Works

Add Local Shop Installation

Install Shops are available near Ashburn - 20149
Total cost of service $299.00
    Create a list
    Add to New List

    Saved - View your saved items

    We're sorry. We couldn't save this product at this time.

    or use

      Video Review & Installation

      Hey, guys. Adam here with americanmuscle.com and today we're taking a closer look at, listening to, and installing the Borla Stinger S-Type Cat-Back Exhaust with Polished Tips, available for the '09 to '14 5.7 Hemi challenger. Now, as you just heard from our sound clips, this is gonna be a great option for the guys looking for a nice aggressive daily driver exhaust. This option here is gonna make a whole lot of noise at wide-open throttle, but it's gonna be very tamed, yet still aggressive, exactly what you want for your Hemi on a daily commute. Now, this is good for weekend warriors too looking to make some noise with a sportier exhaust, hence the sport S-type muffler. Now, Borla has a number of options in their layout. They have their touring, which is a little more mellow, their stinger, which is that middle of the road option and their ATAK, which is loudest of the loud. So there's a preference out there for everyone and there's an exhaust option to fit it.Now, this guy here is made from all premium quality materials. It comes with an X-pipe in the kit, which is gonna help add a little bit of rasp to that tone you just heard while pushing out a little bit more power over the H-pipe. Now, this guy having 304 stainless, steel top quality materials, great for guys looking for the most corrosion and rust-resistant in the category, especially if you're located in a wintery weather area, seeing road salt. Now, this also has a two and a half-inch dual mandrel-bent tubing. Mandrel-bent is gonna free up some of those kinks for a better free-flowing airflow. Now, this also has polished tips coming out the rear. Now, your factory exhaust has just a single rectangle, whereas this is more of a quad-tip styling, which I like and if you're not fan of the polished finish, Borla has a number of different options out there for you, including a black for a more stealthy look.This one's gonna come in right around 1,350 bucks there, putting it right around the top side of the spectrum. May not be the most expensive in the category, but with the premium quality materials and the high premium Borla name, which has a perfect fitment every time, that's definitely something you can expect from the price. Install, I'm gonna give two out of three wrenches on our difficulty meter. There is no cutting, no drilling, no welding, none of that nonsense. Your factory exhaust comes off all in one piece and this new kit is gonna go in piece by piece extremely simply. It's gonna have a very mint fitment. Install, I'm gonna give two, maybe three hours from start to finish. I'm gonna take you through every step of the process. Let's get started.Tools used in this install include an impact gun or a ratchet, extension, 13 and 15-millimeter deep sockets, a mallet, WD40 or something similar, and hanger removal tool is recommended. First up here, I'm gonna grab my impact gun, an extension, and a 13-millimeter socket and I'm actually gonna remove the hanger isolators directly from the frame, unbolting them from the vehicle rather than using a removal tool and popping the isolators out. So we're gonna keep them all in one piece attached to the exhaust and just remove them from the frame. So I go straight above the muffler. There's one behind it and one in front of it by the tips. Now, when you do the second one, you wanna make sure you have a handle on the muffler because it's gonna wanna drop down a little. All right. Now we can do the same thing on the other side.So now you can grab a hanger removal tool and head back toward the middle section of your exhaust here. Now, on the driver's side, you have this flex tube. Directly above that, there's a hanger in the isolator. I'm actually gonna pop this guy out. Same thing on the other side. Now, as you're doing this, before you finish up removing the exhaust, it's a good idea to have a pole jack in place or a jack stand or something similar, maybe even a hydraulic jack just to support the middleweight of the exhaust as you remove it. Now, if you have a helping hand during these final stages of one clamping it from the front of the vehicle, that goes a long way. So I'm gonna grab a buddy to hold the tips while I remove the front and we can drop it all in one piece. Now you can grab your 15-millimeter deep socket and loosen up the two clamps, holding them to your cat pipes. At this point, grab a helping hand and drop your exhaust. All right. So we got our factory exhaust off of our 5.7 Challenger here just on the ground next to our Borla stinger S-type dual cat-back.Now, I wanna take you guys through some similarities and differences between the two kits. And there's a lot of similarities but also quite a few differences worth mentioning. Starting at the front of the vehicle, you'll notice that your factory exhaust has an eight pipe for a mid-pipe. Your new Borla stinger has an X-pipe. Now, the X-pipe is known to be a lot free-flowing with a greater velocity because there isn't a mid at crossover section, or the H-pipe, that'll slow down your exhaust velocity. Because of that, you can see a small bump in power and torque, with the X-pipe over the H. Now, the X-pipe is also known to be a little bit louder, a little bit raspier than the H-pipe which has a historically and traditionally a deeper throatier sound. So it's all personal preference there, but when it comes to power, X-pipe is typically the way people go.Going on from there, you'll notice the entire kit here is a dual two and a half-inch mandrel bent 304 stainless-steel. It's more corrosion and rust-resistant than your factory exhaust, which you can see, looks a little worse for wear. It's not in the worst condition, but this Borla is just gonna hold up a lot longer. That 304 is great for guys located in wintery weather areas. Seeing a lot of road salt, which we all know can corrode your exhaust on the underbody of your vehicle. Moving on from there, you'll see that we are retaining the midsection resonator similar to that of the factory. They are a little bit smaller of that bullet style. The resonator is gonna help reduce some of those higher frequencies so that you don't have any drone inside the cabin, which is something that most people want, especially daily drivers. Now, if you were to go with something like the ATAK option or some of the louder or five out of fives, you may not see resonators there, which would result in some interior drone, at least for most kits.Moving on there, you'll also see, you know the same mandrel bent tubing. Mandrel bends are gonna help reduce any kinks or airflow restrictions in the exhaust to help keep that velocity up as opposed to the kink-friendly factory exhaust. The mufflers have a huge difference in shape. You've got this weird-looking exhaust from the factory that tucks up into your rear bumper. Your new Borla stingers here, these guys, the S-types are that sporty muffler that give you that middle of the road option when it comes to the Borla series, so the stinger is great for the daily driver. That's what you heard with our sound clips earlier. It gives you a nice rich aggressive tone without being overwhelming. And jumping out the rear, you'll see a quad-tip styling here. You get four by two and a half inch rectangular tips, but unlike the factory option which is one big rectangle, these are split into two squares. So I personally like this look over the factory. It is personal preference. There's a lot of different options out there for the Challenger, but these quad-tip styling that you see here comes in that polished 304 stainless steel. Borla has black tip options as well if you're looking to go stealthier.Now what we do have to do before we do anything is pop off these hangers from the factory exhaust that we'll move over to our new exhaust and then bolt up in one piece. First up here for the install, grab your X-pipe. What we're gonna do is put our clamps over the end, making sure the bolt head's on the outside, and we're gonna line this up with our cat pipes. Now, you might have to do a little flexing of the cat pipes in order for it to sit in properly, so I'm gonna put those in, bring this guy in as well and I'm gonna push from the back to get them the seat. Seat that all the way back. Rotate your clamps into position and tighten them down with a 15 socket. Next, let's take our resonator pipe along with another one of those clamps. Now, as you can see, it angles out and then straight back. You wanna make sure you're taking note of which direction you install it in. So let's put it on our passenger side of that X-pipe and slide this guy back. Now, when you tighten this down, you wanna make sure this is angling out towards the outside of the vehicle, not towards the middle of the vehicle. So once you have that in place, tighten down your clamp. Now you can grab the other resonator pipe. Do the same thing for the other side.Now, for our next pipes, what we're gonna have to do is transfer over our hanger isolators. Now, remember, we unbolted this from the frame, so we have to remove them and transfer them over. I'm gonna grab WD-40 and I'm gonna lubricate the bottom side where it connects to the hanger and then the outside as well just to make life a little bit easier. Now I'm gonna use my hanger removal tool, slide that in, and pop it out. Now let's transfer them over. Now, these do have to sit on a specific way when we connect them to our new hangers. You'll see this hanger here on the isolator has a little tab. The tab has to be facing the front of the vehicle. So we're gonna slide this on, making sure that when it's up, this tab is at the front of the vehicle. All right,. same thing for the hanger attached to our muffler here, just to make sure the tab is facing in the front. Same thing on the other side. Now, for our passenger side, you can see this one here has a ground strap, so we're gonna have to disconnect that but make sure it's still attached to the isolator side. Grab your removal tool and pop the whole thing off.All right. So now we can do the same thing here, making sure that tab is facing the front of the vehicle. Slide this guy on. And this one, slightly different case, but we're just gonna make sure we reconnect the ground strap to the new exhaust hanger. All right. So now we can start with our under axle pipe. Now what we're basically gonna do is slide this guy on, starting with our passenger side. You wanna make sure you have a clamp in position as well. Once this is all the way back, you wanna hang it up into that factory hanger. Just like that. Now, for this, I've got my factory 13-millimeter bolt inside my socket and extension. I'm gonna start putting that through this tab and set that tab up into position on the vehicle. All right. So I'm gonna tighten this down. Just get a couple of threads going so it hangs up. Now let's grab our impact gun and tighten it down.You just wanna make sure that that tab we made a facing the front of the vehicle sits into the opening there on the frame. Now we can head back to this clamp here underneath of our rear diff, grab your 15 socket, and tighten it down. All right. Now we can do the same thing on the other side. All right, now we can go back and tighten down that clamp. All right. So now we can grab our driver's side muffler. Got a clamp on the end there. Let's slide this guy into place. Now, it is still gonna tuck up into that bumper a little bit similar to our factory one, but it's not nearly as much. All right. So we got my hanger up there into the frame. Grab your 13 bolt, thread it through, and then grab your impact gun or your ratchet and tighten it down.All right. Now we can tighten down that clamp. Now, for these, because it is a little more visible from the outside of the vehicle, I like to rotate it up as far as I can so the bolt head isn't hanging down too low. All right. So what we did here was we found out that this muffler was fighting us a little bit on the passenger side. I just took this off the frame. If you remember, we just put our factory 13-millimeter bolt through it. I just took it back out. That way you can drop this down low. You can grab the muffler, slide this guy into place. So now what I'm gonna do is just rotate this up and tuck it back into the bumper. Just do the same thing for the other bracket.All right. Now we can tighten down our muffler clamp. So now we can grab our passenger side tip along with the ball clamp. I'm gonna put this back onto our flange here and now we can tighten this down with a 13 socket. One thing to make note of here is that with these quad style tips, the one on the left here is actually offset a little out more than the one on the right. That's how you know it's for the passenger side. The one closest to the inside of the vehicle or your deck lid here is gonna come out a little further. All right. Same thing on the other side. Now go back and align everything. Tighten down your clamps and you're good to go.That's gonna wrap up my review, install, and sound clip for the Borla's thing or S-Type Cat-Back Exhaust with Polished Tips for the '09 to '14 five 5.7 Hemi Challenger, if that's what you're looking for, pick this up right here at AmericanMuscle.com.

      Product Information

      Features, Description, Reviews, Q&A, Specs & Installation
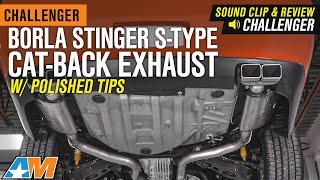
      Features & Specs

      • Robust Sound Without Drone
      • Upgrades Horsepower and Torque
      • S-Type Muffler Design
      • X-Pipe Included
      • Dual Split Rear Exit
      • Stainless Steel 2.50-Inch Mandrel-Bent Tubing
      • Exhaust Tips: 4-Inch x 2.50-Inch Rectangle Angle Cut
      • Direct, Bolt-On Installation
      • Fits 2009-2014 Dodge Challenger 5.7L Models

      Description

      Powerful Racing Note. The Borla Stinger S-Type Cat-Back Exhaust System provides the Challenger the ability to effortlessly produce a persistently powerful exhaust note. This exhaust eliminates drone or monotonous sound, and instead sustains the aggressively confident racing exhaust note matching the Challenger's supreme engine power.

      Spirited Performance. This Borla Stinger Cat-Back Exhaust is engineered using a straight-through technology with prime core attributes that delivers maximum exhaust velocity. The exhaust components have been particularly pooled together for increased power and improved torque. Furthermore, the mandrel-bent tubing boosts engine performance and maintains the efficient velocity across temperature range.

      Premium Austenitic Construction. Borla manufactures its Stinger Cat-Back Exhaust from high-grade 300-series austenitic stainless steel using premium engineering. Austenitic grades possess high corrosion resistance and great thermal strength to withstand extreme temperatures produced by catalytic activities. Moreover, this particular material improves fuel efficiency, thanks to its relatively lighter weight.

      Direct Installation. This Borla Stinger Cat-Back Exhaust can be installed directly, as the components fit well with the original system. The bolt-on installation requires moderate mechanical skills and takes approximately 2 hours to complete.

      Application. This Borla Stinger S-Type Cat-Back Exhaust fits 2009-2014 Dodge Challenger 5.7L models.

      Fitment:

      Details

      Borla 140707

      CA Residents: WARNING: Cancer and Reproductive Harm - www.P65Warnings.ca.gov

      Installation & What's in the Box

      Installation Info

      What's in the Box

      • (2) Mid Mufflers
      • (2) Rear Mufflers
      • (1) X-Pipe
      • (2) Intermediate Pipes
      • (2) Muffler Tips
      • Mounting Hardware
      4.8

      Customer Reviews (500+)

        Questions & Answers

        10 More Questions

        Will It Fit My Challenger

        • R/T - 09, 10, 11, 12, 13, 14
        • R/T Classic - 12