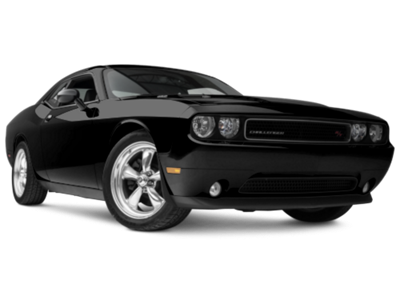
Talk to a Challenger Sales Tech
1-877-887-1105
M-F 8:30A-11P, Sat-Sun 8:30A-9P
$20K Sweeps! 10 Chances to Win! Enter Daily >

KW Suspension H.A.S. Height Adjustable Lowering Springs (2011 Challenger SE; 11-14 Challenger SRT8; 11-23 Challenger GT, R/T, SXT, T/A; 2014 Challenger Rallye Redline; 15-16 Challenger Scat Pack; 15-18 Challenger SRT 392)

Item CH2237
Verify parts fit and get product recommendations.
Challenger Sales Techs: Connect Now M-F 8:30A-11P, Sat-Sun 8:30A-9P
$0.00
Our Price

$899.00 (set of 4)

FREE Shipping Market Price $1,033.99 You Save 13% ($134.99) Up to 10% off for Military & First Responders! See Details

Will this fit your Vehicle?

Select a different vehicle Help?
Update or Change Vehicle
Out of Stock

Ship to: Ashburn - 20149
Sorry, please enter a valid US or CA postal code
We're sorry, zip can't be updated at this time.
    Create a list
    Add to New List

    Saved - View your saved items

    We're sorry. We couldn't save this product at this time.

    or use

      Video Review & Installation

      Hey, guys. Adam here with americanmuscle.com, and today we're taking a closer look at and installing the KW Suspension's H.A.S. Adjustable Lowering Springs, available for the 2012 and newer Challenger. Now, our '13 R/T behind me has them installed, and I got to say right off the bat, the H.A.S., or height adjustable springs, are exactly what they sound like. They're adjustable springs. Now, they're not full-on coilovers, but they still give you the ability to just ride height anywhere from zero or stock to about 1 inch all around. Now, the fronts, you get 0 to 1 inch, the rears get more like 0.2 to 1 inch, which isn't too big of a difference, but it's worth pointing out. Now, anytime you lower the center of gravity on your Challenger, you can expect, of course, to have a nice even playing field when going around corners, your body roll is gonna be reduced. You're also gonna get reduced squatting. These are gonna be a little bit stiffer so you get more of a sporty feel and, overall, you'll get an improved suspension and handling.Now, this particular set of springs is gonna be for the guys who want that on-car adjustability with the front end. Now, the rears, you do have to take off to make the adjustments, but you still have that option. If you find yourself using your Challenger for a number of different applications like just daily driving or if you find yourself on the drag strip or even doing a little bit of autocross, these are gonna be some pretty good affordable springs to go with without breaking out the big bucks for a full set of coilovers. Now, the springs themselves are aggressive. Now, because these are adjustable, it does come with a little perch that's threaded that you'll have to install all along with the springs, and the perch also has a small preload spring that goes with it. So, there's really two springs in the front, which is actually very interesting. These are pretty unique set of springs. They are on-car adjustable, which means you just jack your car up, get the load off of the springs from the vehicle. You'll be able to crank down on them with the tool included in the kit.Now, that's just the fronts. The rears you actually do have to lower the lower control arm to gain access to the perch that'll sit on the top of the spring, replacing your upper isolator. Now, the price for these adjustable springs come in right around about 600 bucks. Now, for comparison, typical lowering springs that are not adjustable, just a regular set of springs, is usually around 200 to 250. So, you can see it as a pretty sizable difference in the price tag, but if you really want that adjustment, this is gonna be a really good option for you. The alternative for adjustment would be a full set of coilovers, which is typically around 1,000 if you're just getting a base model coilover kit. So, you can see the difference. It's right in the middle between the two. You get a little bit more coilover functionality without going with the full set.So, it's really just about that niche group of people who are looking for adjustable springs but don't want to crack out the big bucks, like I said earlier. Now, the installation, I'm gonna give full three out of three wrenches on our difficulty meter here. We are gonna have to work with a spring compressor on this because, again, they're not coilovers, you're reusing that factory strut. And if your vehicle is equipped with the electronic damper control, this will retain that functionality. Because you're using the factory strut, they don't impede with that at all. So, every step of the process we'll go through. It took me about four hours from start to finish. Let's get started.Tools used in this install include a 3/8 impact gun, half-inch air gun, dead blow hammer, variety of extensions, 13, 15, and 18-millimeter deep socket for the 3/8, 15-millimeter deep and short sockets for the half-inch, 18-millimeter deep and short sockets for the half-inch, 21 and 22-millimeter deep sockets for that half-inch, 15-millimeter and 18-millimeter wrenches, a flathead screwdriver, and a variety of pry bars.First step here guys, get your car in the air and supported properly, whether it be jack stands or a lift. Grab a 22-millimeter socket and get your wheels out of the way. First step in the front end we're gonna start here is to remove or pull off the plugs for your ABS lines. Now, the reason we're doing this is we wanna remove the tension from the lines. We wanna get as much slack as we can so you're not tugging on it. There's a couple of lines all along here. We're just gonna really pull down on them just to give them that excess slack and there's one more right on the back of the hub. From here, we're gonna disconnect our sway bar end link from the strut. Now, what you're gonna need is a 21-millimeter deep socket. And typically a regular impact gun or a wrench even won't have enough torque to get this off. So, having an air tool definitely makes things a lot easier.All right. Now, if you break it loose a little bit, but it's still struggling, the bearing itself tends to spin. So, what you might wanna do is put a pry bar on the inside, the opposite end here, just to hold that from spinning. So, let's go ahead and get a pry bar. There you go. You just got to keep that bearing from spinning. All right. Once you break that loose, take the nut off, remove the sway bar end link. What I like to do is just a couple of threads, put the nut back on so you don't lose it. Next step, guys, we're gonna tackle the upper control arm. Now, the upper control arm to the hub itself is held on by an 18-millimeter nut. Now, this again also has the tendency to spin, so you might need to do a pry bar on the inside of that coil and pull down just to put some pressure on it to keep it from spinning. Again, air tools definitely make this easier. Once you have that loosened up, keep the pressure on the upper control arm. This will pop out if you just remove it quickly. So, you wanna make sure you're just threading this off, still holding pressure on that pry bar and now you can slowly get those to disconnect. See, this is gonna come down. You don't wanna get bunked in the head, so make sure you've got that held on. Bring the control arm back up. And, again, I just like to put the nut on there just so we don't lose it.Next step here, we're gonna remove the 18-millimeter bolt holding on the bottom of your strut. You can keep that 18-millimeter socket on there and gun this off. You might wanna have a hand on the strut just to wiggle it back and forth to get this out of there. There you go. Now, we can drop the car and tackle the three bolts at the top. Now, our Challenger under the hood has a Mopar strut tower brace. If yours doesn't, this may not apply to you. What we have to do is remove our cap here and holding on the top of our strut at our strut tower are three 13-millimeter bolts. This is the last thing holding on that strut. So, what we're gonna do is pop these three off, but at the same time, you wanna have a hand underneath to hold the strut. Because this is loose down here, it's gonna start dropping out. You wanna have a hand there, make sure you grab it. All right. Got our 13. You don't wanna use air tools for this. A simple deep socket will do the trick. Hold onto these nuts because they will be re-installed later. And when you get to the last one, have a hand on that strut. Now, to remove it, you may have to push down here. So, that's what we're gonna do. We're just gonna push down, lift up, and there you have it. Once you have one side done, do the exact same thing for the other side of the front.The next step is to take your strut and your factory spring. We wanna head over to our spring compressor. Now, we've got one fixed at the wall at our shop here, but if you've got a loose one, you guys wanna make sure you're using extreme caution because they can be very dangerous if not operated properly. Now, what we have here is we've got a stool propping our stroller up because we don't want it to fall through. I've got the bottom coil set in our slots. The top, I'm gonna put straight to the strut hat. Now, that's gonna put good pressure on it. We're gonna compress the spring, removing it on at the top, take the strut hat off, and then our spring will come out once we decompress it. Like I said, it can be very dangerous, so exercise extreme caution.What I will recommend now is removing the top bushing and the spacer from the nut. Now, those are in the way, so what we're gonna do is just pull those straight off. Come off pretty easy, you can just thread that off. It just a rubber bushing and a washer. I'm gonna put those aside. Now, you can start compressing. So, now you take your 18 socket and remove that top nut while the spring is compressed. All right. Once you have that nut off, you can lower your strut and decompress your spring slowly. All right. Once that spring is decompressed, pop this guy out, then we can remove our hat. Once you have your strut hat off, dust cover comes with it. You can set this aside along with your spring and just repeat for the other spring.All right. Our fronts are out of the way, so we're moving on to the rear. Now, the rear is a little bit of a different story and it can be a pain in the butt. The uninstall is fairly simple, the reinstallation can be the pain. Starting with the uninstall, what we need to do is remove this bolt as well as the bottom bolt on our shock in order to lower this side of your lower control arms. We're gonna bring that down and that decompresses the spring and allows you to take it out. Now, if you're also changing your shocks, now is a good time to do so, but instead of just doing those two, they'll remove the two bolts at the top of the shock. We're not doing that today, so we're gonna leave our shock in. This bolt, as you can see, it's impossible to get out because our tailpipe is in the way. Now, I know we have an aftermarket exhaust but this still applies to the factory exhaust. That tailpipe is just in the way. So, what we need to do is lower the tailpipe down in order to clear that bolt.So, what we're gonna do is grab an extension and a 13-millimeter socket and we're gonna start above our muffler. The muffler is held on with hangers to isolators that are attached to your frame. Remove the 13-millimeter bolt holding on both of those above the muffler. Now, that might be enough to do it and we'll see once we get these out. All right. And our second one is right behind our tip. Now, as you can see, this is starting to rotate down, but since we have an aftermarket one, it's connected here. We need to lower it from the other end. If you have a factory exhaust on your Challenger, you should have a flange right here, in which case you can just bend that down and not have to do anything else. If you don't have a stock exhaust, do what we're doing and start lowering this tailpipe. So, this will come down just a little bit. So, we're just pulling on down on this and it doesn't look like we have to loosen up anything else. Just removing those two 13s give us enough clearance. We can go right over this pipe and get to that bolt.Now, the next step since we're working on a lift, I'm gonna use a pole jack and we need to support our lower control arm. If you're working on the ground, a hydraulic jack does the exact same thing. It might actually be easier for you guys. So, what we're gonna do since we're in the air here is grab our pole jack and support that weight right under the lower control arm. There's a little pocket here under your spring, I'm gonna put one end in there. Basically, hold it up just like this. Now, if you're using a hydraulic jack, you wanna position that pad evenly so when you're dropping it, it doesn't come down sideways. You wanna make sure it's coming down flat.Next up, we're gonna remove that bolt and the nut holding on the bottom of our shock. So, you're gonna grab a 15-millimeter wrench and hold the bolt head from the inside with an 18-millimeter socket to remove that nut. All right. Now, you can pull the bolt through. Next up, we're gonna remove the bolt holding on that lower control arm. So, now it's really crucial that you're supporting that weight because if you take this bolt off, that spring is gonna decompress. So, we wanna hold that up. Grab a 15-millimeter wrench to hold the bolt head and an 18 socket on the opposite end to take the nut off. All right. Grab your hammer and tap on the other side of the bolt to get it out. Now, if you're having trouble getting this bolt out, you can try to spin it out from the other side using your socket. So, grab your socket and try to gun this off. And as you saw, the lower control arm started to move that spring and that's why we have our pole jack under there. At this point, you want to slowly, and I mean slowly decompress that spring by either lowering your pole jack or rotating the handle on your hydraulic jack to lower it down.Once it starts getting a little easier, you feel it decompressing, taking the weight off of that spring for it to get a lot looser. Just lower it down to the point where you can actually take it out. So, you can see the top of our spring is coming off. So, this is totally loose. We've got to bring that lower control arm down enough to clear it to come out. Now, when you take it out, you wanna make sure you're bringing that isolator with you. All right. Now, the bottom isolator is still in there, so we're just gonna pop that guy out, too. So, we got our factory springs off of our '13 R/T behind me on the table next to our KW Suspension's height adjustable lowering springs. I wanna take you through how this system works. So, here, we have our factory Bilstein. Our springs come in two sections unlike our factory one, which is just straight up one-piece fixed linear. This is going to adjust between zero and an inch at the front end using two components, your main spring and your preload spring.Now, the preload spring is gonna sit on this perch that's adjustable. The way the adjustment is going to work is right now we have it set to the max drop at an inch with our adjustment purple ring all the way at the top. If you were to spin this, and we can do this by hand, but when it's on-car you'll use a tool. When you spin this to about the middle, we're looking at about a half-inch drop. Take it all the way down to the bottom and it should be just stock. It'll be plain and simple stock at the front end. Now, the rear is a little different. If you put it all the way down, it'll be 0.2 inches of lowered, which we'll tackle in just a second here, but this just how you see is how you're goNow, because we're not doing coilovers and it's just springs, you're making this perch body shorter. Now, making this shorter is gonna cause preload. You're putting pretension on the spring, condensing that prior to the load of the vehicle being on it. So, without even having your vehicle on the ground, that spring is gonna be condensed when you adjust this. Now, instead of gonna compress the strut causing the lowering of your vehicle. Now, taking a look at the rear, it's gonna be a little bit different. You're not worrying about putting it over a shock body or anything, it's gonna sit right in your factory spot on the lower control arms. And it's gonna actually adjust at the top as opposed to the bottom here on the front.What we have right now is the maximum amount of drop with it all the way down and it would sit just like that. When you adjust this purple ring all the way to the top, it's gonna look almost factory. Like I said, about 0.2 inches you get with the lowest amount of drop. The whole kit together is gonna be a progressive spring rate. Progressive springs adjust depending on your driving style. So, under normal driving conditions they'd be comfortable, but when you take harder cornering, harder launches on the drag strip, they start to get progressively stiffer. Now, your factory springs are linear. Linear springs are unpredictable and they'll have the exact same spring rate regardless of how you're driving. What we're gonna do is start assembling things and we do have to disassemble a few components on our factory strut. So, let's start there. We're gonna disassemble a few things on our factory strut.Now, the first thing you wanna do is remove that bottom factory isolator, which you don't need tools for. You can just twist that thing on out and you're gonna set that aside. Now, next, in order for our perch, the adjustable perch to fit over the shaft, we're gonna need to remove this metal cap and our bottom seat. So, you wanna grab a flathead screwdriver and start working this off. Now, it's really simple. You're really just gonna apply a little bit of pressure, start prying up on it. If you need to, you can grab a hammer, you can use it like an ice pick and chisel and just work your way down like this. You'll see it start to come off a little bit. Just work it and it pops out. All right. We can set this aside. If you ever wanna revert back to stock, you're gonna need this, so you wanna hold onto it for later.The next part is where it gets pretty tricky. For this, you'll need snap ring pliers, which is a very specific tool. If you don't have that or you don't wanna pick one up, you can try it with two flatheads and you're really just prying open this clip. But it's got a lot of tension on it, so it's really difficult to do so. You're gonna pry that off and slide it off the shaft and then this will slide right off. So, what we're gonna do is grab some snap ring pliers and get to work. Now, snap ring pliers, the reason these are good is because you can pinch and they spread apart and they're really, really fine at the tip. You're really trying to separate that ring and it might fight you. So, what you might need to do is separate them and use a very small flathead to pick the ring up and move it. All right. So, we got it separated. On the back, you can see I had the snap ring lifted. So, once you have that taken care of, you can just run your flathead around the edges and pick it all up. From there, I'm just gonna slide it off.Again, if you wanna revert back to stock, you want to hold onto these because they're important and they'll be used to put the factory spring back in place. From here, you can grab our perch. You wanna decide at this point whether or not you wanted to have it at the max drop or the minimum drop or somewhere in between. Figure out where you want that to go. We're gonna do max drop from here and you're gonna slide this in place. Now, if it hits a wall here, what you can do is just lightly grab a hammer and work this down a little bit. From here, what we're gonna do is there's two retainer screws right where my fingertips are. We're gonna loosen those up so that it can sit a little bit lower. Grab a small Allen key and loosen those retaining screws up in order to get this to drop down a little bit farther.All right. From there we can drop it. Perfect. Once you have that dropped down all the way, grab that key again. We're gonna tighten those bottom retainer screws all the way down. Grab your smaller spring, the preload spring, insert that along with your secondary purple ring. Grab your coil, the tighter and the smaller end is gonna go down first and seat on that perch just like this. Now, we can grab the factory strut tower hat along with that dust cover, dust boot, put our bump stop in place and insert that. Now, this factory one, you wanna reach in here and we're gonna remove that bump stop and you're gonna replace it with the one included in the kit. Now, you can either insert this in here, but it might actually be easier for you guys if you just remove that spring and just insert it over the shaft. I think that might be just a little easier for you. I'm gonna slide that down. Now, we can grab that spring and the boot.All right. So, now what we're gonna do is have to put pressure on this in order to close that gap. You wanna make sure that you're meeting the end of the isolator on the top and you're condensing it or compressing it enough that you can put the nut on top. All right. So, what I'm gonna do cautiously is put pressure down here just enough to get the threading to show through. Now, I have my buddy Blake helping me put that nut on top. Once you have that nut on, putting it away from yourself, grab an 18 socket and tighten it down. All right. Now that we have that assembled, it's time to put it back in our vehicle. So, what we're gonna do, start on our driver's side here, line this up with our holes in our strut tower. Now, we're gonna go, before we mount this, we're gonna go up top and tighten down at least one of those nuts to hold it in place. Right here, just thread this in as much as you can. Perfect. Now, that's holding it up, now let's head back down.Now, as you can see, we need this portion to face our sway bar end link. It's facing that wrong direction which happens once you decompress your spring. So, what we're gonna do is before we mount it down here, we're gonna rotate it. Make sure it's facing that right direction. From here, let's push down and mount it around that control arm. Perfect. Now, to get it to hold its position, grab that bolt, line those holes up and put it through. Now, we don't have to tighten it down just yet, but at least we have it in the right spot. Now, we can head up. All right. Now, that we're back up here, we can put in the rest of those nuts. Grab our 13-millimeter socket, we're gonna tighten those guys down. We're just gonna cap that off. Perfect. Now, we can head back down.What we're gonna do now is work on our upper control arm. So, we're gonna loosen up this nut here. Using our hands, we're gonna push this up and line it up with our upper control arm. Now, if you need to, you can grab a pry bar if that makes your life easier. But what I like to do is use my hands to line this up because once you get the stud through the hole, you can use one hand and put the nut on. Put that on a couple of threads. Now, it's holding itself. Now, you can grab a pry bar to push down and an 18 short socket to tighten this up. Now, you can use the same 18 socket to tighten down your bottom strut bolt. All right. Now, you can grab your sway bar end link and remove the nut there and put it back in place on the strut body. Grab a 21-millimeter socket and tighten that down. Now, we just need to reconnect these lines, which just go right into those rubber boots, and then again down here on the ABS line. Once you have that reconnected, you can repeat this exact process for the other side and you're good to go.All right. So, now that we have our factory spring uninstalled, you wanna take your factory lower isolator. Find that edge seat and put it on the bottom of your spring. Now, what you'll have to do is just feed the coil through until it hits the edge there. Now, on the top, you're gonna put the adjustment perch up here. And as we have it sitting now with the purple all the way at the top, that's gonna be your maximum drop. That's what you want to install right now. So, what we're gonna do is seat the isolator on the lower control arm first. Make sure this little notch here at the top is in the proper position. There's a cutout there on the lower control arm for it to sit in. Perfect. Once you have that seated, we're gonna grab a floor jack and start jacking this back up into position. Note that you're not going to reuse the top isolator. That comes out and it's getting replaced with your adjustment perch.All right. So, now we're gonna take our floor jack and put it on the lower control arm. We're gonna get it in a good position here while also putting your hand in to guide your spring up. Now, you may need to wiggle this back and forth to get it to position correctly. Start lining up the holes right back here on your subframe. Now, once you to have those lined up, you can put your bolt through. You might need a hammer to tap that through. Try to get this side lined up as best as possible. Now, we can switch over to the other side and align the other side of the hole and hammer it all the way through. So, what I'm doing here is using a pry bar to align the lower control arm on the opposite end. And then I'm gonna use a hammer to tap the bolt head through on the other side. So, we got it through a little bit. Now, we can come out and really get it in there. Perfect. Now, you can throw the nut on. Now, we can use a 15 socket and an 18 wrench and tighten those down. Perfect. All right. Now, we can do the bottom shock bolt.All right. So, for the bottom shock bolt, as you can see, those holes are not lined up. To correct that, you can take a screwdriver and put it into the opposite side and just pry up to line those bolt holes up. And so I got my screwdriver in. You can see it lifts up on it. Now, if you're doing that, you don't wanna put your screwdriver in too far because you still wanna leave room for the bolt to go through. Once you have that hole opened up, put it in, grab your hammer and tap the bolt all the way through. Thread your nut on the other side and tighten them down. Perfect. At this point, we're gonna jack our car back up and reconnect our exhaust tailpipe. All right. Now, we can grab our 13-millimeter bolts, go through the hangar brackets and bolt it right back up to the vehicle. Same thing to the other one back here. All right. Once you have your exhaust back up, you're just gonna repeat the process the exact same way for the other side. Put your wheels back on and you're good to go.All right. So, now, guys, once you have everything completed, I wanna show you how you make adjustments on-car at the front end. Now, you wanna grab the tool included in the kit. There's two different tools, two different sizes, the smaller ones for the front, the larger ones for the rear just fitting around this purple color here. Now, the way to do it on-car is get your car jacked up off the ground. You need tho lower the vehicle off the spring. Next, you wanna grab your Allen key and tighten up these two screws if you haven't done so already. That's gonna hold the adjustment perch in place so it doesn't rotate on-car. If they're not tight, you can see what it'll do, it'll just spin and then it's ripping that sticker off. So, you can see the effect that can have. So, what we're gonna do is we already have ours tighten, so we're gonna grab this and start rotating. Now, because this guy is in the way, you don't get a full rotation. So, it might take a while but you can knock it out.So, at this point, you wanna take your tool, wrap it around the back and start wrenching so that it's going toward the bottom to make the adjustment. Now, if you're going the opposite way, wrench the other way, and it will either maximize or minimize the drop. It depends on where you're adjusting it to. For us, we're gonna drop it down lower. Guys, if you wanna make life a little bit easier, you can even hit the threading right under it with just a little bit of WD-40 or PB Blaster. It'll lubricate it and, I think, make things a little easier for you. As you can see, we've got far enough down a little bit that it's relieving some of the tension on the spring that I can even adjust it with my hands. You can throw some gloves on so you're not hurting yourself, too. You can start scratching a little bit. Once you get to the end, there's a tightening screw right on the side there, the same Allen key, you can tighten that up so it doesn't adjust itself on-car. Now, once it's under tension, it's probably not gonna move, but it's there, so why don't we just take the precaution. Perfect. Now, you can repeat for the other side and you're good to go. Once you've made your adjustments and repeat it for the other side, grab your tire, throw your wheels back on, and you're good to go.That's gonna wrap up my review and install for the KW Suspension's H.A.S. Height Adjustable Lowering Springs for the 2012 and newer Challengers. If you're looking for that adjustability, you can get yours right here at americanmuscle.com.

      Product Information

      Features, Description, Reviews, Q&A, Specs & Installation

      Features

      • Agile Muscular Stance
      • Lowers Center of Gravity For High-Performance Handling
      • Made of Chrome-Silicon Steel
      • Durable Finish
      • Estimated Drop: Front 0-1 Inch (0-25mm), Rear 0.20-1 Inch (5-25mm)
      • Re-Uses OEM Shocks and Controls
      • Clears Stock and Aftermarket Wheels and Tires
      • Sold as a Set of 4 Springs
      • Fits 2011 SE, 2011-2014 SRT8, 2011-2023 GT, R/T, SXT, T/A, 2014 Rallye Redline, 2015-2016 Scat Pack, 2015-2018 SRT 392 Challengers

      Description

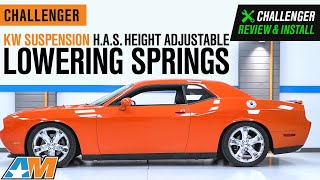
      High-Performance Handling. The KW Suspension H.A.S. Height Adjustable Lowering Springs improve the Challenger’s steering behavior on the road and on the track, without the need to deactivate the electronic damper control. KW particularly designed the springs with the advantage of individual adjustment range. This allows height adjustment, even after installation.

      Dynamically Agile Stance. This set of KW Lowering Springs provides the Challenger with a sharper appearance by lowering the ride height. The reduced gap between the fender and the tire provides the Challenger not only with an improved agile stance, but also enhanced overall driving dynamics. Furthermore, the adjustable spring seats allow fine-tuning by hand.

      Lifelong Durability. The coil springs are made of chrome-silicon steel formed through a multi-level tempering procedure with an annealing process. This method eliminates internal stress by heating the metal and allowing it to slowly cool. This also provides high tensile strength, which is further reinforced by the durable finish to lessen vibrations and prevent corrosion.

      Progressive Design. Progressive springs (also known as variable rate springs) are designed to be more compliant when riding over rough and uneven surfaces. Progressive springs are engineered with a low starting spring rate that increases as the spring compresses. Variable rate compression allows for a smoother ride, while still providing good handling characteristics when pushed hard.

      Clears Stock and Aftermarket Wheels & Tires. These adjustable lowering springs were engineered to be compatible with the stock size wheels and tires.

      Professional Installation Recommended. AmericanMuscle recommends professional installation for these KW Springs. The installation process takes approximately 4 hours. Please note that an alignment is highly recommended after installation.

      Limited Warranty. These Height Adjustable Lowering Springs are covered by a limited lifetime warranty, during which KW Suspensions warranties its products to be free from defects in material and workmanship. This warranty does not cover damages due to mishandling, misuse, misapplication, negligence, improper installation, or alterations.

      Application. The KW Suspension H.A.S. Height Adjustable Lowering Springs fit 2011 SE, 2011-2014 SRT8, 2011-2023 GT, R/T, SXT, T/A, 2014 Rallye Redline, 2015-2016 Scat Pack, 2015-2018 SRT 392 Challenger models.

      Fitment:

      Details

      KW Suspension 25327018

      CA Residents: WARNING: Cancer and Reproductive Harm - www.P65Warnings.ca.gov

      Installation & What's in the Box

      Installation Info

      What's in the Box

      • (4) Lowering Springs
      • (4) Threaded Sleeves
      • (4) Bump Stops
      4.0

      Customer Reviews (1)

        Brand Image

        Reviews of KW Suspension Suspension products have an average rating of 4.6 out of 5

          Questions & Answers

          10 More Questions

          Will It Fit My Challenger

          • 392 Hemi Scat Pack Shaker - 16
          • GT - 19, 20, 21, 22, 23
          • R/T - 11, 12, 13, 14, 15, 16, 17, 18, 19, 20, 21, 22, 23
          • R/T 392 - 17, 18
          • R/T Classic - 12
          • R/T Plus - 15, 16
          • R/T Plus Shaker - 16
          • R/T Scat Pack - 16, 19, 20, 21, 22, 23
          • R/T Scat Pack Shaker Widebody - 21
          • R/T Scat Pack Widebody - 19, 20, 21, 22, 23
          • R/T Shaker - 16
          • Rallye Redline - 14
          • Scat Pack - 15
          • SE - 11
          • SRT 392 - 15, 16, 17, 18
          • SRT8 - 11, 12, 13, 14
          • SXT - 12, 13, 14, 15, 16, 17, 18, 19, 20, 21, 22, 23
          • SXT Plus - 12, 15, 16, 17, 18
          • T/A - 17, 18
          • T/A 392 - 17, 18
          • T/A 392 Widebody - 21