Talk to a Challenger Sales Tech
1-877-887-1105
M-F 8:30A-11P, Sat-Sun 8:30A-9P
$20K Sweeps! 10 Chances to Win! Enter Daily >

PowerStop Z23 Evolution Sport Brake Rotor, Pad and Caliper Kit; Front and Rear (12-20 Challenger GT, R/T, Rallye Redline, SXT & T/A w/ Dual Piston Front Calipers)

Item CH18106
AmericanMuscle no longer carries the PowerStop Z23 Evolution Sport Brake Rotor, Pad and Caliper Kit; Front and Rear (12-20 Challenger GT, R/T, Rallye Redline, SXT & T/A w/ Dual Piston Front Calipers). Please check out 2008-2023 Dodge Challenger Brake Rotor & Pad Kits for an updated selection.
Verify parts fit and get product recommendations.
Challenger Sales Techs: Connect Now M-F 8:30A-11P, Sat-Sun 8:30A-9P
$0.00

    Product Videos

    Jake: Jake here for American Muscle, and today I'm taking a look at the PowerStop Z23 Evolution Sport Front and Rear Brake Rotor, Pad, and Caliper Kit fitting various different models and trims of 2012 to 2020 Challengers. Now, before we dive in here, I just want to take a moment to acknowledge that this does have a bit of a complicated fitment, so make sure you double-check on the website before you buy to ensure that this is gonna fit your particular Challenger.Brakes are some of the most important components on your vehicle and they're one that is often overlooked when people start modifying. Especially if you find yourself hustling your Challenger around or tracking it, the stock brakes just aren't gonna be up to the task. Enter the PowerStop Z23 Evolution Sport Brake Kit. This is an all-inclusive kit that is designed to refresh and upgrade your braking system to provide you with improved stopping power at an affordable price point. This is a great setup for a daily driven car that sees some occasional spirited driving. Now, there are a few places on my own vehicles where I make doubly sure to spend money to get the good stuff, and brakes are one of those places. Personally, I've run PowerStops on a few vehicles now, and they're always impressive, especially as compared to your stock brakes. And such is the case with this kit.So let's start with the most obvious difference from your stock brakes, and that's going to be the rotors. Now, these are of the drilled and slotted variety, so despite being the same diameter as your stock rotors, these are going to be much better at dissipating heat than your stock solid ones. Keeping heat out of brakes is important. There's nothing scarier than cresting a hill, only to find the pedal going all squishy on you when you need it most. So that's exactly what these channels and holes in the faces of the rotor are designed for. The channels are meant to push heat out from the edges of the rotor and the pads, whereas the holes here give it another escape route through the central veins, like this.Having good rotors in your braking system is excellent, but they're only going to work as well as your pads do. In this kit, you get a set of PowerStop's Z23s. These are the Z23 Evolutions, to be specific. Like most of Power Stop's other offerings, these are made using their proprietary carbon-fiber ceramic compound. So they're going to be very good, again, at dissipating heat, while still maintaining everyday drivability. As you can see, they feature chamfered edges and a slot down the center. This is going to help with break-in, with heat dissipation, and also maintaining everyday drivability. These are also thermal scorched for a faster break-in, too. And you get rubberized shims on the back that are going to help keep noise at bay. And that's a great thing to talk about as well.Lots of upgraded brake pads often come with a compromise when it comes to regular use, such as just driving around town. Sometimes that might be in braking feel or the amount of noise. The initial bite might come on a bit later than it did with your stock brakes. They might make some more noise, or they might produce a ton of brake dust, despite that really excellent stopping power. However, that's not the case here. There is virtually no compromise in brake performance or feel. In fact, PowerStop claims that these are nearly dust-free. Now, let's be honest. No brake pad is entirely dust-free just due to the nature of how they work. But these are a super low dust formula. It's going to help keep your wheels a lot cleaner, which is especially nice if you've got some cool aftermarket wheels on your car, or you're just like me and you can't stand cleaning wheels. They're also going to be very quiet, and they're going to have great stopping power, too. So all-encompassing, these are a great set of brake pads.Now, of course, you also get a brand new set of calipers in this kit, as you can tell right here. They've got a very nice red powder coat. It's very glossy, really nice pop of color when you put it behind the wheel. Now, these are dual pistons in the front and single pistons in the rear. They're going to be the same size as your stock units, but they are brand new so they're going to give you that peace of mind when you've got brand new braking hardware. So before you hit the road, you're going to know that you'll be able to stop quickly, and safely, and consistently.Moving on to construction, the rotors we were talking about earlier are made using G3000 metallurgy. So that has a higher percentage of carbon in the metal itself. And like those veins and holes in the faces of the rotor, that composition is going to be excellent in dissipating heat. The rotors also have this very nice silver zinc plating over top, which is going to help prevent against rust and corrosion. So they're going to look good and they're going to perform well for a long time. The pads, again, use PowerStop's own carbon-fiber ceramic compound, which is, again, designed for excellent heat dissipation, consistent performance, and feel with low dust. And PowerStop also thoughtfully includes all-new premium stainless steel hardware in the kit. So short of brake lines, you've got pretty much everything you need for a full brake overhaul. And this is all really high-quality stuff too. You can tell the moment you take it out of the box.Coming in around $925 though, this is not a drop in the bucket. However, good brakes rarely come cheap. But despite this kit carrying a not-so-insignificant price tag, believe it or not, this is about the least expensive full brake kit on the market for these Challengers. And that is especially cool considering you're getting upgraded pads and rotors in addition to the calipers. You don't get drilled and slotted rotors in everything. Now, this is not a place you want to skimp if your vehicle sees a lot of usage if you do back roads, if you do the occasional track day, or you just happen to drive a little bit more spiritedly. It's worth reiterating here that there's a lot of good science and a lot of great technology baked into the rotors, the pads, and everything else that comes with it. And you get everything you need to get this job done and vastly improve the braking performance of your car.I'll throw in a little personal recommendation here as well by saying that I've experienced PowerStops on some of my own vehicles, and I can tell you firsthand that it is a worthwhile upgrade if you've got the room in your budget. Again, I've driven on PowerStops on a couple of different vehicles, and I'm always impressed by the performance and the cost. So, if you can find the room in your budget for it, or if you're shopping for a full brake upgrade, and it is actually going to be an upgrade, this is a great one to consider.Installation comes in at a two out of three on our difficulty meter. Installing this kit is definitely a job you can accomplish at home. It will take you probably about three hours or so to complete, perhaps a little bit more if you've never done something like this before. Now, while this is a totally bolt-on system that doesn't require you to make any modifications to your car, it is worth noting that you're going to have to do a full bleed of the braking system since you've got to open those lines to get your new calipers fitted. Now, while that might sound intimidating, it's really not a difficult job, just a time consuming one, and it is going to require you to get either a brake bleeder tool or have another set of hands to help you out with it. But fear not, we're going to show you how to get this whole thing done right now. So with that, let's head on out to the shop.Man: The tools you're gonna need for this install include an impact, an electric or regular 3/8 ratchet, an 18-millimeter wrench, a 20, 18, and a 15, 13-millimeter socket, a swivel socket, a 10-millimeter swivel socket, a 3/8ths to quarter-inch adapter, included brake lube, a rag, a breaker bar, and a rubber mallet.What's up, guys? Today we're going to be installing a set of brakes on our Challenger, so let's get started. All right, guys, so the first thing we're going to do is we're going to remove our brake line bracket using our 10-millimeter swivel socket, so that way later in the uninstall we can have access with a socket to the caliper cage bolts. So let's get started. So now we're going to remove this bolt here with our 10-millimeter swivel socket. Now we can take this and push it out of the way. Now we're going to remove our caliper bolts. All right, so the first thing we're going to do is we're going to just loosen up our banjo bolt that holds on our brake line, just so later it'll make that a little bit easier for us. Now we're going to remove the caliper bolts. So we're going to take an 18-millimeter wrench and hold the inside, and we'll take our 13-millimeter socket to remove our bolts. Move up to the top one.Now, from here, you're gonna wanna make sure that you have a rag on the floor because there is gonna be brake fluid that comes out, like so. Just gonna tuck that off to the side. Make sure you've located both of the copper bolts that are holding this in place because that is what is going to seal the caliper shut. So now from here, we can pull off our caliper. All right, so now that we have our caliper off, we're going to remove our two cage bolts. So I'm going to use an impact with a swivel socket and a 20-millimeter socket. We're going to remove these two bolts here. Just lift up there, and now we can remove our rotor by sliding that out through the studs. If you do have trouble getting your rotor off of the hub, you can use either a piece of wood and a hammer or a hammer to hit on the face on the outsides of the rotor.So moving on to the rear uninstall, the first thing we're going to do is we're going to crack the bolt for the brake lines and then we're going to remove the two bolts that hold on our caliper. First step, we're going to take a 13-millimeter socket and we're just going to crack this bolt loose so it's easier to uninstall once we have the caliper bolts off. Crack it like that. Now I'm going to swap sockets to a 15-millimeter socket, and we're going to use an 18-millimeter wrench to hold the bolt in place, then we're going to remove these two bolts. Now, once our bolts are removed, we can peel this off of our caliper cage. Then we're going to twist off this bolt that we already loosened. Make sure that you have a rag on the ground because there will be brake fluid that'll come out. Now for our two cage bolts, I'm going to use an 18-millimeter socket with a swivel socket to remove these two bolts. Now for our top bolt, make sure you hold your cage because it will fall. Remove that from our rotor.All right, so the last step is removing the rotor. An important note, if you have a manual Challenger, make sure to release your e-brake. But if you don't and your rotor is seized, I would screw the lug nut onto a couple threads and use a hammer and piece of wood and hit it from the back and it should bust free. So now I'm just going to remove the rotor from the studs. And now your uninstall is complete.All right, guys, so the first step of the rear install, we're gonna slap on our new rotors. So we're gonna line our holes up with a stud. And I like to use a lug nut to hold this in place so it doesn't move. Then the next step, we're going to be grabbing our new caliper cage and we're going to be reusing our factory bolts. So we're going to get that lined up back here. So now we can get this lined up, our cage is going to go over the mounting points. Take our factory bolts and thread that onto the hub. Same for the bottom one. Then we're going to take that same 18-millimeter socket and universal socket and we're going to tighten these two down. So now we can install our caliper clips. You're gonna make sure...there's very different sizes that's included with the kit, but this size fits for the rear caliper. So we're gonna slide that in on both sides. Make sure that sits nice in place, making sure that your inside of the clip does not clip the rotor because that will cause scoring later during your drive. The same for the top. Get those in there.Next, we'll be installing our brake pads. We're gonna use the included lube that comes with it and we're gonna put that on the wings of the pads so it makes the sliding process easier when you're applying the brake. So we're going to put that on both wings. Set this down. Now we're going to install this, we're going to slide this through, and your wings are going to go in the divot of the caliper clips, like so. Same for the back pad. Make sure that you never get the lube on the brake material because that will not brake when you apply your brake pedal. So that same process. Slide it in. Make sure that those are together. Now we can install our caliper. So now we're going to slide our caliper over the pads. We're going to push our slide bolts in. Then we're going to use our included bolts. We're going to thread those in. So now we're going to thread in our included bolts into the cage and the caliper. Now, to tighten these down we're going to use a 15-millimeter socket and an 18-millimeter wrench.So now we're going to reinstall our brake line. So we're going to be using that factory banjo bolt. We're going to throw our new copper washer onto the bolt. We're going to put that through the brake line and then we're going to throw that other copper washer onto the other side of that bolt. We're going to thread that in. Then we're going to tighten this down with a 13-millimeter socket. Make sure you don't crank it down too hard. And now the rear install is complete. So now that your rear brakes on the driver side are complete, you can repeat that process on the other side.All right, so moving up to the front of the vehicle, the first thing we're going to do is install our rotor. I'm gonna thread in a lug nut to hold this in place. So important note, I'd like to add that in this kit the rotors are labeled differently. So it shows here that this is the front driver side and vice versa. Next step is our new caliper cage, so we're going to slide this over the rotor, so we'll line our holes up. We thread our bolts into the back. We're going to tighten these up with our 20-millimeter socket and our swivel socket. So now we're going to install our caliper clips. We're going to line this up, clip those into place. Same for up top. And now we can install our brake pads.So before we install our brake pads, we have to put brake lube on. So we're gonna have to put that on this wing here. Just gonna rub that on. Same for the other side. Set that down. Now we can slide this in. Our wing is going to go into our caliper clip. It's going to slide right in there. We're gonna repeat that process for the back pad. Now we can slide this into place. Now we can install our caliper. So now we can install our caliper. Slide that on. We're gonna thread our included bolts into the cage. So now we're going to grab that 13-millimeter socket and an 18-millimeter wrench, we're going to tighten these two down.So now we're going to reinstall our brake line, same as before. Our new copper washer is going to go over the bolt, then it's going to go through the brake line. Then you're going to slide that copper bolt onto the other side and get this lined up and thread this into the caliper. We're going to use that 13-millimeter socket and we're just going to tighten this up. And from here, we're going to reinstall that brake line bracket so we can get this up into place. We're going to thread our bolt through. We're going to tighten this down with a 10-millimeter swivel socket.All right, guys, so now that your driver's side is complete, you're going to repeat that process on the other side. And once that's done, you're going to grab a buddy to help you bleed your brake system. And to do that, you're going to have your buddy in the driver's seat pumping the brake pedal three times. And then once he's on his third, he's going to hold that. And then while he's doing that, you're going to come over and crack your bleeder screw open, which is located right here. You're going to make sure you have a solid stream coming out, making sure that there's no air bubbles. And your first caliper you're going to start with is the one that's farthest away from the brake cylinder, which is here. So you'll be doing the right rear side first and working your way farthest to closest.So that's going to wrap up the install on our PowerStop Z23 Evolution Sport Brake Rotor, Pad, and Caliper Kit for your Front and Rear on your '12 to '20 Challenger GT, RT, Rally, Redline, SXT, and TA with dual-piston front calipers. Thanks for watching, and for all things Challenger, keep it right here at americanmuscle.com.

    Product Information

    Features, Description, Reviews, Q&A, Specs & Installation

    Features

    • Race Performance Brake Kit
    • Red Floating Caliper Design
    • Dual-Piston for Front, Single-Piston for Rear
    • Front Rotor Height of 55mm
    • Rear Rotor Height of 67mm
    • Five Lug Design
    • Front Rotor Thickness of 28.2mm
    • Rear Rotor Thickness of 22.1mm
    • Front Outside Diameter of 344.9mm
    • Rear Outside Diameter of 320mm
    • Drilled and Slotted Surface
    • Zinc-Plated Cast Iron
    • Features Carbon Fiber Ceramic Pads
    • Limited 3-Year 36,000-Mile Warranty
    • Easy Installation
    • Fits 2012-20 Challenger GT, R/T, Rallye Redline, SXT and T/A with Dual Piston Front Calipers

    Description

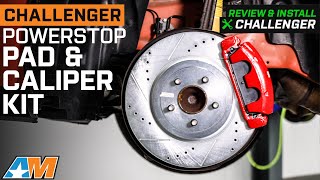
    Modern Seat Styling. Reliably halt your Challenger on the road and on the track with this PowerStop Z23 Evolution Sport Brake Rotor, Pad and Caliper Kit; Front and Rear. Expertly crafted for performance systems, it features dual-piston calipers and precision machined cast iron rotors for superior hardcore stopping. The surface of each vented rotor is drilled and slotted to improve its cooling as well as traction in wet or rainy roads, perfect for all-around braking.

    Clean and Silent. Designed to outperform every other Brake Kit in the market, this kit features PowerStop's expertly formulated Z23 Evolution Sport Carbon Fiber Infused Ceramic Pads. The strong low-dust compound of the pad offers superior traction without making a mess of your rotors, while the rubberized shims dampen the sound and vibrations during every stop, resulting in a low shriek brake you can comfortably use.

    Warranty. There is a 3-year 36,000-mile warranty on this product.

    Installation. This product is easy to install and should take about 1 hour.

    Application. This PowerStop Z23 Evolution Sport Brake Rotor, Pad and Caliper Kit; Front and Rear is designed to fit 2012-20 Challenger GT, R/T, Rallye Redline, SXT and T/A with Dual Piston Front Calipers.

    CA Residents: WARNING: Cancer and Reproductive Harm - www.P65Warnings.ca.gov

    Installation & What's in the Box

    Installation Info

    What's in the Box

    • (4) Evolution Drilled and Slotted Performance Rotors
    • (4) Red Powder Coated Brake Calipers
    • (1) Brake Pad Set
    • (1) Pin Bushing Kit
    • (1) Hi-Temp Lubricant
    • (1) Pad Shim Set
    • (1) Mounting Bracket Set
    • Mounting Hardware
    4.7

    Customer Reviews (500+)

      Questions & Answers

      10 More Questions