Talk to a Mustang Sales Tech
1-877-887-1105
M-F 8:30A-11P, Sat-Sun 8:30A-9P
$20K Sweeps! 10 Chances to Win! Enter Daily >

Roush Cat-Back Exhaust with Black Tips (15-17 Mustang GT Fastback)

Item 406653
Verify parts fit and get product recommendations.
Mustang Sales Techs: Connect Now M-F 8:30A-11P, Sat-Sun 8:30A-9P
$0.00
Our Price

$1,249.99 (kit)

FREE Shipping Market Price $1,437.99 You Save 13% ($188.00) Up to 10% off for Military & First Responders! See Details

Will this fit your Vehicle?

Select a different vehicle Help?
Update or Change Vehicle
Ship to: Ashburn - 20149
Sorry, please enter a valid US or CA postal code
We're sorry, zip can't be updated at this time.
Recommended Install Shops
How It Works
Install Shops are available near Ashburn - 20149

Add Local Shop Installation

Total cost of service $299.00
    Create a list
    Add to New List

    Saved - View your saved items

    We're sorry. We couldn't save this product at this time.

    or use

      Product Videos

      Hey guys, Adam here with americanmuscle.com. Today we're taking a closer look at, listening to, and installing the Roush Cat-Back Exhaust with Black Tips for the '15 to '17 Mustang GT Fastback. Now, if you're the owner of that S550, you're looking to ditch the factory cap back exhaust to pick up a lot more volume, a lot more aggression and of course better quality materials and construction. Now this particular Roush option, as you just heard from our sound clip is gonna get a really, really nice four out of five on our loudness meter. As a matter of fact, this is gonna be one of my personal favorites on the 50 of the S550 Gen. Personally, I think this sounds absolutely amazing. It is extremely deep, very throaty, and very track inspired, and that's obvious with the sound here. Now, at idle, you're getting a nice rumble, very aggressive, like I said, and it's not too overwhelming. Everyone knows that the aftermarket doesn't sound stock whatsoever, but it's not overbearing. Once you start getting on the throttle and low RPM range, you can expect a lot of rumbles, a little bit of backfire on decel or downshifting. And once you hit wide open throttle, this thing is all out mean. I will say when it hits wide open throttle at redline this thing is not going to distort. Sometimes you get an aftermarket Cat-Back that's four or five out of five and our loudness meter that just distorts, sounds absolutely insane at wide open throttle or just overbearing, blows your eardrums out and really can be pretty unattractive. This one here keeps the quality, has a really nice tone and stays really deep and aggressive through the entire RPM band. That's why it's one of my personal favorites. Now, aside from the way it sounds, let's talk about the build.Three-oh-four stainless steel from head to toe, no resonator, so it's got that resonator, delete X-pipe, and then once you get toward the tip bullet-style mufflers, again, all 304 stainless top quality materials, mandrel bends for a more streamlined airflow. And you've got three and a half inch black powder coated tips. I think they blend in really well with the real balance. It looks really stealthy and aggressive at the rear end and I know I'm saying aggressive a lot but personally, I think it's one of the keywords to describe Roush's Cat-Back. Now, the whole kit comes in right around the $1,200 dollar mark, putting it more toward the premium end of the spectrum. You get what you pay for, guys. Now, when it comes to a Cat-Back, you can find a really budget-friendly option in the $500, $600 region but you can expect lesser quality materials, sometimes aluminum steel, maybe 409 stainless, which is decent. But if you're looking for top quality stuff, 304 is the way to go. Roush is known for premium quality materials and welds and just the construction overall. That lasts a really long time and I personally found the install to be very, very simple. Sometimes you're fighting with clamps depending on what you get but with this price tag, you can expect very easy install with some really good hardware and components. Install by the way I'm giving two out of three wrenches on our difficulty meter, not because it's super hard but because it just takes a little bit more time than your simple [inaudible 00:03:48] air intake or regular bolt on. No drilling, no welding, no cutting, none of that nonsense, bolts right up to your factory manifolds or if you have an aftermarket long tube header or shorty header, just make sure the outlet on those headers fits the outlet on this pipe here, which is about two and three-quarters inch.With two out of three wrenches it will take you about two, maybe three hours from start to finish. Very straightforward, I'm gonna take you through every step of the install. Let's get to it. Tools used in this install include an impact gun, an extension, 13 and 15-millimeter deep sockets and a mallet. First up for the uninstall is to grab a 15-millimeter deep socket. We're gonna loosen up the knots on the band clamps connecting our factory resonator to our factory manifolds. And you don't have to completely remove the nuts, just get them nice and loose, perfect. Now, before we disconnect that, we're just gonna disconnect the hangers and brackets from our frame toward the rear end and this will all come off in one piece. Moving a little more toward the rear end here underneath of our subframe, I actually find it easier to just unbolt this whole bracket, both of these, rather than trying to get this out of the isolator.Personal preference but I think this is a little bit easier, it's just one 13-millimeter bolt on each side. I'm gonna use an extension and a 13 deep socket, go right above our rear sway bar and remove those bolts. Now, once you have those removed, you're just gonna lift up and pop it out and swing it down. There's a little nob on the top of the bracket that hooks in. We just need to lift up and disconnect them. All right guys, the next step here is to drop the entire factory Cat-Back down all in one piece. Now, I'm gonna disconnect it from our factory manifolds. My buddy Andrew is gonna help me out because it is all one piece, it is pretty heavy, it's a little awkward to do by yourself. If you're working on the ground, it might be a little easier for you, but in the air here I'm gonna disconnect these band clamps. We're gonna slide the hangers from right above tips right out of place and we'll drop it all down in one piece.You might need a mallet in order to bang these band clamps a little more forward, so use your own discretion. All right, I'm free. [inaudible 00:06:14] toward me, nice. We got our 2015 GT factory Cat-Back off of our car, it's on the ground here next to our Roush Cat-Back. Now, I want to walk you guys through some of the similarities but mainly the differences between the two kits as far as materials, set up, and the components included in the kit. I'm gonna start up here at the front of the vehicle. Your factory Cat-Back has that H-pipe sort of resonator here, that's pretty restrictive, it's gonna mellow down that tone. It's not going to be as aggressive and it's gonna rob you of some of the power you'd get from an aftermarket X-pipe. That's a huge upgrade here from the Cat-Back on our Roush side. Now, the Roush X-pipe is going to give you a better airflow, there's less kinks, it's got mandrel bends which means it's going to reduce some of that back pressure.And X-pipes, given that it has a welded center, giving it a cross-through section for the airflow, that's gonna increase some of that power and honestly, the X-pipe produces a little bit more of a raspy tone. The H-pipe, on the other hand, will give you something a lot deeper and throatier, the X-pipe being a little raspier and louder and volume while also giving you some more power. That is gonna lead us through to the next section, those mid-pipes, the integrated mid-pipes. All of this 304 stainless steel, highest quality materials on the market. That's exactly what we expect from Roush, one of those premium brand names in the category, all mandrel bend as well. Moving along, you'll see that the hangers are in the same location right under your subframe at the rear end. That's really good. We're gonna transfer over those brackets from this side to our new Roush option. Next up, the mufflers. Now, you can see a huge difference in size here, we're going from the factory traditional style mufflers to the bullet style, a lot smaller of a muffler. This is that race-inspired tone that we heard in the beginning of the video with those sound clips, that's all coming from this particular muffler. Now, that in combination with the resonator [inaudible 00:08:11] is giving you a lot more volume as well. So, take note of that when you're browsing through the category, some brands do include a resonator. Roush being that pretty much straight pipe design is just gonna give you a small bullet style with very little baffling inside those chambers. Moving on, you'll see we're upgrading to larger matte black finished 304 stainless steel tips. Now, they do retain that 304 quality, they had the added layer of corrosion and rust resistance with that black powder coated finish. It's got the Roush name very subtly embedded in the materials at the top of the tip, slash cut, of course, three and a half inches on each side. So, no quad tips here which means that it works perfectly with your factory valance. No need to pick up a new rear valance for your S550. Now, I'm really excited about that. I think it's gonna look super good on our Mustang. Now, all I wanna do is show you guys exactly how to install this step by step, we'll start at the X-pipe. Keep in mind these band clamps from the factory exhaust will get reused, we'll transfer those over to our factory manifolds first, then we'll tackle our brackets. Now, to transfer these over, they're very, very simple to take off, really just gonna rotate it straight back, pull them off and just swap them over. Now, when you're putting them back on, just make sure that the tab is facing the front of the vehicle. Perfect.Now, let's get to work on our X-pipe. Next step we're gonna take our band clamps off of our factory exhaust, we're gonna transfer them over. Now, if you take a look at your manifolds here, there's a little button welded on. That's gonna line up with this tab here. So, you just want to make sure you're lining that up, sliding it in place. The point is, this tab locks it in place on that button. So, we push down on that, do the same thing for the other one. Next up, we're gonna install our X-pipe. Now you wanna make sure you're putting your inlet side on the factory manifolds into those band clamps. All right, perfect. From here, grab your 15 socket and tighten it down. Next up, you're gonna grab your mid-pipe, it's gonna go under our rear suspension, make sure you have one of your clamps ready and over the side. We're gonna insert that onto the outlet side of our X-pipe.This is a good time to make sure that your X-pipe was put on correctly, make sure that this lines up with the holes on your subframe. If they don't, flip your X-pipe around and test the waters there. Ours looks pretty good, so I'm gonna grab my 15 socket, tighten down this clamp. Now, when it comes to tightening the clamps, I like to get them nice and snug, but still leave a little room for adjustment just to make sure we have everything aligned properly, and then come back to the clamps at the very end and tighten them down. All right, now repeat that same thing for the driver side. All right, at this point, what we're gonna do is rotate these brackets upward, reattach them to the hooks on the subframes. Now, you're gonna have to put a little pressure on, you might have to even adjust where those even sit. Let's lift them up, snap them in the place, grab the factory 13-millimeter bolts, put them in by hand at first and then when you tighten them down, you wanna make sure that these brackets are straight. So, you're gonna have to adjust, maybe pulling the pipe one way or the other. Grab your 13 socket and I'm gonna use an extension and tighten them back down. Next up, we're gonna start with our passenger side muffler. Now, in order to do this, you wanna slide the hanger and the isolator above with a tip would be first, then rotate upward and connect it to your pipe. So you have that inserted, line this up. Now, if you need to, you can grab a mallet and just tap on this to get it to sit all the way through. You wanna make sure that this crack, this seam, is completely covered, you want no gap here. All right, once that's closed, grab your clamp, rotate that upward, tighten that down. Repeat for the other side. All right, the last steps are our tips. Now, don't get discouraged if they don't seem lined up properly just yet, just get the tips lightly installed or loosely installed rather. And then we'll go back and make any adjustments, which is why we left our clamps loose in the first place. Repeat for the other side. Go back and make any adjustments you need to and it'll be good to go. Well, guys, that's gonna wrap up my review, sound clip, and install walkthrough for the Roush Cat-Back with Black Tips for the '15 to '17 Mustang GT Fastback. Quick disclaimer guys, if you're a convertible owner, this one might not be for you, but there are tons of options in the category to fit the convertibles. So, just keep an eye out, scroll through the category, look for one that fits your particular ride. For fastback owners, if you're looking to pick up something very aggressive, very deep and throaty, in my opinion what a muscle car should sound like, this is a great staple in the Cat-Back category you can pick up your Roush Cat-Back right here at americanmuscle.com.

      Product Information

      Features, Description, Reviews, Q&A, Specs & Installation

      Features & Specs

      • Aggressive Exhaust Tones
      • Improves Airflow and Reduces Back Pressure
      • High-Flow Mufflers
      • Made From 304 Stainless Steel Materials
      • Mandrel-Bent Tubing
      • Exclusive Black Tips
      • Uses Factory Mounting Points
      • Straightforward Installation
      • Covered With 3-Year or 36,000-Mile Warranty
      • Proudly Made in the USA
      • Fits All 2015-2017 Ford Mustang GT Fastback Models

      Description

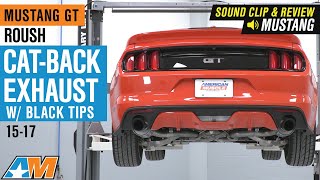
      Aggressive, Race-Inspired Tones. If you want exhaust tones that resemble the rumbles and roars of those cars competing on the tracks, this Roush Cat-Back Exhaust with Black Tips is for you. The assembly is designed for aggressive, race-inspired exhaust tones and sound in your Mustang. Get a healthy rumble at idle and a powerful roar when you step on the gas, all while enjoying a drone-free cabin experience.

      Performance Sound and Great Looks. This system will definitely give your Ford Mustang a boost in sound and performance. Featuring mandrel-bent tubing, high-flow mufflers, and chrome-flashed tips, this exhaust assembly will improve the sound, performance, and flow characteristics of your Mustang’s powerhouse. The reduced back pressure ensures that you get increased horsepower and boosted performance anytime, anywhere.

      Premium Quality. All the components in this cat-back exhaust assembly are manufactured using high-grade 304 stainless steel material. As such, these exhaust components are guaranteed to be corrosion-resistant and can withstand the abuses of daily driving. The pipes are also mandrel-bent to allow for high airflow and better performance.

      Straightforward Installation. This exhaust assembly comes with all the hardware and an instruction manual to help you with installation. The process does not require any modifications but you need to unclamp your factory exhaust before mounting the new set. The included clamps and hangers make it easy to secure the components without welding or drilling.

      Limited 3-Year or 36,000-Mile Warranty. This cat-back exhaust is guaranteed to be of the best quality and includes a 3-year or 36,000-mile warranty, whichever comes first. The warranty is limited to the coverage of defects in materials and workmanship. Proof of purchase required to be eligible for warranty coverage.

      Application. This Roush Cat-Back Exhaust with Black Tips is specifically designed to fit all 2015-2017 Ford Mustang GT Fastback models. Check with your local noise ordinance levels prior to purchase.

      Fitment:

      Details

      Roush 422092-BLK

      CA Residents: WARNING: Cancer and Reproductive Harm - www.P65Warnings.ca.gov

      Installation & What's in the Box

      Installation Info

      What's in the Box

      • (1) X-Pipe Assembly
      • (2) Intermediate Pipe Assembly (Left and Right)
      • (2) Mufflers (Left and Right)
      • (2) Round Tips
      • (2) 2.50-Inch Tip-to-Muffler Clamps
      • (4) Heat Shield Clamps
      • Installation Manual
      4.8

      Customer Reviews (49)

        Questions & Answers

        10 More Questions

        Will It Fit My Mustang

            Related Mustang Categories