Talk to a Mustang Sales Tech
1-877-887-1105
M-F 8:30A-11P, Sat-Sun 8:30A-9P
$20K Sweeps! 10 Chances to Win! Enter Daily >

C&L Sport Axle-Back Exhaust with Black Tips (05-10 Mustang GT, GT500)

Item 412340
Verify parts fit and get product recommendations.
Mustang Sales Techs: Connect Now M-F 8:30A-11P, Sat-Sun 8:30A-9P
$282.99
Our Price

$314.99 (kit)

FREE Shipping Market Price $370.99 You Save 15% ($56.00) Up to 10% off for Military & First Responders! See Details

Will this fit your Vehicle?

Select a different vehicle Help?
Update or Change Vehicle
Ship to: Ashburn - 20149
Sorry, please enter a valid US or CA postal code
We're sorry, zip can't be updated at this time.
Recommended Install Shops
How It Works
Install Shops are available near Ashburn - 20149

Add Local Shop Installation

Total cost of service $229.00
    Create a list
    Add to New List

    Saved - View your saved items

    We're sorry. We couldn't save this product at this time.

    or use

      Product Videos

      Justin: The C&L Sport Axle-Back that we have here today in black will be an affordable and very unique way to crank the volume on your 2005 to 2010 GT or GT 500 at home, thanks to that all-black finish. Now, the C&L will pack a full stainless steel build here guys along with that black powder coat. And of course, your large 4-inch tip all for right around that low to mid-$300 price point. Install with the S197 is gonna be a 100% bolt-on job. But since all of your work is done underneath the car, so it's automatically gonna nudge this one up to a soft 2 outta 3 wrenches on the difficulty meter. Call it a couple of hours or so to complete from start to finish. But hang with me for a little bit guys and we'll walk you through this job later in the video.What do you say we get right into the sound you can expect with the C&L sport system. And guys, listen, this thing is going to absolutely peg the old bang for your buck meter when we're talking sound. Now, you can expect strong, aggressive tone from the small perforated two mufflers and one that I feel confident in giving a strong 3 out of 5 on my 1 to 5 or 1 to wake the neighbor scale, which by the way, is still very stout for an Axle-Back by itself.I'm also happy to report that we didn't pick up any drone while cruising inside the car with the rest of the factory exhaust in place. Now, I say that because some of our customers have mentioned that with aftermarket headers, aftermarket mid-pipe, some more free flowing exhaust setup, they have mentioned picking up a little bit of noise here with the C&L Axle-Back. But just keep in mind that if you have a factory exhaust system, factory headers, factory mid-pipe with the C&L Sport in place should be a relatively quiet in-car experience. Now, all of that sound you guys heard with are sound clips at the top of the video comes directly from these small straight-through design mufflers that to me, kind of resemble almost a mini ROUSH muffler for the 3-valve GT or for the GT500. These mufflers, again, do utilize what is called a straight-through perforated tube design, which passes through the muffler's packing and kind of shapes the sound in the process.Now, because of this design and because of that packing, you're picking up more of a deeper tone, which I really like here. Not really a huge fan personally of the higher pitch raspy stuff, but the deeper tone is certainly in place here with this system and that's a big thumbs up for me. Now, because you are receiving that straight-through design, you're also going to be increasing your exhaust flow along with your volume of course. And that is especially true in comparing it to your restrictive factory mufflers.But getting away from those mufflers a little bit, you can also expect things like the 2.5-inch mandrel bent tubing, small amount of it, but it is there, and everything is going to exit out of the twin 4-inch tips/cut dual wall tips, really nice stuff. There's even some black clamps installed with this kit as well keeping everything consistent. Again, I do wanna point out here guys, you're getting a full stainless steel system for that mid-$300 price point. That's awesome. Really hard to match the materials in this system at that price point. Speaking of stainless steel tips, in particular are 304 grade, that's the cream of the crop when we're talking about materials for exhaust. The rest of the system is gonna pack that 409 grade stainless. So, stainless steel throughout here, differing materials a little bit, but basically that stainless is going to give you years and years of trouble-free operation without worrying about rust or corrosion. Now, helping that even further will be the fact that this entire system, including those clamps we just mentioned, have been finished in that black powder coat. So, that's gonna offer another layer of protection for that stainless and one that's gonna deliver a very cool stealthy look at the same time.Well, let's shift gears guys and talk about that install a little bit more. Again, bolt-on job, no cutting needed for the C&L. Therefore, the site still is gonna stick with a soft 2 outta 3-wrench rating here, about 2 hours or so to knock this one out from start to finish. But now, why don't you head out to the garage, grab your toolbox, and check out our detailed walkthrough and tool breakdown.Man 1: Hi everyone. Today, we're installing an Axle-Back exhaust on our Mustang, but before we do that, let's watch a quick video on how to uninstall the stock system first, and we'll see you right back here.Man 2: Step number one guys, I'm gonna show you how to do this on our passenger side and you'll just repeat it on the driver. It's an exact mirror image. So, first thing you wanna do is grab a 15-millimeter deep socket. We're gonna loosen up the clamp holding the factory muffler to the rest of the exhaust, and then we're gonna remove all the hanger brackets. Now, I recommend removing the brackets from the frame instead of the hangers from the isolators and brackets. You can try to squeeze those hangers out, but it's just much easier to just disconnect the entire bracket assembly from the frame, and I'll show you guys that in just a second. First off, let's get that clamp loose. Next step, directly above the tip, you'll see this hanger going into the isolator bracket. Instead of trying to slide that out, I'm gonna remove this bolt, it's a 13-millimeter, and the one up above it.For the first one, I'm gonna use a deep socket and an impact gun along with an extension. Now, because the top one's at a weird angle, let's switch over to a ratchet. Directly above that, you see that other 13-millimeter, I'm using a .25-inch ratchet along with a 13 deep socket. Now, when I go to loosen this up, my hand's gonna pretty much block it there, but you guys just wanna take note that it's directly above the bolt that we just removed. Again, it's a really tight squeeze and it's hard to see, but you're gonna get that guy off. Once you loosen it up, you can usually get it off by hand. All right. Just like that, there it is.Next up, we're on the opposite side of the muffler. So, on the outside of our passenger side, if you look straight up onto the frame directly above the muffler, you'll see another 13 on the frame right here next to the isolator and hanger. Now, again, not gonna slide the hanger outta the isolator, just gonna remove the bolt from the frame. Then there's one more underneath of it, which is actually on top of the muffler that's hard to get to. And we just wanna do this one first. And again, it's gonna be hard to see with my hand up there getting it off, but you can just fit your hand and arm up through the muffler and ratchet that guy off. All right, just like that.Next step is pretty difficult, but because our clamp is loose, we need to slide the pipe out of the rest of the exhaust over the axle there. So, what we're gonna do now is just grab the muffler and wiggle that guy down, try to disconnect it because we have to shuffle the whole muffler assembly forward in order to be able to get to the last bolt. There we go. Next step, you can see that 13-millimeter that was directly above the muffler. I'm gonna switch over to a 13 swivel socket just to make life a little easier. Keep in mind, guys, that once this comes down, the entire muffler assembly's coming down with it all in one piece. So, make sure you have it supported. All right. Once you have that bolt free, bring the muffler down and set it aside.Man 1: All right. Now that we've got our old system out, we need to transfer our two hangers for each muffler to our new system. So, we're just gonna slide these off and slide 'em on to the new system. Now, your system may be a little tight, so you may need an exhaust hanger removal tool to help pull these off here. To do that, you would just clamp it on like so and pull it off. Now, you may need to use some spray lubricant in order to help slide that off, and then we'll just put it on to the new one, and then we can bolt it back up using the original hardware.Now, the system does come with new clamps to be able to attach your muffler to the existing exhaust system and also for the exhaust tip. So, right now you're gonna want to use the 2.5-inch or the smaller of the 2 clamps, slide it over top of the muffler, and then go ahead and install it. And then you can secure it using the original hardware to the frame. All right. It's a little tough to get the camera up in here so you can see what I'm doing, but you already know all four of the bolts for each, the two hangers. You just put 'em all back in and tighten them down with your 13-millimeter socket. Now, we go ahead and double-check our alignment on the muffler itself and tighten the clamp down with our 15-millimeter socket.Now, we can go ahead and slide our 3-inch clamp onto our exhaust tip and install it on the back of the muffler. All right. Once you've got it installed, before you tighten down the clamp, go ahead and make sure that you've got your alignment correct where you want it, and then tighten it down with your 15-millimeter socket. And now you can repeat that whole process for the other side.And that wraps up our review and install of the C&L Sport Axel-Back Exhaust with Black Tips for the 2005 to 2010 Mustang GT and GT500. Thanks for watching. And remember, for all things Mustang, keep it right here at americanmuscle.com.

      Product Information

      Features, Description, Reviews, Q&A, Specs & Installation

      Features & Specs

      • Aggressive Performance Sound
      • Improves Exhaust Flow for Better Performance
      • Round, Straight-through Perforated Mufflers
      • Mandrel-Bent 2.5-inch Diameter 409 Stainless Steel Tubing
      • Black Coated, 4-inch 304 Stainless Steel Exhaust Tips
      • Simple Bolt-on Installation
      • Fits 2005-2010 Ford Mustang GT and GT500 Models

      Description

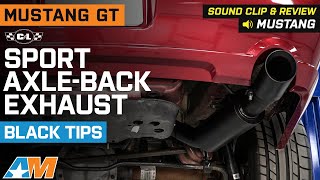
      Aggressive Performance Sound. Add an exciting exhaust note to the sound of your GT or GT500 Mustang's exhaust with a C&L Axle-Back Exhaust System. This C&L Axle-Back Exhaust features a pair of round, straight-through perforated mufflers that will produce an aggressive performance sound under acceleration, but a mellow tone at idle. Besides an increase in sound, this Axle-Back, with its mandrel bent piping, will also improve your Mustang's exhaust flow for an increase in overall power and performance.

      Quality Construction. C&L proudly manufactures their Axle-Back Exhaust systems from mandrel-bent, 2.5-inch diameter, premium grade, 409 stainless steel tubing for excellent exhaust flow and enduring corrosion resistance. This system features a pair of round, high-flow, straight-through perforated mufflers that end with a set of 4-inch, black coated, 304 stainless steel exhaust tips.

      Direct Bolt-On Installation. C&L engineered their Axle-Back Exhaust to be a direct upgrade replacement for your Mustang's factory rear axle-back exhaust. This Axle-Back Exhaust Kit easily bolts up in the stock location with no cutting, drilling or modifications required for a straight forward install that can be completed in about 2 hours.

      Application. This C&L Sport Axle-Back Exhaust with Black Tips is designed to fit 2005-2010 Ford Mustang GT and 2007-2010 Shelby GT500 models.

      Fitment:

      Details

      C&L 412340

      CA Residents: WARNING: Cancer and Reproductive Harm - www.P65Warnings.ca.gov

      Installation & What's in the Box

      Installation Info

      What's in the Box

      • Driver Side Muffler Assembly
      • Passenger Side Muffler Assembly
      • (2) Exhaust Tips
      • (2) Exhaust Clamps
      4.8

      Customer Reviews (122)

        Questions & Answers

        10 More Questions

        Will It Fit My Mustang

        • Bullitt - 08, 09
        • GT - 05, 06, 07, 08, 09, 10
        • GT500 - 07, 08, 09, 10