Talk to a Challenger Sales Tech
1-877-887-1105
M-F 8:30A-11P, Sat-Sun 8:30A-9P
$20K Sweeps! 10 Chances to Win! Enter Daily >

Eibach Pro-Alignment Camber Arm Kit (09-23 Challenger)

Item CH1130
Verify parts fit and get product recommendations.
Challenger Sales Techs: Connect Now M-F 8:30A-11P, Sat-Sun 8:30A-9P
$0.00
Our Price

$474.00 (pair)

FREE Shipping Market Price $554.99 You Save 15% ($80.99) Up to 10% off for Military & First Responders! See Details

Will this fit your Vehicle?

Select a different vehicle Help?
Update or Change Vehicle
Ship to: Ashburn - 20149
Sorry, please enter a valid US or CA postal code
We're sorry, zip can't be updated at this time.
    Create a list
    Add to New List

    Saved - View your saved items

    We're sorry. We couldn't save this product at this time.

    or use

      Video Review & Installation

      Adam: Hey guys, Adam here with americanmuscle.com. And today, we're taking a closer look at and installing the Eibach Pro-Alignment Camber Arm Kit available for the 09 and newer Challenger. You should be checking these out if you recently lowered, or are looking to lower in the future, your Challenger in order to get the alignment back into factory spec. These pro alignment camber arm kits from Eibach are fully adjustable to allow you to get up to plus/minus 2 degrees of caster or plus/minus 1.5 degrees of camber adjustment. Now, of course anytime you lower the center of gravity on your Challenger, whether it be lowering springs or a full coilover kit here, you are risking putting your vehicle out of alignment. That means you can have a camber or caster out. And having the ability to adjust your caster/camber position will allow you to reduce premature uneven tire wear and of course get better traction on the road or the track and of course finally get a better suspension feel correcting all of the out-of-alignment specs.Now, this particular option from Eibach here is the Pro-Alignment camber arm kit made from a hybrid of tubular and forged steel, super rigid, very durable. It allows for better flexibility and articulation in the suspension components over your factory option. And I will say, it is worth noting, it is slightly heavier than the factory control arm.Now, it comes with upgraded bushings, along with an upgraded ball joint here, to make sure all the adjustment is capable, whether it be in your driveway at home with the proper tools or if you take it to an alignment shop. And I will say here, guys, it's definitely recommended to take it to a pro alignment shop to get it done professionally, but if you do have the proper tools in your driveway, you can dial it in yourself with some patience.Now, when we're talking about caster and camber position, if you're not familiar with the terms, caster position is basically your pinion angle going forward or backward for the suspension, which of course you wanna be dialed into the factory spec in order to get the factory-like ride quality, which you can do so here, plus or minus two degrees, like I said earlier.And when it comes to the camber position, that's the in or out of your tire and wheel position. Now, of course we're talking about toe-out or negative camber, it basically means you're gonna have uneven tire wear. Your tires are riding on a small thin patch of the inner tire there which of course is just gonna wear it down a whole lot quicker, which is not what you want, and of course it sacrifices wide quality and traction. Now, with these, you have full adjustability, and I'm gonna show you guys how to install them in just a little bit.Note that the kit does come as a pair, it comes in right around 400 bucks. Now, of course you just wanna get this dialed back into factory spec, or if you're looking for a stance look, you can accomplish that with these control arms but of course it's not necessarily the intended purpose. For this purpose, we're just gonna get it back to factory spec.With that said, the install does get two out of three wrenches on our difficulty meter here. You can tackle it in the driveway at home with very simple hand tools, but again, you do wanna keep in mind you still need an alignment done properly after the installation is complete. The install itself is fairly straightforward, you're essentially just gonna remove the upper-control-arm bolt, then of course we're gonna remove the two connecting it to your wheel well. Now, when it comes to the install here, I am gonna show you guys a process that includes removing the entire strut assembly. That is not required for the install but I'm gonna be showing you that route just to give you guys a better look at exactly what you're dealing with. The strut can be a little bit in the way when it comes to getting those two bolts out and it definitely can make it difficult to see. So, for the purposes of the video, I'm taking the strut out, but just know you can do it without doing so. With all that said, it'll take you about an hour from start to finish. Maybe 2 hours, depending on your personal experience and if you have the right hand tools on deck. What do you say we get to it?All right. Tools used in this install include an air impact gun, cordless impact, ratchet, and extension. 10, 18, 21, and 27-millimeter sockets, along with a universal swivel socket. An 18-millimeter ratcheting wrench is recommended, a pry bar, and of course a torque wrench.All right, kicking off the uninstall here, I wanna show you guys what we're working with. Now, basically all you're gonna have to do is disconnect the ball joint from the upper control arm to the suspension assembly here. This is gonna be an 18-millimeter nut. Once we have that taken care of, this will drop forward and we can remove the two bolts holding on to the control arm to the body of the vehicle. Now, it's a little tough to see, but in the corners here, there are two nuts on the inside, behind your springs. Now, those have a little tab on it so we don't have to worry about getting a wrench on there. But what we are gonna have to do is lower the vehicle back down and to take the bolts out. The bolt heads are actually under the hood, inside the wheel well there, on both sides of the inner fender. At this point, what we're basically gonna do is use our 18-socket and our swivel and we're gonna get that nut off the upper control arm.All right, so I'm gonna put my hand here and put pressure down. What we're basically gonna do is take that nut off. Now, here's what's worth noting. Usually, if you haven't touched your suspension in a while, the upper control arm and the ball joint there will be stuck together. They're tapered fit, so it usually has to be hammered out. Now, as you can see, ours cracked loose, but if yours didn't, I'm gonna show you what you wanna do. So, if yours does crack open, you just wanna catch this and guide it down.Now, if yours does not pop off and it's still stuck together, what you can do is, with this installed, stuck together like that, thread on the nut a couple of threads, grab a hammer, and start tapping directly on the front there. Now, you don't wanna hit the bushing, that can damage it. I know of course we're replacing it but it's a good idea just to keep that intact. Now, if you're tapping on that, it should disconnect. Pull straight down, take the nut off, and guide it off. It's pretty simple. At this point, you can, if you have like a bungee cord or something, you can wrap it around here and hook it onto the spring to take some of the tension off your brake lines if it's putting too much tension on it. Now, what I like to do is just take the factory nut and just thread it back on here just so we don't lose it. At this point, let's lower the Challenger back down and start working under the hood.All right. Now that we're under the hood, I wanna show you guys where the front bolts are here. Now the front is right here on the inner-wheel well but in between that and your coolant reservoir. Now, this is kind of in the way. Now, you can get a regular wrench in there and unbolt it but it can be a little bit tough, especially when you go to start reinstalling. But I think it's gonna be a little easier. Let's grab a 10-millimeter socket and we're gonna unbolt the brackets here. That way we can just lift this up...and we don't even really have to disconnect any lines, we're just gonna lift it up and set it off to the side just a little bit to access those. So I'm gonna use my 10 socket here and get these two bolts off.That allows us just to pick this guy up, and you can access that knot a little bit easier. I'm basically just using my impact gun here to prop that up. Now, you can clearly see this but we have tons of access to it. So I'm using an 18-millimeter ratcheting wrench to get this guy off. All right. With that off, I'm gonna put my hand in the wheel well, I'm pushing that stud through, I'm just catching it when it comes out.So, in order to get the nut on the inside the back all the way out, we're actually hitting the back of the spring. So what I think might be a good idea is to take the bottom bolt off of the strut connecting it to the lower control arm there. That's gonna help us bring the strut forward just enough to give us clearance for that nut. So, for this, I'm gonna grab my 18 socket and just remove that bottom bolt. All right. That way we can bring that forward, get enough clearance for the nut, and pull it straight back. So what was happening was, as we were loosening the nut, it was coming out this way and bottoming out here up against the back of the spring. Bringing that strut forward gave us the clearance to push it all the way out. That's gonna make life a little bit easier when we start to install this well. What we're gonna do now is head back up under the hood and tackle the other bolt on the inside there, which is extremely difficult to see but it's easily accessible of course.Now, the other bolt is under the cowl here, straight down. If you just reach your hand back down here, you can feel it. Now, of course you can't see it because it's tucked away. I would recommend a ratcheting wrench here, this might make life a little easier. It is at a pretty harsh angle and there's not a whole lot of room to move back and forth here, so it might take a little while to get the bolt off, or the nut off rather, but it definitely is doable.All right. So, once you get it loose enough to get it off by hand, you wanna stick your hand in there before it falls off, twist it off just about there. We're gonna pull that nut back up and of course go onto the wheel well to pull the bolt out.All right, so now we're in the wheel well. This is loose, and as you can see, the upper control arm here is pretty limp. We can move it up and down. So, what we're basically gonna do is reach in and pull that nut straight out. Once you have that nut out, pull the control arm straight back. Now that we have it pulled out, we can set it aside.All right. So, at this point, I wanna show you guys how to assemble this before we start installing the vehicle. So, the first thing you wanna do is determine the left and right control arm itself. Now, they're labeled L and R but they are interchangeable. So, if you flip it over, it's the right side. Flip it over here, it's the left side. We're focusing on the driver's side, so it's gonna be the left, so we're gonna put it this way.Now, when it comes to the ball-joint assembly here, the adjustable part of it, I'm gonna take this nut off the top, and then, you have a couple of washers. Now, when I take the nut off, I'm gonna pull the washer off, we're gonna focus on this guy here. Now, as you can see, the hex shape in here is offset, so that's gonna help us adjust. Now, when it comes to this plate here, you wanna make sure that the rounded part is at the top or facing the inside of the vehicle. The first thing I'm gonna do is just drop it on. You'll see that it drops right on to the hex shape and you can adjust its position by just rotating the ball joint. And you'll see that the exposed part of the plate here keeps becoming offset in a different location. So, the first thing I'm gonna do is start right in the middle. And I'll know it's the middle because it's centered right around the plate we just dropped on. The plates hanging off the bottom here and the exposed part is equally on the top and the two sides. This is the 0 position, as far as degrees, so 0 degrees of adjustment right now. If we were to move this and adjust it to the left, we're starting to get positive adjustment. Now, we're gonna move it the opposite way, we're moving negative. So, as the ball here or the edge of the plate is exposed to one side or the other, you start getting the positive or negative change. What I'm gonna do for the purposes of the video is drop it right in the middle to get 0 degrees.Once you have that dialed in, you're gonna lift this guy up, you're gonna slide it underneath. And when you slide it underneath, of course, this is slotted. So here we have adjustment as well. I'm gonna put it right in the middle, drop our spacer on, and follow it up with the nut. At this point, guys, you just wanna determine what position you're looking to have, you want a little bit more toe-in or are you looking to get factory spec? It really depends on your specific circumstances. And of course this is where you wanna consult with your alignment shop if that's what you're working on as well. In my opinion, it's worth getting it to the closest 0 position, or neutral position, just to make sure that you have a drivable vehicle in order to get it to a shop. That's most important. You wanna make sure it's safe just to get it on the road and get it done properly. Of course I'm gonna tighten this all the way down, as far as I can by hand, just to make sure that it's not gonna be shuffling around. All right. So, tough to adjust there. It's pretty close to 0. And maybe adjust it back the other way just a tad, just to get it right in the middle. Perfect. Now, of course you can repeat this for the other control arm, and then, we're gonna get to the install. Once this is bolted down the suspension assembly with the nut underneath, this castle nut, we'll torque the top down here to 120 foot-pounds.All right. Just pretty quickly, I wanna take a closer look at these guys side by side. So, in my right hand here, we have the factory upper control arm, which is non-adjustable, we of course have the Eibach one in my left hand. Now, you can clearly see differences when it comes to the mounting point for your spindle, that adjustment position on your new ball joint. That obviously is not present on the factory control arm here, which you can see is just a fixed ball joint, which is not adjustable. So, that of course is the biggest difference between the two. Your factory one, here in my right hand, is a stamped steel. Your new one is a mix of tubular and forged steel, which of course is gonna be a lot stronger than your factory one. Now, it's worth noting here that this new control arm is maybe slightly heavier than your factory one. That's of course due to the new materials here of course and your ball joint here being adjustable, that's a different bracket mounting system. So, just a little bit heavier shouldn't make too much of a difference, if any at all.When it comes to the bushings here, we have new polyurethane bushings versus your factory rubber bushings. These should last you a little bit longer than your factory ones. And of course we wanna avoid torquing down your bolts until the full weight of the vehicle is down because, if you torque them down without the weight of the vehicle, then you're putting pressure here, and then, it's just gonna of course rotate as you put the weight of the vehicle on it, which can cause premature bushing wear. So that's just something to note as well. But otherwise, you're still gonna have OEM fitment of course but you wanna make sure that you're torquing down that bolt, which you didn't have to do to your factory one. So, the first thing we're gonna do is slip this guy in and we're gonna reuse those factory bolt plates.All right. Now, for the install, we're gonna reuse those factory bolts, like I said. So, slide this guy in position. Of course, again, you wanna make sure you're grabbing the correct side when you're doing this. All right. So I'm gonna let this hang down just like that. I'm gonna try going in from the left to put the bolt in through the right. Of course you wanna make sure those bolt holes are lined up. Yeah. Once you have that in, slide it all the way through making sure the pin is on the front. Just like that. All right, so now we're gonna do the same thing on the other side.All right. Now, it is a little difficult to get the left bolt in. So what I'm gonna do is I'm just gonna take the end link off here, just like we took the lower strut bolt out. I'm gonna take this off, that way we can pull the strut forward a little bit more. We're having some clearance issues again back there. Grab a 21 socket and get that off. With that like that, we can pull the strut all the way off that way and get our hand back there.So, now what we can do is pull that strut forward and we'll be able to clear that bolt, which just clicked into place, like that. Perfect. Now what I'm gonna do is I'm gonna put the strut back together and then we're gonna tighten down those bolts.All right. At this point, I'm gonna swing the strut back into position here. First thing I'm gonna do is that end link. Put that nut back on, take your factory bottom bolt, and put that through. Perfect. Now, for the end link, grab your 21 socket again and tighten that down. All right. So, for this bottom guy, I'm switching over to my 18.All right. So I moved the reservoir out of the way again, we're gonna focus on this bolt. As you can see, the stud's coming through. First thing you wanna do is make sure, when you're putting the nut on, it doesn't push the bolt back through. So just be gentle putting this guy on, or put your hand in the wheel well to push the nut up against it. All right. Threading that on here. I'm gonna grab my 18 ratchet wrench, tighten this guy down. Keep in mind, guys, you don't wanna torque it down too much just yet, we're gonna get it hand-tight. And then, once the weight of the vehicle is back down, you can grab your torque wrench and torque it down to the proper spec. All right. We can drop the coolant back down and do the same thing for the other side. And then, we'll bolt this back up.All right. Now for the one on the other side, guys, just be careful not to drop the nut all the way down. You just wanna make sure you're threading it on carefully, and then, going back with your ratchet wrench or whatever you're using to tighten it down.All right. At this point, we're gonna focus on connecting that to our spindle. Now, the first thing you wanna do is pull out the cotter pin. We're gonna set that aside for a second. Thread off the castle nut. And you should still have some flexibility because we only hand tightened those nuts at the back end. But if it's too tight to move, you might wanna crack them loose a bit. At this point, what we're gonna do...slide the ball joint into the spindle, push that all the way down, take the castle nut, thread it on the bottom here. All right. Now you can grab your socket and tighten this guy down. And then, we'll put the cotter pin back through.Now, once you have it tightened down, grab the cotter pin. You're gonna put that right through. Now, typically the cotter pin would go in between the little castle nut openings. It looks like...once you tighten this down, it's a little bit below but still worth putting that guy back in.At this point, we have to torque down the top adjustment nut. Now, Eibach lets us know it's 120 foot-pounds, that's the torque spec. I've got my snap-on torque wrench here, and what I'm basically gonna do is torque it down. Now, this is a 27-millimeter nut, so I have a 27 socket on there to get the job done. All right. Once, you hear that snap, that's torqued down.All right. At this point guys, I'd recommend throwing your wheel back on, put the weight of the vehicle back down on the ground, head under the hood, look up the torque specs for your specific model, and torque down the bolts that were holding the control arm to the body of the vehicle itself under the hood. And with that said guys, you can repeat this on the other side and you're good to go.With all that said guys, that's gonna wrap up my review and install for the Eibach Pro-Alignment Camber Arm Kit available for the 09 and newer Challenger. And of course you can pick yours up right here at americanmuscle.com.

      Product Information

      Features, Description, Reviews, Q&A, Specs & Installation
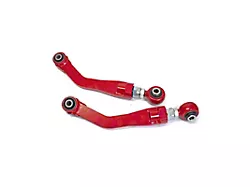
      Features & Specs

      • Pro-Alignment Camber Arm Kit
      • Adjusts Your Camber Back to Factory Specs
      • Prevents Pre-Mature and Uneven Tire Wear
      • Allows for Articulation and Flexibility Over OE Control Arms
      • Features Dual-Threaded Adjuster
      • Hybrid Tubular and Forged Steel Construction
      • Suitable for Street and Track Applications
      • Adjustment Range: -2.00° to +2.00° Degrees Camber
      • Adjustment Range: -1.50° to +1.50° Degrees Caster
      • Sold in Pairs
      • Backed by a 1-Year Warranty
      • Compatible with All 2009-2023 Dodge Challenger Models

      Description

      Allows for Precision Alignment. If you own a lowered Dodge Challenger, it is necessary that you check your vehicle for proper alignment as it can affect the performance of your ride. The Eibach Pro-Alignment Camber Arm Kit is designed to make sure that your wheel camber is in proper position after you have installed a coil over or spring kit on your Dodge. This camber kit does not only adjust your camber back to factory specifications, it also allows you to tune the adjustment to a “dial-in” alignment. This dial-in alignment lets you use the negative camber of your lowered vehicle to maximize your chassis’ potential.

      Durable Built. This Pro-Alignment Camber Arm Kit is skillfully crafted from a top-quality combination of tubular and forged steel to ensure material rigidity and toughness that will last for years. It features a double-threaded adjuster to allow to make caster and pinion angle adjustments without a hitch. Even better, this camber arm is a lot stronger when compared to OE control arms and allows for better articulation flexibility.

      Easy Installation. This camber arm kit is designed for a straightforward bolt-on installation. Once it’s installed on your Dodge Challenger, have a professional alignment or chassis tuner adjust your wheels back to its factory configuration. A performance alignment is also recommended if you want to maximize your ride’s track capability. 

      Limited Warranty Covered. Eibach gives a limited 1-year warranty for this Pro-Alignment Camber Arm Kit. While under warranty, this item is protected against all factory defects in both material and workmanship. Terms and conditions apply. Read the full warranty disclosure from the manufacturer’s website.

      Application. The Eibach Pro-Alignment Camber Arm Kit is compatible for use with all 2009-2023 Dodge Challenger models.

      Fitment:

      Eibach 5.66045K

      CA Residents: WARNING: Cancer and Reproductive Harm - www.P65Warnings.ca.gov

      Installation & What's in the Box

      Installation Info

      What's in the Box

      • (2) Camber/Caster Control Arms
      4.9

      Customer Reviews (10)

        Brand Image

        Reviews of Eibach Suspension products have an average rating of 4.8 out of 5

          Questions & Answers

          10 More Questions