Talk to a Challenger Sales Tech
1-877-887-1105
M-F 8:30A-11P, Sat-Sun 8:30A-9P
$20K Sweeps! 10 Chances to Win! Enter Daily >

Eibach Pro-Kit Performance Lowering Springs (15-23 Challenger Scat Pack, SRT 392, SRT Hellcat, SRT Jailbreak)

Item CH1136
Verify parts fit and get product recommendations.
Challenger Sales Techs: Connect Now M-F 8:30A-11P, Sat-Sun 8:30A-9P
$0.00
Our Price

$350.00 (set)

FREE Shipping Market Price $409.99 You Save 15% ($59.99) Up to 10% off for Military & First Responders! See Details

Will this fit your Vehicle?

Select a different vehicle Help?
Update or Change Vehicle
Ship to: Ashburn - 20149
Sorry, please enter a valid US or CA postal code
We're sorry, zip can't be updated at this time.
    Create a list
    Add to New List

    Saved - View your saved items

    We're sorry. We couldn't save this product at this time.

    or use

      Video Review & Installation

      Hey, guys. Adam here with americanmuscle.com. And today, we're taking a closer look at and, of course, installing the Eibach Pro-Kit Lowering Springs available for the 2015 newer Scat Pack and Hellcat Challengers. We have a 2016 392 Scat Pack in the shop ready for some Eibach Springs. And as you can see, it looks really, really good. We're eliminating a lot of that factory wheel gap. And I gotta say, the Challenger comes with a little more wheel gap than I'd like off the factory line. I personally think this is how the Challenger should come from the factory. But either way, it looks really good. You're getting that aggressive, lowered muscle car stance. But aside from just the good looks, you're also getting a lot of performance benefits as well with some springs. Now, speaking of lowering the vehicle, 1.1 inches in the front, 1.2 inches in the rear is what you can expect, effectively leveling out that vehicle. Those come with a little bit of factory rake off the line here. Your front end is a little bit lower than the rear, so bringing down the front a little bit less than the rear levels things out and give it a nice, even, aggressive stance.In addition to the aggressive stance, you're also getting a number of performance benefits as well, thanks to the lowered center of gravity on your Scat Pack or your Hellcat. This is gonna translate to less body roll on aggressive cornering, reduce the squatting on hard accelerations or launches, less nose dive under hard braking or stopping and an overall stiffer and sportier suspension in handling feel. Now because these have a progressive spring rate, you can expect a comfortable drive under normal driving conditions. But it will get progressively sportier under heavier load, hard launches, aggressive cornering, all the things I just mentioned. So progressive spring rates change depending on the driving condition as opposed to linear, which stays a little bit more predictable, like your factory springs. Now, we'll talk a little bit more about that later on when we compare the Eibach to the factory options. Now, if you're looking to get this particular drop for your Hellcat or your Scat Pack, you can do so right under the $300 mark, around 290, 291 bucks on the site. Now, Eibach does have a more aggressive drop with a sportline kit, and there is a number of different options on the site, this one being a little bit more mild of a lowering spring as far as the drop is concerned.The quality of the spring doesn't change, still high-tensile steel springs similar to the OEM quality stuff. And, again, we'll take a closer look later on. The install is gonna get full three-out-of-three wrenches on our difficulty meter. It'll take about three, maybe four hours from start to finish depending on your personal experience. You wanna have a wide variety of tools on deck. I'm gonna have this car on our lift here. But if you're working on the ground, it can get a little bit more tricky. And, of course, I have air tools, which might be different from what you have at home. So it all depends on what tools you have on hand, which will translate to how quickly you can get the job done. If you're not comfortable tackling this yourself, guys, there's no shame handing it over to a professional to get done properly. When you're messing with suspension components, you wanna make sure you're getting it right, and getting it right the first time. I'm gonna take you through every single step of the process, starting with the front here and uninstalling your factory stuff. So what do you say we get to it? Tools used in this install include a cordless impact, half-inch air impact gun, a 3/8 and half-inch ratchet, 13-millimeter deep socket, 15-millimeter deep socket, 15 and two 18-millimeter half-inch sockets, 18-millimeter 3/8 socket, 21-millimeter deep half-inch socket, and a 13-millimeter swivel socket, variety of extensions, swivel socket, 15, 18, and 21-millimeter wrenches or ratcheting wrenches, flathead screwdriver, two bungee cords, pry bar, torque wrench, ball pin hammer.Additional tools include a hydraulic floor jack, jack stands, and a spring compressor. So once you get your wheels off of your Challenger, have it supported up in the air. As you can see, we're using a lift, makes life a little easier. But if you're working on the ground, that's no problem, just have jack stand supporting the frame rails to make sure your vehicle is properly supported. With all of that out of the way, the first step is to grab a 21-millimeter socket. And I'm gonna use air tools because I also think it makes life a little easier. If you don't have access to these, an impact gun does the trick, but you wanna put it on its strongest mode. Step number one is, use your 21-millimeter socket to remove the bolt holding on your sway bar end link to your factory strut. Once you get that popped off, we'll disconnect the sway bar end link. And then I like to put them right back on just to make sure we don't lose it. So let's get that disconnected. Now, if you start running into the issue that I'm running into where the bushing is just continually spinning in the sway bar end link, it's gonna make it hard to pop this nut out of place. So what you wanna do is make sure you're gunning this off from this side, but you may need to wedge a pry bar on the other side to keep that from spinning. There really isn't any hook for, you know, a wrench or anything like that. It's just a complete circle.So it makes it a little more difficult. You just wanna do whatever you have to do to break this loose. I recommend wedging a pry bar in the outside. All right, so while wedging that pry bar on the other side, we've got that to break loose, pull the sway bar end link out of place. Now, like I said, I like to thread this nut back in just so we know where it is because that'll get reinstalled once we have our new springs in place. Set that aside. The next step is to disconnect your ABS lines from the brake lines. So this is really just plugged right in. There's a couple of them throughout this line, just pull them off we'll reconnect them later. And I'll show you guys why this matters. You wanna make sure you're not putting any tension on this once the suspension starts to droop down when we disconnect the upper control arm. So for now, let's disconnect that, and get it out of the way. The next step here is to put either a pull jack if you're working up in the air, or a floor jack or hydraulic jack underneath the suspension components here underneath the hub to support the weight. Reason being is, once we disconnect the upper control arm, this is gonna wanna drop down and forward. We just wanna make sure that doesn't happen, so we prop that up. So I'm on a lift, but I'm gonna show you guys what it's like to use a jack stand.If you're using a hydraulic jack, it is a little bit easier, but the same concept applies. I'm gonna put a piece of wood right on top to give it a nice flat, even surface. You're gonna put that right past the rotor on the bottom of a hub assembly, just line that up, so that when you lower it, that's what making contact. The bottom hub bolt will most likely make contact first. So what I'm gonna do is basically lower this down onto the wood just enough that it touches and then just a little bit further past that to put some weight on it. From there, we'll disconnect the upper control arm. Now that we have this supported, what we're gonna do is disconnect our upper control arm from the hub assembly. Now, in order to do that, we're gonna need an 18-millimeter short socket to get this off. And, again, I'm using air tools. If you're not using air tools, it will be a little bit more difficult simply because this is extremely tight and all of the tension between them is, you know, keeping it on, as well as the fact that the bushing in here likes to spin as well. So it can be a tough task, but, you know, have some patience. It can be tedious, but you can get that off. One other thing to mention is you may be able to get an Allen key in here. If you have ratcheting wrenches or just a regular wrench, an 18-mil, that can also work. Again, it'll take a little bit of time, but you can do it.With air tools, I'm gonna be gunning this off, but I'm also gonna use a pry bar to pry down on the upper control arm. The reason being is we don't want this to jolt off. Once this is disconnected, it may pop completely out, and we don't want it to do that. Also, putting pressure on it, pulling down on this, will prevent this from spinning a little bit more than just having it free bird. So I'm gonna get my pry bar on the upper control arm, air tools, trying to get in on that bolt there. All right, with that nut out of the way, you still wanna hold pressure on the upper control arm. This is a neat trick that might help you out here. Take that nut, and thread it on just two threads. Take this out. Now, this is stuck, so we have to dislodge the upper control arm. So we're gonna grab a ball pin hammer. We're just gonna tap away at the hub assembly here just to knock this loose. You don't wanna tap on the upper control arm. You don't wanna damage the bushing. Tap here to get it to dislodge, then we'll pry down, remove it, and disconnect them. All right, so we're gonna tap away just right here avoiding the bushing. Having this nut here will prevent it from completely disconnecting and dropping forward. Once you have that disconnected, grab your pry bar, pry down using the coil on the spring, remove this, hold the hub assembly back, disconnect.Now, what I like to do, again, just like we did with our sway bar end link, just thread that nut back on a couple of threads. We know where it is. It's not getting lost because that will get reinstalled later. Next step, we're gonna remove the strut bolt on the bottom of our strut holding into our lower control arm. Grab an 18-millimeter socket, and pull this right off. Now, you don't need a wrench on the opposite end because the nut is welded to the strut itself. With that disconnected, you can remove that block from the bottom, and let it droop down. Now we're gonna grab a bungee cord to make sure with this entire hub support, it's not putting too much pressure on the brake line. Now, as you can see, we're putting a lot of tension and pressure on this brake line here on our hub assembly. So I'm gonna use a bungee cord. If you have a rope or something like that, or even a hanger, that'll do the trick. I'm just gonna use that to prop this back so that we're relieving the tension there. We don't want this to break. So we're gonna hook this around. I'm gonna wrap it around one time, and then just, obviously, hook it anywhere you want, just not on the strut be because we will be removing that. So there's a couple of holes back here on the frame, on the chassis. I'm gonna hook this back that way, even just a little bit takes that pressure off, and now we have a little slack here. So that's all we needed to do.At this point, we're gonna go under the hood, and remove the three top strut tower nuts holding this in place. We'll pull the whole thing out, get to work on our spring compressor. Next step here under the hood is to remove the strut tower cap, which is basically that chrome trim that we have here. It's screwed on, so just lefty loosey, you know. Pop this thing right off. Set that aside. Grab a 13-millimeter socket, and remove the three nuts holding this in place. Keep in mind that this may shuffle down from the bottom, so it's a good idea to have one hand holding that just to support it. Remove the three, and then we'll be able to pop this thing out. So we got everything disconnected, it's about time we just remove the strut from the suspension. So we're just gonna push down to get a little flex on the lower control arm. So we're gonna disconnect the bungee cord just for a moment to get a little bit more flex into it. Push down, and lift up on the strut just to bring that around the lower control arm. Slide this out of place, set this aside, and let's reconnect that bungee cord. Now, we're gonna kick things off through the uninstall of our rear springs. Now, in order to do that, I wanna let you know there are a couple of different methods to go about this. I'm gonna show you guys what I find to be the easiest. Keep in mind, no matter what method you take, you're going to need to get an alignment afterward.So keep that in mind moving forward. Here, what we're gonna do is start by using a hydraulic floor jack to support the weight of the lower control arm right underneath of the spring. And we're gonna unbolt the lower control arm from the subframe at the back. From there, we're gonna lower that hydraulic jack, and it's basically just gonna slowly drop down the lower control arm, taking the compression and the weight intention off of the spring, allowing us to pull it out, throw our Eibach one in, and just jack that thing right back up, stick the bolt through, and do it in reverse order. Now, one of the other methods that people often use is basically dropping the subframe, one piece at a time. You just unbolt it from the chassis, lower it down, pop this out. Now, I just find this to be a whole lot easier. You don't have to worry about lining things back up and using pole jacks and whatnot. I just think this is an easier method, but it's all personal preference. Now, if you're taking it through my way, I'm gonna take you step by step. First thing we're gonna do is take the hydraulic jack. We're gonna put the pad underneath of the lower control arm right under the spring. Then the next step, all you have to support it is to get your bottom shock bolt out. It's an 18-millimeter nut on the outside and a 15-millimeter bolt head on the inside. So grab an 18 socket, put it on the nut, and a 15 wrench or socket, and put it on the bolt head.All right, for the next bolt here connecting our lower control arm to the frame, what we're gonna do is use a 15-millimeter wrench for the bolt head and an 18-millimeter ratcheting wrench for the opposite side, for the nut. Now, we're gonna be cranking the nut off. You don't wanna be backing the bolt head off just yet. Just back off the nut on the opposite end. It's a really tight spot, so you might not be able to fit a socket and a ratchet. So we're gonna use a ratcheting wrench. As you can see, it's getting to the point where we can't back this bolt up anymore because of the exhaust tailpipe on our driver side. So what I'm gonna do is actually leave everything as it is right now, head under the car, grab a 13-millimeter socket, and remove the bolt holding this tailpipe up right above the tailpipe kit. That will give us enough flex in this pipe to just shuffle it out of the way, back the bolt head all the way out, and continue moving forward. All right, right above our tip, you can see this bracket on the hanger is bolted up to the chassis. We're gonna go ahead, and back that all the way out. All right, at this point, we can really slowly start to let down on our hydraulic jack. We're gonna slowly let this down. It'll relieve the pressure from the spring and basically just limp right out of place. We'll be able to pull it out. Keyword being, slowly.All right, as you can see, the spring came out of place. Now, we can pull it off. Make sure when you're pulling the spring out of place, you're taking the isolators with it. So here's the upper isolator, and the lower isolator is coming with it. You wanna make sure you're keeping these because they'll be reused with our new Eibach ones. Now you can repeat for the other side. Now, guys, it's time to work on our spring compressor. We still have our factory springs on our built-in strut, and we have to get those off in order to get our Eibach one on. So when operating a spring compressor, it goes without saying, guys, it can be extremely dangerous. Exercise extreme caution, make sure you're doing it properly. I'm gonna show you a couple of the steps here. We've got a wall-mounting oppressor, which is a lot easier than a free-hand one. If you're working with a free-hand one, again, just take extreme caution. So we have our coil over here mounted right up on the bottom coils. You wanna rest these arms flat up on the bottom coil here without coming in contact with the bottom of the seat. Now the top portion, there's a couple of different ways to skin the cat here. It's all personal preference.I like to put these arms directly on the top of the strut hat. It gives you a flat solid surface to work with. Most people would go straight to the top coil and condense from there, but I'm going straight to the top hat. We have these arms positioned properly. And as you can see, there's a big indent here with a solid surface. You wanna make sure that the indent is right on top of the strut head and the solid surface on the outside of this rim here. Once we have that positioned correctly, we're gonna compress this, bring it down to make sure it's touching and they all evenly seat on the top hat. Once you have all your safety checks in place, what we're gonna do is continue to compress the spring. The goal here is to basically take the pressure and tension off of the spring in order to safely remove the top hat without the spring decompressing. So we're gonna decompress the spring. All right, at this point, we have the tension taken off the spring, 18 socket here right on top of the nut. All right, let's get this out of the way. Now, we can slowly decompress the spring. Slowly is the keyword here, guys. You don't wanna shoot this thing off. And again, we're working on the wall-mounted one. But if you're working freehand, just be really careful. It's under a lot of tension and pressure.Once we're off, I like to put a stool underneath it, so it doesn't fall straight out. Once you have this out of the way, move these arms back. With the whole thing out, take the strut hat right off with the boot, spring comes out, and we can set this aside. So we finally got all of our springs off of the 16 Challenger behind me and on the table. And I just wanted to give you guys a quick side-by-side comparison between the Eibach and our stock springs. We've got our front springs over here and our rears here. I've got one of each on the table to give you that side-by-side. Now the biggest thing I wanna point out here is the drop. Now, I know we talked about that earlier on, but keep in mind, the front end dropping 1.1 inches and the rear, again, 1.2 inches, so a relatively mild drop. But we know that these cars come with a pretty big wheel gap from the factory. So I'm expecting this to do a ton of good as far as appearance, and especially when it comes to your handling and suspension components. Now, another big change comes in with the spring rate. Now, the factory springs are linear, and your new Eibach Springs are progressive. Now, if you guys aren't familiar with the terminology, linear springs are gonna be a lot more predictable off the line. These things are gonna keep those spring rates consistent no matter what the driving condition, whether it be in traffic, on a highway, or if you had to drag strip during a hard launch.Now, those springs to stay consistent, and they're very predictable. But the thing about linear springs is they're not always the best on-road control. So going around corners at higher end speeds, linear springs aren't typically the better choice there. Now, progressive springs typically stay pretty comfortable under normal driving conditions. But under heavier load, like doing burnouts, hard launches on the strip, or quick takeoffs, these things definitely stiffen up and get a lot sportier and tighter, keeping more control, producing a lot more body roll, nosedive and excessive squatting on braking. So progressive springs are gonna have that sportier feel. They change depending on your driving conditions, and how hard your launches are, and, you know, the different loads being put on them. And you can clearly see the difference, especially when it comes to the rear springs. Now, here, I'm gonna pop off our factory isolators. The factory rear springs look like this. That's a linear spring, even gaps among each of the coils. This is your progressive spring from Eibach. You can see at the top end here, they're a lot tighter wound together with bigger gaps at the bottom end. That is a clear indication of a progressive spring. Now, the other big difference here, and I know it doesn't make any difference to performance, but it's worth noting, your Eibach Springs are coded in red, factory springs are coded in black.The red is a pretty good indication of an Eibach Spring. As far as the quality of materials, it's all pretty much OEM quality, the same materials as you can expect with your factory springs, high tensile steel. And really, the quality is gonna be there. It all depends on the spring rate. That's gonna really change the performance and feel of the car. And going from your linear to progressive with the Eibach with the 1.1 in the front, 1.2 in the rear, you're definitely gonna feel a sportier ride, and one that's more controlled. With all that out of the way, the last thing I wanna point out here is your isolators. Now because we're working on a 2016, our isolators are looking pretty dang new, so we're not gonna need replacements. But if yours are looking worse for wear, you might wanna pick them up now while everything is uninstalled. No sense putting everything back together with the crappy isolators just to find out that they're breaking and you need new ones anyway and then having to redo all of it. If your isolators are looking worse for wear, just pick up some new ones. You can get them at your local auto parts store, order them online, whatever the case may be, and install those while you're doing this job. Now, ours are looking pretty good, so we're gonna reuse them.But keep in mind, none of them are included in the kit. So we're gonna transfer those over to our new springs and get to work on the Install starting at the front. All right, guys, we're back here at our spring compressor because we're gonna start our install at the front end of the vehicle, which means we have to reinstall our new Eibach Springs onto our factory built-in struts. In order to do that, we mounted our spring on to the compressor here with the strut placed through the bottom of it. We're gonna take our top strut hat and do the same thing we did, taking it off, just in reverse order. We're gonna drop our strut hat right through the middle here. And you wanna take note of the end coil at the top and the end coil at the bottom because they do have a seat or a wall that they're gonna push up against for the isolator. So when they drop into place here, you're basically gonna rotate this to make sure that wall seats up against the end of the spring, both at the top and bottom. You can see it down here seating up against that isolator. Now, what we're gonna do is make sure that this can safely compress up against the top of the hat like we did in the beginning. Now, the goal here to reinstall our spring is to basically get just enough thread through the top that we can put the nut on.We can gun it on from there, and torque it down. You don't have to compress it too much, just enough to get the threads through. All right, so we got enough thread definitely from the top. So making sure that the springs are still seated properly at the top and bottom, which they are, grab the factory nut, spread it on by hand up here. Grab your 18 socket, and gun it on. Once that's torqued, the last step is our factory spacer or the washer that goes right on top. Make sure that the spring is still seated properly and decompress. Once it's decompressed, you won't have any plan where the spring seats on the isolator. So, you wanna do that while it is still compressed. Slide those out of the way, pull it out. We're gonna do the same thing for the other one. All right, first step of the reinstallation here is to grab your driver-side strut. Now, we're gonna indicate our driver side because the welded-on nut here is gonna be facing the front of the vehicle. We're gonna go ahead, and slip this into place. Once you have it lined up top, we'll try to line up your bottom half of the strut over the bolt holes. There's nothing perfect just yet, but just get it nice and lined up. From here, pull the studs up to the top a little bit, and we're basically just gonna lightly tighten down these 13-millimeter nuts just by hand to get it to hold itself in place. We don't wanna tighten it down too much just yet. It's all personal preference, but I find it to be easier just to put the nuts in place to hold the strut up while we work down low.And the last thing we'll do for the assembly is tighten it all down up here. All right, the next step here is to line up the bottom of our strut with the holes in the lower control arm, which may require you to just give a little play in the suspension to line those bolt holes up. Once you get them lined up, grab your 18-millimeter bolt and put it through. Start that threading by hand to make sure it catches. You'll feel it go all the way through and catch, grab an 18 socket, and tighten that down. Next step is our upper controller arm here. Now, as you remember, we have this bungee cord, so we're gonna have to remove that. And you might find it easier to do what we did in the beginning by putting like, you know, a jack stand or a hydraulic jack and pushing up on the suspension to line it up. But I don't think we're gonna need that here. We're just gonna basically take this nut out of place, line these two up. You might have to adjust the position and the angle of that control arm. Drop it down into place, and we're gonna thread that nut back through. All right, so we got these connected. I'm gonna go up as high as I can by hand. So that's in place. Grab an 18 socket, and tighten this down. Next step is our sway bar end link. Now, if you remember, I put our nut right back on the stud. Just get that off, line that up with the back-mounting position on your strut, and tighten that nut down from the back end. Grab a 21-millimeter socket, and tighten that down.All right, the next step here down low is to reconnect our ABS lines. Now, if you remember, they just pop right into these plastic clips. There's one on the frame, and there's three of them on your brake line. All right, the last step for our driver side here is to tighten up these three nuts, and we'll put that cap back on. Grab your Billet cap, just thread it back in, get it nice and hand tight, and you can repeat for the other side. All right, once your whole suspension of the front end is dialed in, you wanna grab a torque wrench and torque down a few things. So we're gonna tackle our sway bar end link, we're gonna tackle the bottom strut bolt, and we're gonna tackle the upper controller arm. Now, the upper control arm bushing we've already done, this is 35-foot-pounds plus a 90-degree turn. Your sway bar end link, you're gonna do 74-foot-pounds. So that's what we're gonna do next. We've got our torque wrench here and 21-millimeter half socket on the end here. Set your torque wrench at 74-foot-pounds. Set that into place, and tighten it down until you hear the click. We're gonna turn this up to 128-foot-pounds, and we're gonna do the bottom strut bolt connecting it to the lower control arm. All right, switch over to an 18 socket.So what do you say we start the install on the rear? Now, before we get started, I wanna point one thing out. For our uninstall, if you remember, it was a struggle getting that bolt out that holds the lower control arm to the frame simply because the exhaust tailpipe is in the way on our driver side. So in order to remedy that situation, we basically loosened up the clamp holding the exhaust pipe next to the actuator for our active exhaust. So that'll be right under your axle shaft. Loosen that up, and you can just drop the entire tailpipe downward a little bit after unbolting the tailpipe tip if you remember that as well. So with that rotated out of the way, we have a clear access point. That'll give us a little bit more of a headache-free install, putting our new Eibach Springs into place. Next step here, install your lower isolator. Now, this isn't gonna get installed to the spring directly. It's gonna get installed to the lower control arm. Now, as you can see, it has a very specific shape. It has a notch up at the top that has a specific point that you're gonna install it in right on that lower control arm pocket. You'll see it only rotates in one way. So we're gonna drop that into place, get that down. And you'll know because you can't twist it. It seats right in a very specific order.So with that out of the way, we can grab our spring, and you're gonna install this with the tightly wound coils at the top and the spaced-out coils at the bottom. The Eibach logo should be legible. So as you can see, we can read it just like that. The top isolator, if you remember, just like our spring compressor situation, is gonna seat properly as well. You can see it's got this opening and the lip that's got a wall it's gonna seat into. Rotate this in, and it stops. That's how you're gonna wanna install that. So that'll go right on the top. On the bottom, same case. On the end, that'll have a seat on that lower isolator we just installed. So let's get it in there. All right, now, we can insert our spring making sure the bottom coil seats where we want it to. We're gonna rotate that, so you can see the bottom coil lined up with its wall that it needs to sit against. Once that's in place, we can use our floor jack to pump this up into place. All right, now, pumping up the lower control arm with our floor jack here, the key is to keep an eye on this bolt hole on our lower control arm, getting that to line up with the bolt hole on our frame. Now, it can be a little tricky. It might take a little trial and error repositioning your jack, making sure it's leveled. Once you have it lined up, we'll slip the bolt hole in, hammer it into place, and then do our bottom shock bolt. All right, once you get that bolt hole lined up, grab your bolt, your stock bolt, set it into place. You may need to use a hammer to tap it back in.All right, with the bolt all the way through to the other side, grab your 18-millimeter nut, thread it on by hand. Grab an 18 wrench or socket on this side and your 15 sock on the opposite side, and it'll pull through, and you gun it on. Now, for the next step, we're gonna attach our shock bolt to the bottom of the shock to the lower control arm. Now, the trick to getting these holes to line up is to take a flathead screwdriver and insert it into the opposite end where the bulk end would come out of. From there, you can actually pry up from the inside and line up those bolt holes. You can kind of manipulate the shock that way from the opposite side, insert your bolt in. Just hammer it through, grab your nut, hand-tighten it on the opposite side. Now, grab an 18 and a 15, and tighten them down. Now with them tightened up, you can lower your floor jack. All right, the last step of the driver side of our rear end is to reassemble our exhaust pipe. So we're just gonna rotate this back up into position. Use our 13 bolt to tighten this back down to the frame rail. At this point, just repeat for the other side of your rear end, and you'll be good to go. Well, guys, that's gonna wrap up my quick overview and install for the Eibach Pro-Kit Lowering Springs available for the 15 and newer Scat Pack and Hellcat Challengers. You can pick your setup right here at americanmuscle.com.

      Product Information

      Features, Description, Reviews, Q&A, Specs & Installation

      Features

      • Aggressive Lowered Muscle Car Stance
      • Provides Improved Handling and Cornering
      • Improves Stopping Distance
      • Increased Mileage
      • Features Progressive Spring Rate
      • High-Quality Spring Steel
      • Estimated Drop of 1.10-Inch (Front) and 1.20-Inch (Rear)
      • Clears Stock and Aftermarket Wheels & Tires
      • Direct Fit Replacement
      • Million Mile Warranty
      • Sold as a Set of 4
      • Fits 2015-2023 Scat Pack, SRT 392 and Hellcat Challenger Models

      Description

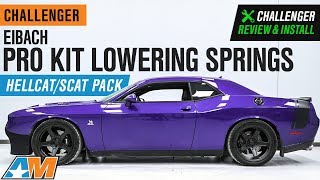
      Race-Inspired Look and Performance. Get that lowered racecar look and performance with a set of Eibach Pro-Kit Lowering Springs. With a lowered stance, you get a number of performance advantages aside from that aggressive look. Experience reduced squats upon acceleration and excessive body rolls when cornering. What’s more, you get better fuel efficiency and high-performance handling for a more exciting ride.

      Lowered Aggressive Stance. These Eibach Springs will provide a front drop of 1.10 inches and rear drop of 1.20 inches. It’s a relatively modest drop, but it comes with all the advantages including the right amount of clearance on the fenders and wheels. Your Dodge Challenger will have the look of a classic muscle car after installing these springs.

      Eibach’s Tough Construction. These Eibach Pro-Kit Lowering Springs make use of advanced CNC-machining to produce progressive high-performance springs. In addition, each spring are heat-treated to ensure durability and longevity.

      Progressive Spring Rate Technology. Progressive springs are ideal for track and street applications. That’s why Eibach developed their own proprietary progressive springs to improve handling on the road and on the tracks.

      Wheel and Tire Clearance. Don’t worry about your tire and wheel clearance when installing these Eibach Pro-Kit Lowering Springs. Whether you’re sporting stock or aftermarket wheels and tires, these springs make sure there won’t be any scraping or rubbing issues.

      Professional Installation Recommended. While the Eibach Pro-Kit Lowering Springs are designed for bolt-on direct replacement, professional installation is still recommended. This is because of the inherent hazard of installing springs. You may need special clamps for the job so consult with a professional if you’re not confident enough to do the job.

      Comes With a Million Mile Warranty. Eibach warrants the Pro-Kit Lowering Springs against factory defects in material or workmanship under normal installation and use. However, the coverage is valid only for the original purchaser and other exclusions will apply.

      Application. This set of Eibach Pro-Kit Lowering Springs are designed for 2015-2023 Scat Pack, SRT 392 and Hellcat Dodge Challenger models.

      Fitment:

      Details

      Eibach E10-27-004-01-22

      CA Residents: WARNING: Cancer and Reproductive Harm - www.P65Warnings.ca.gov

      Installation & What's in the Box

      Installation Info

      What's in the Box

      • (2) Front Pro-Kit Lowering Springs
      • (2) Rear Pro-Kit Lowering Springs
      4.8

      Customer Reviews (500+)

        Questions & Answers

        10 More Questions

        Will It Fit My Challenger

        • 392 Hemi Scat Pack Shaker - 16
        • R/T Scat Pack - 16, 19, 20, 21, 22, 23
        • R/T Scat Pack Shaker Widebody - 21
        • R/T Scat Pack Widebody - 19, 20, 21, 22, 23
        • Scat Pack - 15
        • SRT 392 - 15, 16, 17, 18
        • SRT Hellcat - 15, 16, 17, 18, 19, 20, 21, 22, 23
        • SRT Hellcat Redeye - 19, 20, 23
        • SRT Hellcat Redeye Widebody - 19, 20, 23
        • SRT Hellcat Widebody - 18, 19, 20, 21, 22, 23
        • SRT Jailbreak - 23
        • SRT Super Stock - 20, 21, 22, 23