Talk to a Challenger Sales Tech
1-877-887-1105
M-F 8:30A-11P, Sat-Sun 8:30A-9P
$20K Sweeps! 10 Chances to Win! Enter Daily >

Flowmaster American Thunder Cat-Back Exhaust System (15-23 6.4L HEMI Challenger)

Item CH1667
Verify parts fit and get product recommendations.
Challenger Sales Techs: Connect Now M-F 8:30A-11P, Sat-Sun 8:30A-9P
$0.00
Our Price

$1,106.95

FREE Shipping Market Price $1,272.99 You Save 13% ($166.04) Up to 10% off for Military & First Responders! See Details

Will this fit your Vehicle?

Select a different vehicle Help?
Update or Change Vehicle
Ship to: Ashburn - 20149
Sorry, please enter a valid US or CA postal code
We're sorry, zip can't be updated at this time.
Recommended Install Shops
How It Works
Install Shops are available near Ashburn - 20149

Add Local Shop Installation

Total cost of service $299.00
    Create a list
    Add to New List

    Saved - View your saved items

    We're sorry. We couldn't save this product at this time.

    or use

      Product Videos

      Justin: If you're looking to add that iconic Flowmaster sound to your 2015 and newer Hemi at home, but without adding a ton of volume, well, then the American Thunder Cat-Back that we have here today, it's certainly gonna be a great option. Now, this system will combine 409-grade stainless steel along with the legendary Super 40 Series mufflers and a lifetime warranty all for right around that $1,200 price point. Now, install is gonna be a 100% bolt-on job guys, as we'll show you here in a little bit, but figure middle of the road two out of three wrenches on the difficulty meter and maybe a couple of hours of your time to get in place from start to finish. So the star of the American Thunder from Flowmaster will certainly be the Super 40 Series muffler here, which is chambered and will help deliver that iconic Flowmaster tone I mentioned earlier.Now, what does that mean for the Hemi in regards to volume? Well, as you guys heard with our sound clips at the top of this video, the American Thunder is gonna deliver that iconic rumble, but with a bit more volume compared to your stock cat-back, and one that yes is a little bit louder, but at the end of the day, isn't crazy loud or over the top, which is something I really like. It's a very livable system. So, going to my wake the neighbor scale here, guys, I have the American Thunder coming in at a pretty strong three out of five on my one to five or one to wake the neighbor scale. Listen, at the end of the day, if you're looking for a loud system, this just isn't gonna be the one for you. Instead, you might wanna consider the Outlaw from Flowmaster, which is gonna certainly deliver a lot more volume, a lot more unruliness if you will. And that is an option that you can find here at AM if you're interested.But again, the American Thunder is gonna help deliver that very unique tone that's a little bit deeper compared to your factory system with minimal interior noise and that's thanks largely in part to Flowmasters Gen 2 case or muffler design. But what do you say we get into the nitty-gritty here with the American thunder? And listen, we already talked at length about the Super 40 Series muffler, the chambered muffler, of course, responsible for most of the sound, but the mufflers do get a little help from Flowmasters scavenger series X-pipe here, which will help add a little bit more volume compared to maybe using a stock mid-pipe. Again, this is a full stainless system here, gang. And as a result, does get backed by that limited lifetime warranty. Now that stainless does find its way into things like the 3-inch mandrel-bent tubing throughout here, does lead into and out of that X-pipe also stainless, of course, as are your Super 40 Series mufflers as well.Finally, everything is gonna exit out of your quad 3-1/2-inch polished tips and now those guys are embossed with the Flowmaster logo and does look great underneath that rear bumper. Now, one thing I do wanna point out before we get into the installation is that the American Thunder from Flowmaster does include what Flowmaster likes to call their "dummy valve stands" for your factory exhaust valves. And those, guys, are in place basically to prevent any possible check engine lights while still maintaining that wide-open power and sound at all times with this system in place. But now let's get into that installation as promised earlier. And again, full bolt-on job here, guys, can be done in a couple of hours or less from start to finish, depending on how fast you like to work. And to give you a better idea of how things will go down, here's my man, Joe, with a detailed walkthrough and tool breakdown now.Joe: The tools used for this install are, an impact gun, exhaust hanger pliers, a power or hand ratchet, 15-millimeter socket, 13-millimeter socket, 8-millimeter socket, a 4-millimeter Allen, a 10-millimeter wrench, an extension, a 13-millimeter wrench, and a clip removal tool. So the first step of this install is going to be removing the exhaustion system from the vehicle to make room for our new Flowmaster. I'm gonna walk you through every step of the process, and you're only gonna need a few simple hand tools to get this job done. So, let's get started.I'm gonna start by unplugging my electronic valve controller for my exhaust system. There's one on each side of the pipes. Just remove the clip and then using my clip removal tool, I'm going to remove the retainer clip for the wire harness that's on the exhaust hanger and just set that aside. Now, I can just do the same exact thing on the other side of the exhaust. Now that I have my valve controllers unplugged and the wire harnesses set aside, I'm gonna use a 13-millimeter ratcheting wrench, but a standard box wrench or a very stubby ratchet will do the same job. And I'm gonna remove the 13-millimeter bolt for both of the hangers right next to the differential. Once these bolts are removed, I'm going to leave the hangers sitting in their clips just so it will hold the exhaust system up while I remove the rest of the hardware.So these hangers here next to the differential, they both bolt in, but they also have a little hook hanger that holds them in place. That's what I meant when I said I'm gonna leave them clipped into place. When it comes time, I'm just going to lift up and remove that from the hook, and that way I'll be able to drop the whole exhaust system. But for now, I'll just leave these sitting in place while I remove the rest of the hardware. The next hanger bolt that needs to be removed is directly above the muffler. And it's straight-up here on the underside of the body, and you're gonna use a 13-millimeter socket with an extension to get to it.And now I can do the same exact thing on the other side of the exhaust system. Now I'm gonna use my 15-millimeter socket on my ratchet to loosen up the clamps for the X-pipe right here behind the cats. So, now's gonna be the time to grab the help of a friend or an extra set of hands. If you've got them, we're gonna lift the exhaust system off the hooks here in the back, and then we're gonna wiggle this out and pull it from the back. Now, there are a few components from this exhaust system that need to be transferred from our factory setup onto our new exhaust pipes. The hangers and the valve controllers are going to be transferred over. Now, these valve controllers are going to be bolted on and plugged in, but they are not going to be functional. You'll need an 8-millimeter socket to remove the three nuts. And then using the provided spacer hardware, you can install them onto the new pipes and plug them back in as if they were factory.I'm gonna use my exhaust hanger tool to remove the exhaust hangers here, and on the back of the exhaust as well. And like I said, I'll use my 8-millimeter socket to remove the controller. It's a good idea to use a little bit of penetrant to get these exhaust hangers to slide off a little easier. And then take your exhaust hanger tool and slide that right off and now you can slide it onto the new pipe. I'll do the same thing for the muffler hanger, and then I can repeat this process for the remaining hangers on the exhaust. Now that we have our hangers and our valve controllers removed from our stock exhaust system, we're ready to transfer them over to our new pipes. Now, I'm going to use the provided hardware and this depending on the spring size that you're using on your exhaust controller, I'm gonna use the three-quarter-inch spacers that are provided in the kit. But if you have the shorter spring, you're gonna use the half-inch spacer. I'm gonna do that along with the provided hardware in the kit, which are these small screws and these Allen head screws here. And I will install these standoffs into the three locations on the mounting bracket. And then I'll tighten them up with a 10-millimeter wrench. And I'll repeat that for both sides of the exhaust. Now that I have my standoffs installed properly, I'm gonna line up the spring with the slot on the mounting bracket. And I just have to twist it into place, and then I can install the provided hardware through the bolt holes.Now that I have all of my bolts started by hand, I'm gonna take my 4-millimeter socket and tighten up the Allen bolts. Now I can repeat the same exact process on the other side of the exhaust. Next, I can slide on all of my exhaust hangers front and back. And you can repeat that for the other side of the exhaust as well. Now that we have our valve controllers and our exhaust hangers switched over to our new exhaust pipes, it's time to start installing our new exhaust system onto the vehicle. Now I have my clamps pre-Installed here on my center X-pipe and I'm gonna line them up with the two pipes coming off of the catalytic converters and slide them into place. With my X-pipe in place, now I can start installing the mufflers to the vehicle. There's an inlet and an outlet. The inlet is offset and the outlet is centered. I'm just gonna, pre-install my clamp on there, slide it into place. And then using my 15-millimeter socket, I'll just snug that clamp to hold the muffler while I assemble the rest of the exhaust system. I'm not gonna fully tighten that down until the end. Once again, I'm just gonna snug up this clamp to hold things in place. Now, keep in mind, there's gonna be a lot of weight sitting on the end of this X-pipe so it's not a bad idea to support it in the middle. I'm just gonna use a pole jack to hold things in place, and then I'll snug this clamp. And once I have everything installed, I'll go back and fully tighten everything.Now that I have my muffler sitting in place, I'm gonna take my clamps for the back end of the muffler, and I'm gonna install those into place. Once I have those ready to go, I can start installing my tailpipes. The tailpipe just slide into the back of the muffler. And it's going to use the factory hanger locations. Now, you can use the factory exhaust hanger and just hook it on into place while you line up your other hangers and secure your clamps. Now I can line up my rear hanger bolt location and reinstall the factory bolt. I'm just gonna get this bolt started with my 13-millimeter socket. Now that I have my rear exhaust hanger bolt installed and just started by hand, I can do the same for the exhaust hanger here next to the differential. I'm just gonna get this bolt started to hang things in place and keep everything from moving while I make my adjustments. And now I can just repeat the same install for the other side of the exhaust.Now that all of my bolts for my hangers are in and started, I can start reconnecting my electrical connections for the exhaust valve controller. And then I can go back with my 13-millimeter wrench and sockets and tighten down every one of the hanger bolts. Now I can use my 13-millimeter wrench to tighten up my forwardmost hanger bolts. Now I can use my 13-millimeter socket with my extension to tighten up the rearmost hanger bolts. Now that I have all my adjustments made and everything sitting the way I wanted, I made sure that nothing's going to touch or get hot. I also made sure that my exhaust tips are clearing my bumper. Now I can start tightening up all of my clamps and I'm gonna use my 15-millimeter socket on my impact gun and tighten all those down.The kit provides you with these little serrated washers that actually slide onto the hanger next to the differential, just push them into place. And then you might need a socket or a small screwdriver to get them fully engaged. And this is just gonna keep the exhaust hangers from potentially sliding one way or the other due to vibration and they just hold everything into place. Now, just repeat that same exact thing on the other side of the exhaust. And that's gonna wrap up this review and install of the Flowmaster American Thunder Cat-Back Exhaust, fitting your 2015 to 2021 Dodge Challenger 6.4-Liter Hemi. Thanks for watching. And for all things Challenger, keep it right here at americanmuscle.com.

      Product Information

      Features, Description, Reviews, Q&A, Specs & Installation

      Features & Specs

      • Produces Moderate to Aggressive Exhaust Tones
      • Improves Car’s Overall Engine Performance
      • Features the Super 40 Muffler Series
      • With Mandrel Bent Chambered Stainless Tubing
      • Non-Rolled, Double Wall Tip Edge Style
      • Dual Rear Exit
      • Bolt-On Installation
      • Covered by a Limited Lifetime Warranty
      • Fits 2015-2023 Dodge Challenger Models With 6.4L Engines

      Description

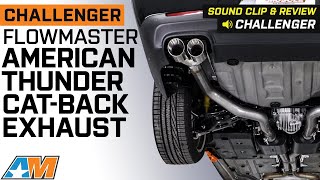
      Moderate and Aggressive Exhaust Tones. If your Challenger’s exhaust tones are too silent and meek, you may consider equipping your car with this Flowmaster American Thunder Cat-Back Exhaust. This cat-back exhaust lets your car growl with a loud, aggressive note while starting up your engine. Then it creates a moderate roar while you’re cruising the road.

      Improves Engine Performance. Geared with the Super 40 Muffler Series, your car’s exhaust gases are able to escape more freely due to this cat-back’s more efficient and larger pipes. As a result, you experience significant improvements in your car’s overall engine performance. With this cat-back exhaust, you’ll be gaining more horsepower and torque, quicker throttle response, and better mileage.

      High Quality Construction. Engineered for on-road use, this Flowmaster American Thunder Cat-Back Exhaust is guaranteed to be of the highest quality. It’s crafted from durable stainless steel that’s capable of withstanding impact, heat, and corrosion. With its stainless steel construction, this cat-back exhaust won’t easily break.

      Bolt-On Installation. For your installation convenience, this kit already includes all the necessary mounting hardware.

      Covered by a Limited Lifetime Warranty. This cat-back exhaust is covered by a limited lifetime warranty. If you encounter any issues of your purchased product, you may send a warranty request.

      Application. This Flowmaster American Thunder Cat-Back Exhaust is made to fit 2015-2023 Dodge Challenger models with 6.4L engines.

      Fitment:

      Details

      Flowmaster 817739

      CA Residents: WARNING: Cancer and Reproductive Harm - www.P65Warnings.ca.gov

      Installation & What's in the Box

      Installation Info

      What's in the Box

      • (2) Mufflers
      • (1) Scavenger Assembly
      • (1) Left Tailpipe Assembly
      • (1) Right Tailpipe Assembly
      • Mounting Hardware
      4.7

      Customer Reviews (447)

        Questions & Answers

        10 More Questions

        Will It Fit My Challenger

        • 392 Hemi Scat Pack Shaker - 16
        • R/T 392 - 17, 18
        • R/T Scat Pack - 16, 19, 20, 21, 22, 23
        • R/T Scat Pack Shaker Widebody - 21
        • R/T Scat Pack Widebody - 19, 20, 21, 22, 23
        • Scat Pack - 15
        • SRT 392 - 15, 16, 17, 18
        • T/A 392 - 17, 18
        • T/A 392 Widebody - 21