Talk to a Mustang Sales Tech
1-877-887-1105
M-F 8:30A-11P, Sat-Sun 8:30A-9P
$20K Sweeps! 10 Chances to Win! Enter Daily >

Rear Upper and Lower Tubular Control Arms; Red (79-04 Mustang, Excluding 99-04 Cobra)

Item 432971
Verify parts fit and get product recommendations.
Mustang Sales Techs: Connect Now M-F 8:30A-11P, Sat-Sun 8:30A-9P
$0.00
Our Price

$139.99 (pair)

FREE Shipping Market Price $161.99 You Save 14% ($22.00) Up to 10% off for Military & First Responders! See Details

Will this fit your Vehicle?

Select a different vehicle Help?
Update or Change Vehicle
Ship to: Ashburn - 20149
Sorry, please enter a valid US or CA postal code
We're sorry, zip can't be updated at this time.
    Create a list
    Add to New List

    Saved - View your saved items

    We're sorry. We couldn't save this product at this time.

    or use

      Product Videos

      Woman: If you wanna dial your suspension in and fix that very annoying wheel hop on your 1997 to 2004 Mustang, excluding the 99 to 04 Cobras with IRS, this rear upper and lower tubular control arm kit in red will be a set you'll wanna check out. Now, this set will be an affordable option for the Mustang owner who has noticed looseness in the rear end suspension due to worn out components and wants to gain some of that confidence back whether you're off the line at the track or even just for spirited street driving.Now, over time, the bushings in your control arms will start to wear out, and the fact that the 1997 to 04 is 10-plus years old, if you've never changed them, you may have or start to feel that play in the rear end. Now, it can cause that very annoying wheel hop or that nasty vibration that you feel when you're hitting it off the line, but this set will feature a solid build to create more of that controlled and consistent experience that you'll notice especially at launch. Now, being a complete kit, it will come with upper and lowers, as well as some tough bushings that are a lot more rigid than your factory ones. So they're gonna last a lot longer and they're gonna have a sportier feel. And the control arms are gonna have factory mounting provisions, so you won't have to make any modifications when you're mounting these up.Now, these control arms will be made of a tough tube steel construction that will hold up a lot better to whatever power you're putting out compared to the stamped steel factory ones. Now, on top, you can also see that this has a bright red powder coat finish to protect the steel underneath from any rust, but it's also gonna boast a sporty look that will spice up the suspension when you're looking under the car. Now, again, these bushings are going to be made of a tough plastic material. They are going to be more rigid than the factory rubber ones, so this is going to ride a bit tighter and be a lot more responsive rather than the squishy and more fluid feel of the factory bushings, and they're gonna have a longer lifespan. This kit will also come with all the hardware you need, including new metal sleeves as well as bolts, so you won't have to reuse any of that old factory hardware.This kit will come in at about $175 and is on the more affordable side when it comes to a set of control arms. Now, with that being said, this is one of the more simplistic kits as far as the design is concerned with a fixed construction. Now, once you start getting a bit higher in price, you'll see some more depth in the design, like single or double adjustability. But if you wanna keep it on a budget with a well-built set that's still gonna give you the results that you're looking for, then this is going to be a solid choice. Install will be a two out of three wrenches on the difficulty meter and should take you about four hours to get the job done front to back if you do have the experience with popping on a set of control arms and you have the right tools and the right setup. Now, at this point, we're gonna show you a detailed breakdown on how to get these onto your Mustang at home. So, that is going to wrap it up for my review. Let's go ahead and get into the install.Man: For this install you will need air and electric impacts, various ratchets, various extensions, swivel adapters in 3-8ths and half-inch, 10, 13, 15, 18, 19, 21, and 22 millimeter sockets, a flat head screwdriver, 18, 19, 21, and 22 millimeter wrenches, a pry bar, some lubricant, a soft mallet, also not shown here is a jack and jack stands or pole jacks.What's up guys? We're gonna be installing some control arms on our Mustang so let's get started. So now we're ready to go ahead and get started by removing our sway bar, but first we have our pole jacks under our differential supporting that. And notice I have a third one right here under the U-joint because although it is connected to a drive shaft, once we start unhooking things your differential does want to rotate. So to control the angle of that and kind of make things easier, if you have it available a third one is pretty convenient to have. So we'll go ahead and start removing our sway bar. We'll get our ABS line here out of its bracket, pop that out of the way, then we can remove our two 13-millimeter bolts on each side and get our sway bar out.So we've got our 13-mil socket, swivel adapter, and extension on our impact, and we'll go ahead and start getting these bolts out. Get our other bolt out here. We'll go ahead and move our ABS line out of the way, then we'll go ahead and do the same thing on the other side while supporting our sway bar and get that out of the way. So we're gonna support our sway bar with this hand and go ahead and undo these bolts on this side, same as the other side. And we're gonna kind of catch our sway bar on our pole jack handles here. We need to, gonna have to do it by hand here for a second, then we'll go ahead and set this aside.So now we'll go ahead and disconnect our lower shock mounts using our 15-mil socket on our impact and our 18-mil wrench. You may need to use your pole jack. Go ahead and adjust the differential back up to get your bolt out. Then we'll go ahead and do the same thing for the other side. And you don't need to disconnect the upper mounts unless you plan on replacing your shocks while you're doing this. Next, we can go ahead and disconnect our quad shock here from our body mounts. This is just gonna allow for more travel of our rear differential. So we'll grab our 18-mil socket on our impact, [inaudible 00:06:06] that nut off, go ahead and pop these off, and we'll do the same thing for the other side. Now we can go ahead and lower our differential down to relieve the tension on our springs. Now that we have those lowered, we can go ahead and remove our springs.So we've got our pole jack dropped down a bit under our differential to give it a little bit of room for flex. So we're gonna grab a pry bar and go ahead and get the spring out. We'll go ahead and loosen it here. Once you have that off, it's perched, should be much easier to get off. And once you have this one out, you can go ahead and repeat the same process for the other side. So next, we're gonna go ahead and remove this brake line bracket here to give us a little bit more room for our upper control arm. So we've got our 10 mil socket and extension on our impact. Go ahead and remove this bolt. We'll go ahead and do the same thing for the other side.So now we're gonna go ahead and remove our upper control arm and we're gonna start with our first bolt in here by our exhaust and we're gonna grab our 18-millimeter wrench, our 18-millimeter socket with swivel and extension on our impact, go ahead and get this off. You can fish your impact right through here, lock that on. And you can't really see the head of the bolt, but it's pretty easily accessible right behind the body mount. We'll go ahead and run that right off. Now, we'll go ahead and disconnect our bolt from our differential. This is gonna make it easier to get that other bolt out. So, we'll go ahead and grab our 18-mil wrench again, as well as our 18 mil socket and swivel on our impact, run that out. We can run this bolt all the way out. So now that we have this bolt out, we can go ahead and work our other bolt out and remove our upper control arm.So, now we're ready to start removing our lower control arm here. So, I've got an 18-millimeter socket on my ratchet through our body pass through to the head of the bolt here for our lower control arm and a 21-mil socket and ratchet for the nut side. Go ahead and get this off and remove our nut. Now you could remove your exhaust if you wanted to make yourself have a little bit more room, but it's not completely necessary. You can kind of just push your muffler back enough to get your socket and ratchet in and out. So now we can go ahead and remove our bolt from our control arm. Now if you find it getting a little bit jammed up, you can grab a small pry bar, wedge it on the head of your bolt. Just work it out. Again, you will have to kind of persuade your exhaust if you don't want to take it all the way off, then you can just kind of go up and over the muffler. And now that's free, we'll get the other side off and get this control arm off.So now we'll go ahead and bring our control arm down first so it doesn't swing and hit us. Then we can go ahead and remove our nut with our 21-millimeter wrench and 18-mil socket on our impact. Once we have our nut off, we can go ahead and support our control arm. Pull out our bolt and set this aside. So now once you've completed these steps for this side, you can go ahead and repeat these same steps for the other side. All right, so before we can go on to the vehicle with our new control arms, there's a few things we have to do. So we have to get our bushings into our control arms themselves. So we've got ourselves a little bit of lubricant here. Just gonna help our case. And we're just gonna lube up our bushings here a little bit just to make things easier. I'm just going to put a little bit inside because there is a sleeve we're going to have to insert as well. Go ahead and get these. You don't need much, just a little bit will do the job. It just helps things along just a bit.So, we've got those on. What I'm gonna do is set the bigger part of our bushing down on the table, grab my control arm, go ahead and push this in. As you can see, nice and flush with that lip there. And we'll go ahead and do the same thing. Here's our other one just like so. And once we have that in, we can go ahead and push our sleeve through. So now we'll get our sleeve into our bushing here. So, once we have our sleeve started into our bushings, we can go ahead and grab a soft mallet here. Drive that through pretty much flush and then once we bolt it together, that'll pinch that the rest of the way through. Now we can go ahead and do the same thing for our other bushings on our lower control arm.Now, you may even need to give your bushings a tap into place. Again, you wanna do this with a soft mallet as to not damage your control arms. Tap to get it flush, just to help out your situation here. Again, we'll lube our sleeve as well just to a little extra motivation. So now we can go ahead and get our new upper control arm into position, work that into place here. Now mind you, this might be a kind of a tight squeeze into the factory spot. So once we got this into position, we'll grab our supplied bolt and flat washer. Let me get that through. We can loosely install our flat washer and lock nut on this side.So we're gonna go ahead and get our lower control arm mounted in to help us line up our differential for our upper control arms, just a little bit easier to work over here. So we're gonna start by grabbing our supplied hardware, our bolt and flat washer. And again, we're just gonna persuade our exhaust out of the way a little bit, get our bolt up and in position. Once it's up, we can back it off enough to remain in there. Now we can go ahead and get our control arm into its mounting point. I just wanna slowly work this up, it will go. You may need to use your prybar again. Once that's through, go ahead and send your bolt through. Now we can go ahead and get our flat washer and supplied lock nut loosely in place on our bolt here. Just want to get that started for now. And we can go ahead and attach it to our differential.Now we can go ahead and get our differential side mount in place. Let's go ahead and work that up and in. May take a little persuasion. And you may need to grab your soft mallet again to go ahead and give this a few taps to get it up into place. Once you see it start to line up, we're going to need to go ahead and get our differential forward to get it to go into place. So once you have your lower control arm mount lined up with your differential side of your mount, we can go ahead and install our supplied bolt and flat washer. And once we have that bolt through, we can go ahead and install our other flat washer here as well as our provided lock nut.Now, this may take a little time and effort to get this lined up properly as the mount is pretty tight going in. But just have a little patience, work it, and it should go right in. Now we can go ahead and get our bolt into our upper control arm here at the differential. So we may need to move it just a little bit to get it in place. Now, we'll go ahead and get our bolt and flat washer through. Do some persuading for it to come out the other side. We'll go ahead and push that through. So once we have our bolt through, we can go ahead and get our flat washer and our lock nut on here. Now we are gonna leave all of this loose until we get everything done on the other side, then we'll tighten everything down all at once.So now that we've got our control arms all loosely in place, we're gonna go ahead and install our springs first just to make sure everything is in and kind of set up with the tension it's gonna have, and then we'll tighten everything down. So we're gonna swap our lower rubber bushing here onto our new perch for our control arm, and we'll go ahead and get our spring in place. So if you find yourself having trouble getting your factory spring back in, if you're not going to a lowering kit or a coilover kit, it's gonna be a little bit more difficult to get that spring back in because of the much larger perch here. Also, if you notice, we've swapped, again, our factory bushing at the bottom of our springover.So what we're gonna do is remove the differential side mounting bolt for our lower control arm right now. So we've got that out. Then we're gonna drop it down, we're gonna put our spring on, and then use our pole jack to raise it back up and get it back mounted to our differential. So we have that out, lower the pole jack and you kind of just want to make sure you have this lined up if you are using a pole jack beforehand. We can go ahead, you may need to use a pry bar because they're in there pretty securely. So go ahead and work this out like so. You just wanna let this drop down pretty far. That's gonna give us ample room to get our spring back in.So we'll go ahead, get this in place. Make sure it's lined up with our bottom and top perches. And then we'll start raising it back up with our pole jack. We know it's captured by our top perch as well. We can focus solely on getting this back lined up. And you need to pull down on your differential a little bit as well, keep it from raising up with the bushings. Then we'll get that line back up and get our bolt back in place. So now we'll get our bolt through and we'll reinstall our flat washer and lock nut. Then you can go ahead and do the same thing on the other side. Next we can go ahead and get our shocks back onto our differential. Go ahead and get this back up into place here. Let's reinstall our factory mounting bolt, reinstall our 18 millimeter nut, and we'll do the same thing for the other side.So now we'll go ahead and tighten down our lower shock mounts. We're using our 15-mil socket and our 18-mil wrench. We'll go ahead and do the same thing for the other side. Next, we can go ahead and reattach our quad shocks here. Go ahead and reinstall our 18-millimeter nut, tighten this down, our 18-mil socket on our impact. We can go ahead and do the same thing for the other side. Next, we're gonna go ahead and tighten down our upper control arm bolts using our 19-mil socket and swivel with a long extension on our impact and an 18-mil wrench. We're gonna feed this right in between our shocks there. Now, we'll go ahead and tighten this lower bolt with our 19-mil wrench in our 18 mil socket and impact. Now we can go ahead and tighten down our lower control arm bolts using our 21-millimeter socket on our impact and our 22-millimeter wrench.Now we can begin tightening down our upper bolts here, forward bolts rather. Again, we've got our 22-mil socket for our nut and our 21-millimeter bolt head. Now, we can go ahead and reinstall our brake line brackets. Reinstall our 10-millimeter bolts. We'll tighten those back down with our 10-mil socket and extension on our impact. Go ahead and repeat that for the other side. So in order to mount our sway bar back into place, we're gonna have to go ahead and take our threaded clips off of our sway bar. So we're just gonna grab a flathead screwdriver, get under our clip, wedge this out here. And we'll go ahead and do that for all of them. And once we have these off, we'll go ahead and stick them on our control arms because that's where they'll be mounted.So now to get our sway bar in place, we actually have a buddy to help us out and hold it in place. It's gonna make our lives a lot easier. So he's gonna get our first bolt holes lined up and then we'll add our threaded clips onto the control arms and get our mounting bolts in place. Got that lined up, now we'll get our other one in place on the other side and then we can get these mounted up. Now, we'll get our second bolts in place, a threaded clip along with our ABS bracket. Now, it does have an ear on the factory bracket. You may have to bend that as you're tightening the bolt a little bit. Let's go ahead and get this started and we'll get our other one on and get these tightened up.So now we'll go ahead and tighten our hardware back down using our 13-mil socket and swivel adapter with an extension on our impact. Once you have those tightened down, we can go ahead and reinstall the ABS line into our bracket, then we can go ahead and do the same thing for the other side. All righty guys, that about wraps up our review and install of our rear, upper, and lower tubular control arms and red finish for your 79-04 Mustangs, excluding the 99-04 Cobra. Thanks for watching and as always, for everything Mustang, keep it right here at AmericanMuscle.com.

      Product Information

      Features, Description, Reviews, Q&A, Specs & Installation

      Features & Specs

      • Control Arms
      • Glossy Red Coating
      • Stabilized Wheel Motion
      • Restores Axle Connection
      • Enhanced Steering Alignments
      • Fortified Tubular Steel
      • Difficult Installation
      • Fits 1979-2004 Ford Mustangs, Excluding 1999-2004 Cobra Models

      Description

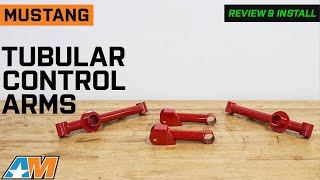
      Stabilized Wheel Motion. Maximize the maneuvering potential of your Mustang with these Rear Upper and Lower Tubular Control Arms. Engineered to provide improved stability, traction, and handling, thanks to their superior strength and durability.

      Fortified Tubular Steel. Made from high-quality tubular steel, these Rear Upper and Lower Tubular Control Arms are designed to withstand the toughest driving conditions, ensuring that you can push your vehicle to its limits without worrying about any performance issues. The gloss red coating also negates rusting on top of the sleek aesthetics that it provides.

      Installation. This product is difficult to install and should take about 4 hours.

      Application. This Rear Upper and Lower Tubular Control Arms; Red fits all 1979-2004 Ford Mustang models excluding 1999-2004 Cobra models.

      Fitment:

      Details

      CA Residents: WARNING: Cancer and Reproductive Harm - www.P65Warnings.ca.gov

      Installation & What's in the Box

      Installation Info

      What's in the Box

      • (2) Control Arms
      • Mounting Hardware
      4.4

      Customer Reviews (5)

        Reviews of similar Suspension products have an average rating of 4.4 out of 5

          Questions & Answers

          10 More Questions

          Will It Fit My Mustang

          • Bullitt - 01
          • Cobra - 81, 93, 94, 95, 96, 97, 98, 99, 01, 03, 04
          • Cobra R - 93, 95, 00
          • GT - 87, 88, 89, 90, 91, 92, 93, 94, 95, 96, 97, 98, 99, 00, 01, 02, 03, 04
          • LX - 87, 88, 89, 90, 91, 92, 93
          • Mach 1 - 03, 04
          • Other - 79, 80, 81, 82, 83, 84, 85, 86
          • V6 - 94, 95, 96, 97, 98, 99, 00, 01, 02, 03, 04