Talk to a Challenger Sales Tech
1-877-887-1105
M-F 8:30A-11P, Sat-Sun 8:30A-9P
$20K Sweeps! 10 Chances to Win! Enter Daily >

CCFL Halo Projector Headlights; Black Housing; Clear Lens (08-14 Challenger w/ Factory Halogen Headlights)

Item CH4985
Verify parts fit and get product recommendations.
Challenger Sales Techs: Connect Now M-F 8:30A-11P, Sat-Sun 8:30A-9P
$0.00
Our Price

$424.99 (pair)

FREE Shipping Market Price $489.99 You Save 13% ($65.00) Up to 10% off for Military & First Responders! See Details

Will this fit your Vehicle?

Select a different vehicle Help?
Update or Change Vehicle
Ship to: Ashburn - 20149
Sorry, please enter a valid US or CA postal code
We're sorry, zip can't be updated at this time.
Recommended Install Shops
How It Works
Install Shops are available near Ashburn - 20149

Add Local Shop Installation

Total cost of service $174.99
    Create a list
    Add to New List

    Saved - View your saved items

    We're sorry. We couldn't save this product at this time.

    or use

      Product Videos

      Noah: I'm Noah from AmericanMuscle, and today we're looking at the CCFL Halo Projector Headlights with Black Housings and Clear Lenses for the '08 to '14 Challenger with the factory halogen headlights.These headlights are a perfect upgrade for the Challenger owner who's looking to replace their stock headlights with something that looks super new and shines bright at night with the projector housing and some colder temperature halos.These headlights don't stray too terribly far from the stock design, but you can tell that these have a little bit of an updated look and that they aren't original. Probably my favorite part about them and what really makes them stand out is the colder temperature LED halo and that reflector bowl under that inner amber bulb.Now, it's an interesting look that I think really adds a certain something to the front end of a Challenger. We're looking at a clear lens with an enclosed black housing, and that's gonna accept the factory headlight bulbs. Everything you need to replace your headlight is included with the kit. These will bolt in exactly the same way you took the old ones out.Now, this is a projector-style headlight, and you are able to swap those factory halogen bulbs out for some super bright LED bulbs as well if you'd like. When you're replacing headlights, I always recommend throwing in some fresh bulbs at the same time, whether you go with upgraded ones from our site that are LED or just a new set of factory halogen ones.So these guys are designed to handle some abuse from the daily drive from things like road debris, or rocks, or anything that has the potential to sandblast and chip your headlight. The lens is constructed from an impact-resistant clear polycarbonate which is shatterproof and will be UV-resistant.Now, the housings are made from a raw black ABS plastic. ABS is strong, lightweight, and heat-resistant, which makes it a great material to construct a headlight housing out of since they're right in front of a big motor. And then, lastly, the headlight is fully sealed so that moisture can't make its way inside and cloud up the inside of that lens.Coming in around $460, these headlights are one of the more affordable options out there when it comes to upgraded headlights for the Challenger. Though headlights are a small part of the big picture of a car, I always think that a fresh and clean set of headlights with an updated design can drastically change the look and curb appeal or presence of a car overall.Installing these headlights should take you about an hour and just about anybody should be able to accomplish getting these guys put in their place. We're looking at an install difficulty of one out of three wrenches. Everything with these headlights is manufactured to drop right in place of the original headlights, which is gonna make installation a breeze. So without further ado, let's head to the install bay and get these headlights on our Challenger.Man 1: The tools you're gonna need for this install include an impact, electric or regular 3/8 ratchet, a 3/8 extension, wire strippers and crimpers, a Phillips head screwdriver, a clip removal tool, a 3/8 swivel socket, a deep 10-millimeter socket, a 10-millimeter swivel socket, an 8-millimeter and 7-millimeter swivel sockets, a 3/8 to a 1/4-inch adapter, a T30 Torx socket, included T-taps, non-included male ends, and a panel removal tool.What's up, guys? Today we're gonna be installing a set of headlights on our Challenger. But before we get started, you're gonna watch a short video on how to uninstall your stock headlights, and I'll meet you back here for the install.Man 2: All right. Now, for the gun install, we do have to remove our bumper to access the headlight bolts. So what we're gonna have to do is a couple of preliminary things. We pop their hood, we're gonna remove the two pieces for the radiator shroud to expose a couple of pushpin clips, and I'll use this panel removal tool to get those off. So under the hood, you'll find this little open hole on the side on each side. You're gonna pull up on that and set these guys aside.All right, now, the first points that are connecting the bumper are these little black pushpin clips. There's six of them on the black pieces. There are a couple in between that are on, you know, your factory paint color, in our case, hemi orange. You don't have to do those that are sitting on the paint color, just on the black plastic trim. Use a panel removal tool or something similar to get these guys off. You're basically just lifting up on the centerpiece and then it loosens up and you can pull it out. Set these aside.All right. Now, in the corners above each headlight where the bumper meets the fender, there's a small 10-millimeter nut on a stud holding on the corners there. We have to get that off. For this, I would highly recommend a 10-millimeter swivel socket. I'm gonna use my impact gun, an extension, and my swivel socket here. It might be a little tough to see, but once you get that locked on there, you can get it off. All right, just be careful not to drop it in. It can be pretty difficult. All right, just like that. Repeat that on the other side.For this one, we put the Challenger up in the air a little bit, but you can work on the ground as well. We're gonna be removing the four plastic pushpin clips in the wheel well. This is holding on this liner, which will give us access to a bolt underneath. Grab a panel removal tool and you're gonna remove all four. Ours is missing one, but that's all right. We've got three more to work with. You should have four there. Next, what you're gonna do is take the wheel well liner and you're gonna peel it back. Underneath of that, you'll see that there is a 10-millimeter bolt holding the fender to the bumper.All right. For this next bolt, we have this 10-millimeter right here. I'm gonna use my 10 socket to get this off. Next, we have a bolt that's pretty difficult to get to. It's where the fender meets the bumper upward a little bit more parallel to the headlights. So it's right about here facing toward the back of the vehicle. It's a nut on a stud. Now, you're never really gonna be able to see that on camera. It's so close up in here, but we're gonna use an extension and a swivel socket.To get in there, we're gonna drop it on and remove the 10-millimeter nut. Like I said, tough to see, but if you follow this line up, it's right about here. All right, so now I'm gonna use two extensions for this guy and just feed a socket on a swivel joint to get up in there at the right angle. All right, I'm locked on right now. I'm just gonna get it off. All right, at this point, you can reach your hand in there and get the nut off the stud.All right, and there it is. Now you can repeat this exact same process in the wheel well on the other side. At this point, we got the vehicle up in the air completely to access the front splitter here and the belly pan. We have to remove all the bolts connecting these two together in order to drop our bumper. Now, there's typically a bunch of 7-millimeter screws holding on the front here, all along the front and the sides underneath of your fog lights. Now, ours have been replaced over the years. These are Phillips heads on ours, yours will probably be 7 millimeters.So, just grab the appropriate tool and we're gonna get these guys off. All right, now we can move on to the sides. All right. So, I have two 7-millimeters on the side here. Same thing on the other side. All right, so now if you go backward a little bit to the belly pan, we have a 10-millimeter bolt on our subframe. All right, now if you go directly next to it on the other side, there's another one to take off. If you look at this little indent in the middle here, there should be three holes with three black pushpin clips.Now, again, our Challenger has gone through some replacements over the years. These three guys are missing currently, but you should have three of those. Grab your panel removal tool, the same as we did under the hood, and get those three out and out of the way. All right. So, next up, we have a couple of pushpin clips left. We have two here on the inside of the wheel well. We're gonna remove them on both sides. All right, I'll do the same thing on the other side.All right, next step, this is loose, so let's pull our belly pin off. All right, a couple of things to note here before we grab our bumper off, make sure when you're pulling this off, you're being careful not to scratch the paint with the studs on the side. Also, you don't wanna go too far with it because we still have to disconnect our fog light harness. So, as soon as you get it off, you wanna set it gently down close to the vehicle so you're not pulling on the harness.So, from here, let's disconnect the sides just like that. Same thing over here. All right, let's get it off. Going right down with it right here, and now we can reach in and unplug our harnesses. All right, now on our passenger side, both fog lights feed into one master harness, which we're just gonna reach down here and disconnect. You can follow the fog lights down, find this connector, and just disconnect. Now we can set our bumper safely aside, making sure we're not scratching the paint.All right, next up, we're gonna remove our headlights. Finally. We have three bolts, one at the top, two underneath there that were covered by the bumper originally. We're gonna grab a T30 Torx bit and an extension and get these three bolts off. All right, with this last guy out of the way, just carefully pull your headlight out of place and disconnect the harnesses. All right, so I'm gonna lift up on the red locking tab, pinch, and disconnect on both sides. Set your stock headlight aside.Man 1: All right, guys, so the first thing we got to do here is we have to transfer over our turn signal bulb over to our new headlight. So we're gonna turn counterclockwise. Pull out, swap that over, do that vice versa, we'll go clockwise, then we can get this installed onto the vehicle. So the next step, we're gonna have to wire up our halos, which we'll be using with our red and black wires.So we're gonna take our wire strippers and we're gonna strip down a little bit of the insulation. We're gonna twist these up so they don't fray. Then we can grab a set of male connectors. We're gonna slide that through the wire so you can see just a little bit right there. Make sure we hold that in place. We grab a set of crimpers, and we're gonna crimp down right here on this metal part. Give it a little tug. Good. We'll do that same process for the red wire.Now, with the set, it comes with included T-taps. So you're gonna T-tap into the black wire on the black connector and the white and brown wire. So now we're gonna take our black wire from the headlight and go in from our T-tap onto the black wire. I'm just gonna slide that in there. For our power, we're gonna be tapping into the white and brown. Like so. Then we can get our headlight into place. This black wire will be on the turn signal bulb. I'm gonna press in and press in your red tab.Then our green connector will be for our headlight. We're gonna push it in until you hear a click, then press in your red tab. Now we can kind of tuck these wires out of the way while we get this lined up in the mount. Now we're gonna thread in our bolts. One on top, two down here on the bottom. Make sure that wiring is tucked out of the way so you don't pinch them. Then you're gonna grab an 8-millimeter swivel socket and we're gonna tighten these three down. Now you can repeat that process on the other side.All right, so now we have the bumper close to the vehicle. We're gonna make our connections with our fog lights. We're gonna slide them in so you hear a click. Then you can tuck your harness into the bumper. Now we can get this onto the vehicle. All right. So now to get the bumper on, we're gonna align this stud up here with the hole in the quarter panel and this plastic tab, it's gonna go into this hole here. We're gonna do both sides simultaneously. Get it lined up. Make sure this side's good. Now we're gonna come over to this side. Try to line your bumper up. Don't worry about the gap here because there is a stud with a nut that we're gonna have to tighten down from the other side.All right, so now we have to get our nut onto that stud that's located right here. It's gonna be very hard for you guys to see, but we're gonna take our nut and we're gonna thread that onto the stud. So we gotta go up in the quarter panel here and get our nut onto the stud. Now we're gonna take a 10-millimeter socket, a swivel socket, and an extension. And we're gonna line that onto the stud. There we go.Now we can grab an impact and tighten this down. See now that your gap is closed in, we can press in our fender liner with a trim panel tool. Push that in to other side. Get back here. Then we can thread in our bolt. So we'll pull back on that fender liner. Thread it in. We could use that same setup we have with the 10-millimeter socket and tighten this down. Now we can push our fender liner back in. We take our push clip. Push that into view.Now we can head on up to the engine bay. So now we can take our nut and thread that onto the stud that will tighten down our bumper to the quarter panel. Just thread that in a little bit. Then we're gonna tighten that down with a 10-millimeter swivel socket. Then you can repeat that process on the other side.So now we're gonna insert our push clips into these six holes here that'll keep the top of the bumper in place. We'll come back to that one. So now we're gonna install our plastic covers. This covers everything up. Gonna line those two studs here into the side of the quarter panel. This one is gonna go under the hood latch. Give that a firm press. Same for this side. Line your studs up. Click in. And now your install is complete.So that's gonna wrap up the install on our CCFL Halo Projector Headlights with Black Housing and Clear Lenses for your '08 to '14 Challenger with factory halogen headlights. Thanks for watching, and for all things Challenger, keep it right here at americanmuscle.com.

      Product Information

      Features, Description, Reviews, Q&A, Specs & Installation

      Features & Specs

      • Projector Headlights
      • Perfect EOM Halogen Headlights
      • Increased Illumination in Low-Visibility
      • Compatible with H9 or HB3 Bulbs
      • Standard-Grade Casing
      • Factory Point Fitting
      • Lifetime Warranty
      • Fits All 2008-2014 Dodge Challenger Models Without HID Headlights

      Description

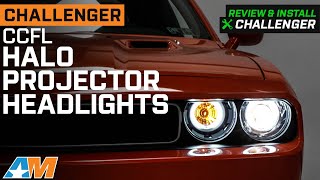
      Emphasized Visibility. Do you feel like your headlights have gotten a lot dimmer than they before? upgrade to these CCFL Halo Projector Headlights and illuminate the dark and gloomy road. These projector headlights are built to be compatible with factory H1 Halogen, H9 low beam, and HB3 high beam bulbs, but regardless of the bulb type, these reflector lights are assured to provide you with an even and non-blinding light.

      Car-Grade Construction. These CCFL Halo Projector Headlights are made with standard-quality lighting components encased in a raw black ABS heat-resistant housing that protects the components and circuitry from engine bay heat. The polycarbonate lens works together with the reflector bowl to provide high-quality lighting.

      Warranty. This product comes with a limited lifetime product warranty that covers any damages to the components caused by the manufacturing process or by the delivery courier prior to installation. This warranty does not cover damage caused by component abuse or faulty installation.

      Factory-Point Mounted. The CCFL Halo Projector Headlights are made to fit into the stock installation points of your Dodge Challenger's headlights.

      Application. These CCFL Halo Projector Headlights function best on all 2008-2014 Dodge Challenger models without HID headlights.

      Fitment:

      CA Residents: WARNING: Cancer and Reproductive Harm - www.P65Warnings.ca.gov

      Installation & What's in the Box

      Installation Info

      What's in the Box

      • (2) Halo Projector Headlights
      5.0

      Customer Reviews (4)

        Reviews of similar Lights products have an average rating of 4.9 out of 5

          Questions & Answers

          10 More Questions