Installation Time
(approx) 2 Hours
Difficulty Level:
Light to Moderate mechanical skill required.
FREE 2 or 3-Day Delivery on Orders $119+ Details
$1,219.95 (kit)
FREE Shipping Market Price $1,402.99 You Save 13% ($183.04)Open Box from $731.97
Add Local Shop Installation
Saved - View your saved items
We're sorry. We couldn't save this product at this time.
or use
Hey, guys. Adam here with americanmuscle.com. And today, we're taking a closer look at, listening to, and of course, installing the Flowmaster Outlaw Cat-Back Exhaust, fitting all '09 to '14 5.7 Hemi Challengers. Now as you just heard from our sound clips, and as I'm sure you're aware, the Flowmaster Outlaw is one of the loudest options in the category through and through, which is why of course I'm giving it five out of five on our loudness meter. Now the Outlaw cat-back from Flowmaster is what is essentially a straight-pipe exhaust. It does have two bullet-style mufflers but not a ton of baffling inside so you can expect loud noises inside and outside the cabin. So if that's what you're looking for, the Outlaw is a great option for you.Now there is gonna be drone inside the cabin, which is worth mentioning especially at highway speeds and from light to light, you'll hear some of that noise inside as well. The cat-back here is a 3-inch mandrel-bent, 409-stainless steel, putting it at the middle-of-the-road as far as construction or as far as quality of materials goes. Now if you're located in wintery weather areas and you want some of the more premium exhaust materials like 304-stainless, there are some other options out there with the same kind of loudness such as the Corsa Xtreme, for example, or the Borla Atak. If you're looking to cut costs, spend around 900 bucks, this is gonna be the way to go.The mufflers do have a black coating on them to help with a little bit more durability and the exhaust tips here are a polished full stainless steel which I think looked pretty good, definitely a lot better than factory. Now the install here, I'm gonna give two out of three wrenches on our difficulty meter. There is no cutting required, no drilling, no modifications bolts right up to the factory locations. And considering the mufflers are not here, but instead, they're in the middle of the exhaust, the installation of your tailpipe here is gonna be a lot easier. As you know, the factory exhaust mufflers tuck up into the bumper, so not the case here. Like I said, essentially a straight pipe. Now I'm gonna walk you through every step of the process, it'll take about two hours. Let's get started.All right, tools using this install include an impact gun or a ratchet extension, 13 and 15-millimeter deep sockets, I also recommend, but it's not required, a 13-millimeter swivel socket, hanger removal tool and WD-40 or something similar. The first step here, I'm gonna grab my impact gun and extension and a 13-millimeter socket and I'm actually gonna remove the hanger isolators directly from the frame unbolting them from the vehicle rather than using a removal tool and popping the isolators out. So we're gonna keep them all in one piece attached to the exhaust and just remove them from the frame. So go straight above the muffler, there's one behind it and one in front of it by the tips.Now when you do the second one, you want to make sure you have a hand on the muffler because it's gonna want to drop down a little. All right, now we can do the same thing on the other side. So now you can grab a hanger removal tool and head back toward the middle section of your exhaust here. Now on the driver's side, you have this flex tube, directly above that there's a hanger into the isolator, I'm actually gonna pop this guy out. The same thing on the other side. Now as you're doing this, before you finish up removing the exhaust, it's a good idea to have a pole jack in place or a Jack stand or something similar, maybe even a hydraulic jack just to support the middle weight of the exhaust as you remove it.Now if you have a helping hand during these final stages of unclamping it from the front of the vehicle, that goes a long way, so I'm gonna grab a buddy to hold the tips while I remove the front and we can drop it all in one piece. Now you can grab your 15-millimeter deep socket and loosen up the two clamps, holding them to your cat pipes.At this point, grab a helping hand and drop your exhaust. So we've got our factory exhaust off of our 5.7 RT Challenger, it's next to our Flowmaster Outlaw and I want to take you through some similarities and differences between the two kits and I want to start up front. Now your factory exhaust has an H-pipe as a mid-pipe which has that crossover section making it that H shape which can act as a restrictor for airflow and it can slow down the airflow resulting in a little less power than you'd like to get out of it. Swapping over to an X-pipe like the one included in Flowmaster's kit here you get a raspier louder sound with a slightly more aggressive tone, but you also get a more free-flowing exhaust flow which can result in a small bump in power.Moving on, you'll see the entire kit is a 3-inch four 409 stainless steel mandrel-bent to make sure it's kink-free and air restriction free. So that 3-inch is gonna be slightly larger than your factory option there and 409 is gonna be the middle-of-the-way option as far as quality of materials. If you're located in a wintery weather area, seeing a little bit of road salt, 409 is gonna be a way better option than an aluminized. Now the mufflers here are the bullet-style Flowmaster outlaw mufflers and these guys are essentially a straight pipe.There's not a whole lot of baffling in there if any at all, so that's gonna produce that loud aggressive note that you heard earlier in our sound clip. It's also gonna result in some drone which is worth noting. There are no resonators in this kit like there are with the factory exhaust. So all that combined you get loud, he gets some interior cabin noise, especially at highway speeds. So if you like that, this is a great option for you.Now the mufflers have a black paint coating on top which is gonna help add some durability to its corrosion and rust resistance beefing up the 409 to make it a little bit better. Now moving on, you'll see again essentially a straight pipe going back to the tips. Now the tips aren't deviating too much from the factory option, they're about three by seven, rectangular tips. They are slash-cut, double-walled, so they are a little bit thicker. They are also much more polished. The factory tips are, you know, looking a little worse for wear, they're not the most attractive tips in the world. So this has Flowmaster's name embedded on top and a polished stainless steel tip. So those are a little bit more attractive while keeping the OEM styling.Now what we're gonna do is we're gonna start with the install up front here at our new mid-pipe and we'll work our way back. First step here is to grab your mid-pipe. Now you'll see it, the mid-pipe outlet there is one curved pipe in one straight pipe, the curved pipe is gonna go on your passenger side. Now on your inlet connecting to the cat-pipes, you want to make sure you have two of the smaller clamps included in the kit. There are only two small ones so you'll know which ones I'm talking about, now we can throw this guy up in a position.Now you might need to finesse the cat pipes a little bit to get this guy to slide on. But once you do, slide it all the way back and we'll tighten it down. Grab your 15 socket and tighten these down. Next to our mufflers. Now I'm gonna start with our passenger side muffler and they are side specific, so you want to make sure you're taking a look at the diagram in the instructions so you can see which way the pipes are supposed to angle. Now on each of the mufflers you'll see a sticker that says inlet. I like to leave that on until it's on-car. It will burn off eventually, we don't have to really worry about it. The inlet side obviously is gonna go into the mid-pipe outlet, so that's gonna connect here. You also want to make sure the sticker is facing down. That's how you know it's got the proper orientation. Put a clamp over the end here, we're gonna slide this guy on and tighten it down.Grab your driver's side muffler and do the exact same thing. Make sure the inlet sticker is facing down and connecting to the mid-pipe with a clamp on it before you slide it on. All right, so now what we're gonna do is take our factory hanger isolators that we removed from the frame and pop them off with the factory exhaust, which is pretty simple. We're just gonna slide this guy onto our new hanger.Now the reason we're doing this off-car is because each of these hangers are facing a different direction which is gonna make it harder to do on-car. So we've got this guy on, we just want to make sure that this tab here is facing the front of the vehicle and you can take your ground strap, I'm gonna swing this guy around and just strap her in. So now you can do the same thing to the front one, just making sure that this tab is facing the front of the vehicle. Now we can lift the entire thing up and slide this guy onto our passenger side muffler outlet. You want to make sure you're seating that all the way in, now you can lift this guy up and connect it to the isolator. Grab your 15 socket and tighten down that clamp.All right, so now we can take the factory 13-millimeter bolts and put them up into the frame. Now for this guy, I'm gonna use a swivel socket just because it's at a weird angle and because we have the hanger in the way. Let's just repeat that for the other side starting with our hangers, making sure that the tabs are facing the front of the vehicle.Now upon testing our driver's side tailpipe, I realized that this muffler was angled in the wrong direction here a little close to the driveshaft and the diff, so what we're doing here is basically taking this and rotating it toward the driver's side so that the pipe comes away from the driveshaft to the outside of it. So we've got to just like that, I'm gonna tighten down this clamp again and then get to work on the tailpipe.All right, so now we're just gonna do the exact same thing, I've got my tailpipe here and I adjusted our muffler, so this will slide right in. All right, so now we can hang up these factory hangers. All right, so now let's repeat that for the front one. So now we can finish things up with our tips. Now the tips are slashed cut at an angle. The peak of the angle here you want on the inside toward your license plate, so that's what we have going on here. So I'm putting this on our passenger side. Perfect. Now we can tighten down this clamp. All right, now we can do the other side.At this point, you can make sure your tips are exactly where you want them, align everything properly so it's even on both sides. Go back and tighten down all of your clamps and you're good to go. That's gonna wrap up my review and install for the Flowmaster Outlaw Cat-Back, available for the '09 to '14 5.7 Hemi, you can get yours right here at americanmuscle.com.
Subscribe to our YouTube Channel
Features, Description, Reviews, Q&A, Specs & Installation
Brand | Flowmaster |
Exhaust System Type | Cat-Back System |
Exhaust System Tip Finish | Chrome, Polished |
Exhaust Loudness | Loud |
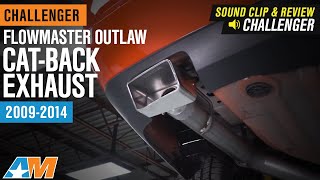
Super Aggressive Tones. This Flowmaster Outlaw Cat-Back Exhaust assembly features a design that promotes deep and aggressive exhaust tones while cancelling out rasp and drone in the cabin. What you get is a race-quality and head-turning growl without going over street-legal limits.
Maximum Sound and Performance. The Outlaw Cat-Back Exhaust is perfect if you seek maximum sound levels and improved performance for your Dodge Challenger. This exhaust assembly features dual Outlaw Series mufflers with unrestrictive design which eliminates backpressure. As a result, you get increased horse power, toque, and gas mileage.
Superior Quality Construction. This cat-back exhaust is manufactured and assembled in the USA. The system is built from high-grade 409S stainless steel to ensure heavy-duty capabilities and long-lasting quality. All components are polished, rust-proof, and can withstand various harsh driving conditions.
Worry-Free Installation. This Outlaw Cat-Back exhaust system is designed for easy and hassle-free installation. Each exhaust kit comes equipped with all the necessary hangers and hardware so you can install it right out of the box. To guide you with the process, a detailed manual is also included.
Limited Lifetime Warranty. This Flowmaster exhaust system is backed by a limited lifetime warranty for defects in materials and workmanship. The warranty will be valid for the duration of its lifespan as long as it remains installed in your Challenger.
Application. This Flowmaster Outlaw Cat-Back Exhaust is specifically designed to fit 2009-2014 Dodge Challenger models equipped with 5.7L HEMI engines.
Fitment:
Flowmaster 817645
CA Residents: WARNING: Cancer and Reproductive Harm - www.P65Warnings.ca.gov
Installation Info
Installation Time
(approx) 2 Hours
Difficulty Level:
Light to Moderate mechanical skill required.
What's in the Box
10 More Questions