FREE 2 or 3-Day Delivery on Orders $119+ Details

Talk to a Challenger Enthusiast
1-877-887-1105
M-F 8:30A-11P, Sat-Sun 8:30A-9P
Win $3,000 in Store Credit! Enter Daily >

MBRP Armor Lite Cat-Back Exhaust; Race Version (15-16 5.7L HEMI Challenger)

Item CH7280
Call a Challenger Enthusiast at 1-877-887-1105
M-F 8:30A-11P, Sat-Sun 8:30A-9P
$0.00
On Sale

$714.99 (kit)

FREE Shipping Market Price $822.99 You Save 13% ($108.00)

Will this fit your Vehicle?

Select a different vehicle Help?
Update or Change Vehicle
Ship to: Ashburn - 20149
Sorry, please enter a valid US or CA postal code
We're sorry, zip can't be updated at this time.
Recommended Install Shops
How It Works

Add Local Shop Installation

Install Shops are available near Ashburn - 20149
Total cost of service $299.00
    Create a list
    Add to New List

    Saved - View your saved items

    We're sorry. We couldn't save this product at this time.

    or use

      Video Review & Installation

      Jake: Jake here for American Muscle, and today I've got the MBRP Installer Series Race Version, Cat-Back Exhaust for 2015 and 2016, 5.7-liter HEMI Challengers. I'm not gonna mince words here. I think the HEMI engines sound awesome right out of the gate, but if you're looking to amplify that sound, and get more outright volume without spending a ton of money, MBRP has got you covered here. This Cat-Back system is gonna give you the race-inspired sound, and volume that are gonna make your ears happy, at a price that will make your wallet happy too.Now, since this is a full Cat-Back setup, as you can see, it's gonna eliminate your stock muffler and resonators. And that means, as you heard from the clips at the beginning of the video, the tone is aggressive and it is loud, loud enough, in fact, to get a 5/5 on our loudness meter. The look here might be kind of subtle, but the sound certainly is not. So, if you're looking for that full-on race car-inspired noise, look no further because this is MBRP's race profile, meaning that it's gonna have some serious volume to it, much more so than their street profile setups.Now, outside of the car, again, as you heard, you're gonna get that boisterous, aggressive, almost rattle-the-windows exhaust note, and you'll get quite a bit more volume inside of the cabin as well. However, you won't get tons of drone like you might with other straight-through type exhausts. Thanks in no small part to this included X-Pipe, and that's not something that you find in a ton of other systems. Now, X-Pipes help even out exhaust pulses caused by uneven firing orders, like you find in a traditional pushrod V8 such as the HEMI. So, with this crossover here in the center, it's gonna help even out exhaust pressure too, and all that helps minimize exhaust drone in the cabin. Now, the piping for this setup is all three-inch mandrel-bent alumina stainless steel. So, it's gonna allow the exhaust gases to flow smoothly because there's no weird creases or folds in the metal.And it's gonna provide some decent protection against the elements too, especially if you live in a drier climate. But this stuff is not what you see once it's installed. Now, the visual impact is left to these dual four-inch tips. Now, these are polished T304 stainless, and they have a nice angle cut to them for that aggressive look. They've also got the MBRP logo stamp into the edge here, and they mount pretty flush with the bottom of your bumper though they are staggered ever so slightly, so it's gonna give you a nice tasteful look once it's installed, but different enough that you'll know it's not stock. The eagle eye will spot the difference at first glance, but let's be honest, they're much more likely to hear this before they see it.Now, price-wise, this setup is gonna run you around $750, and for a full Cat-Back system for the Challenger, that is about the least expensive option available. Now, MBRP has been well-known for making good quality exhaust at a really affordable price, and this one is no exception. You get some good build quality here with some standout features like that X-Pipe at a price that is definitely more palatable than some others in the category. Now I say that with the caveat, of course, that you aren't getting the highest quality of materials or some of those really high-end features like switchable valves, or things of that nature, and that's where the cost savings comes into play. But if you want something that's really gonna wake up your Challenger without blowing the budget, I think that what you're getting here more than justifies the price.Now as far as insulation goes, this is gonna get a two out of three on our difficulty meter, and you should budget about two hours to get everything buttoned up. Now, this is a totally bolt-on system, and it uses all of your stock exhaust hangar locations, so you don't need to modify anything on the car or the exhaust as it comes out of the box. You also get all new clamps in the kit, so you have everything you need to get this bolted together. Now, exhausts can be a little bit fiddly to do in the driveway purely because of space constraints, but this is absolutely a job that a DIY mechanic can do at home, and to show you just how to get it done, let's head to the install bay right now.Man: Tools used for this install, 3/8 electric impact gun, 13 and 15-millimeter sockets, a long extension, and a pry bar. Hey, guys, I'm gonna show you how to uninstall and install our Cat-Back exhaust here on our 2016 Challenger. So, let's get started. So, first thing we're gonna do is remove our stock exhaust system, and what we're gonna do is we're gonna have to get up here. We have two 13 millimeters on this side, two on that side, two right here, and two 15 millimeters up there. So, we're gonna take them off, take this one piece out first, get a couple of our hangers off, and then drop the whole exhaust without this piece, and take it off the vehicle. So, now first thing we're gonna do is I'm gonna remove these two 13-millimeter spring nuts here that hold this pipe onto this one. I'm gonna take a 13-millimeter. I'm using a swivel to get up in there with my 3/8 ratchet, and we're gonna break these loose and take these off. And it doesn't hurt to use some PV blaster if you need to if your exhaust has been on for a while. Ours has been off for a couple of times. I'm gonna remove this one.Okay, so now what we're gonna do is remove our grommet here. I'm gonna use a pry bar. We do have an exhaust grommet tool, but I'm just gonna pop it off with the pry bar, just like that, and get it up out of the way. Now, we have two 13 millimeters in the back we're going to be removing. Now, I'm gonna take my 13-millimeter, my 3-inch gun, remove these two bolts, and I'm gonna remove the other one. And when I remove the other one, I'm gonna hold up on the muffler here, so it doesn't fall. Pull this pipe out, and remove this one. Now, I'm gonna remove these two bolts up here. They're 15-millimeter, and I'm just gonna loosen 'em up, and get that clamp loose, and smack it a little bit like that. Get it loose. Do the same on the other side, and I'll just bump it like that. Nice little trick just to open it up.Now, we'll go to the back. Remove two 13 millimeters and a hangar. I'm gonna take my pry bar, remove this rubber exhaust grommet here, hangar, and move it off. There we go. I'll get that outta the way. So, now what I'm gonna do is take my 13-millimeter. We have one hangar bolt here, one hangar bolt here. I have it on my 3/8 gun. I'm gonna remove these two. Take that bolt out, and then we'll drop this one, and get this bolt out here. So, now we have our two bolts out. We're gonna remove our exhaust, have my friend Alex here, he's gonna gimme a hand. We're just gonna slide this thing forward, get it off the front, drop it down, and remove it. So, now we have our exhaust off. We're gonna have to remove this tin shield here to get access to our mid-mount here on our drive shaft, and then get our drive shaft out. I'm gonna take a 10-millimeter on a 3/8 gun, remove these four nuts, and with them off, I'm gonna be able to grab this shield, and remove it outta the way.So, now we have our stock exhaust off. I put my two new clamps here and got them ready. We're going to install our pipe after the cats here. We're gonna get this up into place just like this. Slide it right to there. And what I'm gonna do is use a pole jack just to hold it up where I want it. And now if you're doing this on the ground, you can also use a floor jack, however you want to do it, to hold it up. I'm gonna get it uptight against the body. Now, we'll take our clamps, tighten these up, and get this pipe set where we want it, and then start running our exhaust. So, now what we're gonna do is I'm gonna take my 15-millimeter on my 3/8 gun. We're gonna tighten these clamps up right here. I'm gonna hold onto the pipe so it don't move, and you really gonna have to crank on it, and then just make sure it didn't move and it's centered. Do the same to this one. And that feels pretty good. We got them tight.Now, we'll work on the rest of the exhaust out back. So, next what we're gonna do is I'm gonna install our clamps. I wanna make sure that our nut is on the inside like that. Same on this side, and get that one right here. Then we're gonna take our two before the axle pipe here and slide these over. And now you're gonna slide 'em all the way over top of this one onto that one. There we go. So, we're gonna slide it all the way till it stops. We'll put our clamp, something like that, and we'll do the same on this opposite side here. There we go. That one. And now what we'll do is we'll take our 15-millimeter on our gun again, tighten each one at a time. We'll go back over them, then run this one in.Now, we're gonna put on our axle pipe. So, before we put our tailpipe and axle pipe on, we're going to reinstall our hangar here. This was the one in the back. We're gonna put our 13-millimeter, and get those reinstalled here. We did take them out on the uninstall, and once we get that one done, we're not gonna be reinstalling this one on this exhaust. They're only going to use that one. I'm gonna take my 3/8 gun with my 13-millimeter, tighten this up. And you're gonna wanna repeat that same procedure on the opposite side. So, now we're going to take our axle pipe, we're going to slide it into our pipe here, get it into our rubber grommet up here, and then turn it, get it in place like that. As you can see, I already have my clamp on. I'm gonna take my 15-millimeter again and tighten this clamp up a little bit.We're gonna leave it kind of loose so that we can move that pipe around and get everything lined up. I'm gonna leave it like that. And now you're gonna want to just repeat this same procedure on the opposite side. The next one, install our tailpipe. I'm gonna take it, get it up into our grommet here that we reinstalled. Get that in first. Then take it, slide it onto our axle back pipe here. Here we go just like that. And as you can see, I already put my clamp on. I'm gonna take our clamp, and we're gonna snug this one up too. And you are just gonna wanna make sure it's straight here in line. Now you're gonna wanna repeat that same procedure on the opposite side.Now we're gonna go round with our 15-millimeter on our 3/8 gun, tighten these clamps the rest of the way up. And next, we'll put our tips on. We're gonna install our tips. As you can see, I already have our clamp on. We'll slide this in place here...pipe. So, now we're gonna install our tip. As you can see, I already have my clamp on and in place. I'm gonna take the tip, slide it in, and now you're gonna want to just center the tip in the slot, get it where you want it, and then I'm gonna tighten this up a little bit, and then move it exactly where I want it. Still pretty loose, so we'll tighten it up some more.Now, the best way to do this is when you get the car down, stand behind it, take a look at it. I'm gonna leave it right there. It looks pretty good, and try to hold it, so it don't move and tighten this up with my 15-millimeter on my 3/8 gun. And now you're gonna wanna repeat that same procedure on the opposite side. That wraps up this review and install of our MBRP Installer Series Cat-Back Exhaust, Race Version for '15 to '16, 5.7-liter HEMI Challengers. Thanks for watching, and for all things Challenger, keep it right here at americamuscle.com.

      Product Information

      Features, Description, Reviews, Q&A, Specs & Installation

      Features & Specs

      • Loud, Aggressive Exhaust Note
      • Improves Horsepower and Torque
      • Muffler Delete Design
      • X-Pipe Cross-Over Pipe Included
      • Aluminized Steel Piping - 3-Inch
      • Polished, Quad 4-inch Stainless Steel Exhaust Tips
      • Direct Bolt-On Installation
      • Three Year Manufactures Warranty
      • Fits 2015-2016 5.7L HEMI Dodge Challenger Models

      Description

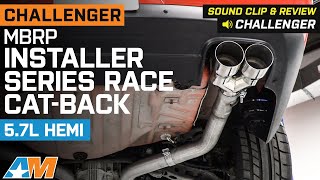
      Loud, Aggressive Exhaust Note. Add a very loud aggressive note to the sound of your Challenger's exhaust with a MBRP Installer Series Race Version Cat-Back Exhaust System. This Race Cat-Back Exhaust features a muffler delete design that will produce an extremely loud aggressive exhaust note that will be sure to wake up the entire neighborhood. Besides an increase in sound, this MBRP Race Cat-Back, with its full mandrel bent piping, will reduce restrictions giving your Challenger a more free-flowing exhaust for gains in both power and performance.

      Aluminized Steel Construction. MBRP proudly manufactures their Installer Series Cat-Back Exhaust systems from 3.0-inch diameter, mandrel-bent, heavy duty, aluminized 16-gauge steel tubing for excellent exhaust flow and corrosion resistance. Besides the crossover X-pipe, this system features a pair of quad, 4-inch, polished stainless steel exhaust tips with embossed MBRP logo.

      Direct Bolt-On Installation. MBRP engineered their Cat-Back Exhaust to be a direct bolt-on upgrade replacement. This Exhaust System will easily mount in the stock location with no cutting or extra modifications required. Installation of this Cat-Back can be completed in about two to three hours with just basic hand tools. This Cat-Back will reuse the existing factory hangers for installation.

      Application. This MBRP Installer Series Cat-Back Exhaust; Race Version is designed to fit 2015-2016 Dodge Challenger models equipped with the 5.7L HEMI engine.

      Fitment:

      Details

      MBRP S7116AL

      CA Residents: WARNING: Cancer and Reproductive Harm - www.P65Warnings.ca.gov

      Installation & What's in the Box

      Installation Info

      What's in the Box

      • X-Pipe
      • (2) Connection Pipes
      • Driver Side Under Axle-Pipe
      • Passenger Side Under Axle-Pipe
      • Driver Side Tail-Pipe
      • Passenger Side Tail-Pipe
      • Driver Side Exhaust Tip
      • Passenger Side Exhaust Tip
      • Clamps
      4.8

      Customer Reviews (500+)

        Questions & Answers

        10 More Questions

        Will It Fit My Challenger

        • R/T - 15, 16
        • R/T Plus - 15, 16
        • R/T Plus Shaker - 16
        • R/T Shaker - 16