 FREE 1 to 3-Day Delivery on Orders $149+ Details
Best Sellers


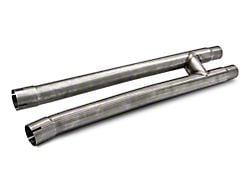


How to Install Stainless Works Side Burners Modular Side Exit Exhaust (11-14 GT) on your Ford Mustang
Thanks for purchasing Stainless Works Sideburners Side Exhaust for your 2011 Mustang GT. We have gone to great pains to make sure that our exhaust systems fit and sound great. Please follow these steps to ensure that your installation goes as planned.
1. Stainless Works recommends the use of Hi-Temp RTV sensor safe silicon gasket maker as an option to or in conjunction with the use of factory gaskets. The recommended Oxygen Sensor Safe RTV is either Valco All-in-One Aluminum or Permatex Copper P/N 101BR available at NAPA, Autozone and other retailers.
2. Disconnect the battery before starting work on the exhaust system for your vehicle. Reconnect the battery when the job is completed.
3. Your exhaust system can be installed by a weekend warrior but the use of a lift is recommended for ease of installation. If using a jack, the vehicle must be placed on a level hard surface and jack stands are required for safety reasons.
4. Temporarily hold up one side of the new exhaust, locating where the tip lines up, and where the front of the Sideburners will locate on the factory exhaust. Use the Sideburner to mark the location for the new exhaust tube, and mark the old exhaust.
5. Drill a 3/8” dia. hole in the old exhaust using a drill (see photo below).
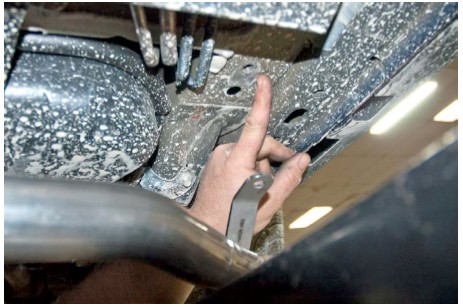
6. Locate the threaded holes in the rocker panel for the tip hangers (see photo below).
7. The two formed half-tubes at the inlet ends of the Sideburners are formed to fit around the 2-1/4” dia. factory exhaust. Place two of the 2-1/4” dia. clamps on each of the factory pipes adjacent to the drilled hole locations.
8. Install the side exhaust tip onto the hangers using the provided 10mm bolts for each side. Do not tighten yet.
9. Apply a 1/4” to 3/8” dia. bead of silicon around the drilled holes at both locations. Install Sideburners onto factory exhaust pipes, and lightly snug up the clamps.
10. Tighten the hangers holding the tips in place (see picture below).

11. Tighten the clamps holding the Sideburners inlets to the factory exhaust.
12. Be sure to have adequate clearance around all wires, hoses and lines. If anything is in contact with the exhaust system, it will melt. Make sure to have at least ½” of clearance and wrap any suspect areas with DEI thermal barrier wrap.
13. After double checking for clearance and making sure all lines, wires and hoses are secured, drive the car for 10-20 miles and re-check all clamps and clearances.
